How to Make a Beaded Bunny: Free Peyote & Brick Stitch Pattern for Beginners

Hi! I’m back with a quick design as I’m diving a little more into flat designs. Sometimes a little break from 3D is nice – but not for too long, as they’re my favorite designs, lol.
Anyway – this little beaded bunny is made with two stitches: flat peyote stitch for the body and brick stitch. It uses only 3 colors and around 170 beads. I put a picture for each row so you always know where you’re at – hopefully it’ll be helpful!
If a word is new to you, check the “words to know” section before you start.
If you are new to these stitches, I recommend checking these first:
- Learn the basics of peyote stitch
- Learn the basics of brick stitch
- How to add new thread and hide your ends
Materials needed
You’ll need some materials before starting, which are:
- Beading thread (about 1.4 m / 51 in) & a beading needle
- Scissors to trim your thread
- Cylinder seed beads (1.6 mm wide, 1.3 mm tall) in 3 colors: 142 white, 28 pink and 2 charcoal(or black). I’m using Miyuki Delica beads, but I’m sure there are alternatives out there that would work just fine. But for the best result, use cylinder seed beads (of any size, I’m using 11/0 or 2mm)
Words to know
There are some words you should learn before starting:
- Tail: the loose end of thread you leave at the start. In this pattern you keep a long tail, because you bead from it again later.
- Gap: the space between two beads of the row you just made. Each new bead goes in a gap.
- Edge stitch: the last bead of a row. It has no bead next to it and sits on the bead two rows down. It counts as a gap.
- Thread bridge: the little loop of thread between two beads at the edge. It’s drawn in teal (blue-green). You use it for turns and for brick stitch.
- Turn without a bead (hidden turn): a way to turn at the end of a row without adding a bead, using the thread bridge so the thread stays hidden.
- Ladder stitch turn: a way to turn by adding 1 bead at the edge and stitching it side by side to the edge bead two rows down.
- Weave through the beadwork: pass your thread through beads you already added, to move it to a new spot.
And about the drawing/diagrams:
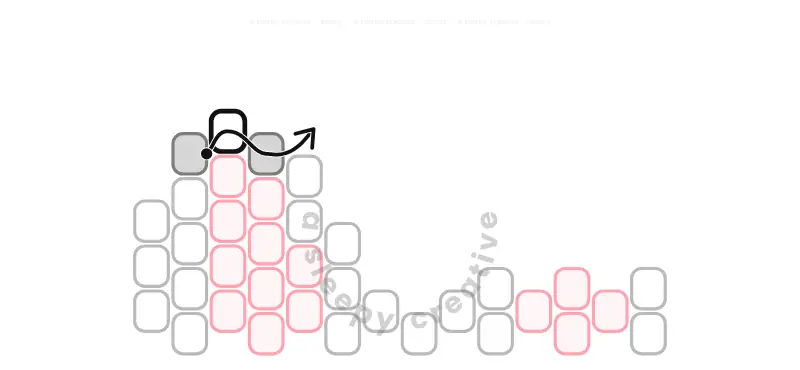
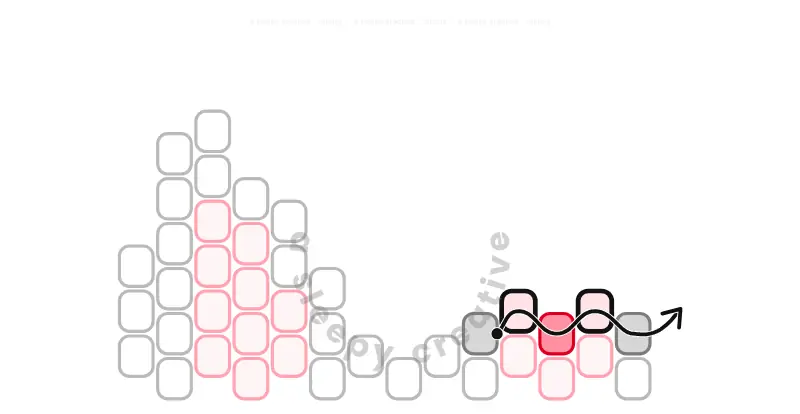
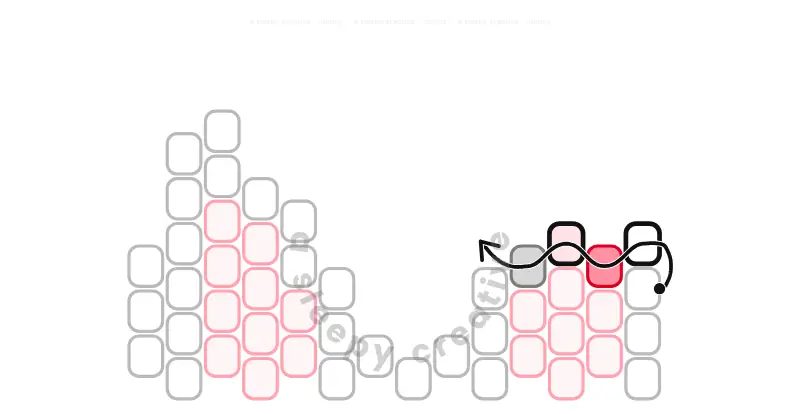
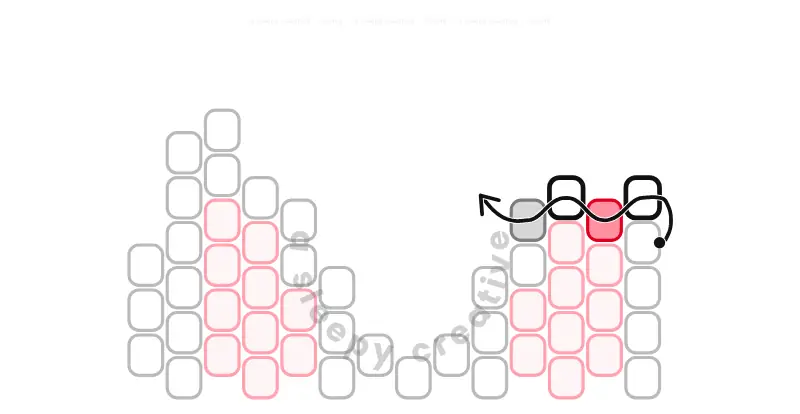
- Dot and arrow: in each drawing, the black dot is where your thread starts and the arrow is where it ends.
- Reading the drawings: the beads with a dark outline are the new beads for that row. The light gray beads are the ones you already added.
Flat Beaded Bunny Pattern – The Ears (Rows 1 to 21)
We start in the middle with rows 1 and 2, then bead the ears in flat peyote stitch.
Rows 1 & 2

Rows 1 & 2
14 beads • 2 white, 3 pink, 5 white, 3 pink, 1 white
Pick up 14 beads in the order shown, from left to right. Leave a tail of at least 24″ (60 cm) and don’t cut it: you will bead the bottom part from this tail later. These 14 beads are rows 1 and 2. For now they sit in one straight line. When you add row 3, every other bead pops up, like in the drawing.
You start using white and pink beads here.
Tip: you can use a stop bead so your beads don’t slide off the thread. A stop bead is just an extra bead that holds the others in place, like a little knot. Before you pick up your beads, put 1 bead on your thread, slide it down until there’s 24" (60 cm) of tail after it, and go through it 2 or 3 times in the same direction. It’s not part of the pattern, so take it off before you bead from the tail.
Row 3
Row 3
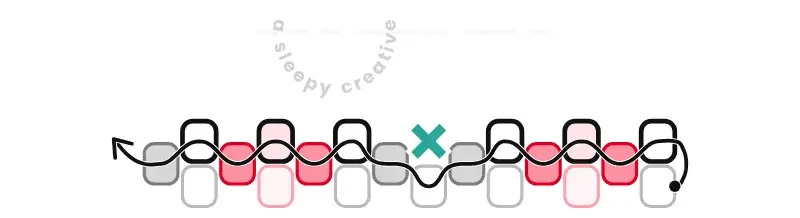
6 beads • 1 white, 1 pink, 1 white, skip a gap, 1 white, 1 pink, 1 white
Work from right to left. Skip 1 gap (marked with an X) and add 1 bead in each of the other gaps: 6 beads total.
A gap is the space between two beads of the row you just made. The last bead of a row has no bead next to it: it sits on the bead two rows down. This is the edge stitch, and it counts as a gap too.
A skipped gap gets no bead. Instead, the thread dips down through the bead two rows down, right under the gap, then comes up into the next bead of the row you just made. This keeps the thread hidden.
Row 4

Row 4
3 beads • 1 white, 2 pink
Work from left to right. Add 1 bead in each gap: 3 beads total.
Row 5
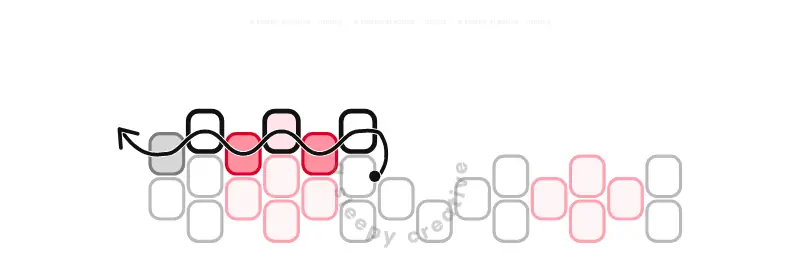
Row 5
3 beads • 1 white, 1 pink, 1 white
Work from right to left. Add 1 bead in each gap: 3 beads total.
Row 6
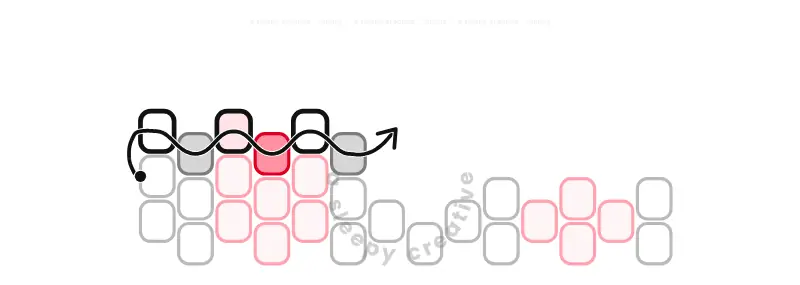
Row 6
3 beads • 1 white, 1 pink, 1 white
Work from left to right. Add 1 bead in each gap: 3 beads total.
Row 7
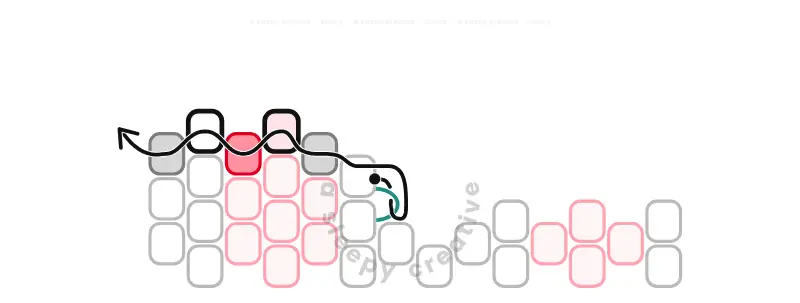
Row 7
2 beads • 1 pink, 1 white
Work from right to left. First, turn without a bead: go under the thread bridge at the edge (shown in the drawing), go back the way you came, then up into the last bead of the row you just made. Then add 1 bead in each of the other gaps: 2 beads total.
Turning without a bead (a hidden turn): when your thread comes out at the edge, pass the needle under the thread bridge, the little loop of thread that runs along the edge between the edge bead and the bead under it. Then go back through the beads you just came out of, and up into the last bead of the row you just made. You only go from bead to bead, so the thread stays hidden.
Row 8

Row 8
2 beads • 1 pink, 1 white
Work from left to right. First, turn without a bead. Then add 1 bead in each of the other gaps: 2 beads total.
Turn with a ladder stitch: go down through the edge bead two rows down. Pick up 1 new bead. Stitch the two beads together side by side: go down through the old bead again, then up through the new bead. Your thread now points the way the next row goes.
This row goes 1 bead further than the row before it at the far end. You turn at that end.
Row 9
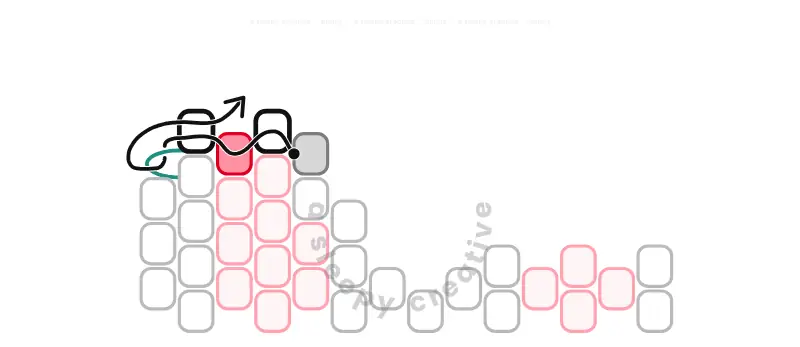
Row 9
2 beads • 2 white
Work from right to left. Add 1 bead in each gap: 2 beads total.
Turn in brick stitch: pick up 1 bead, go under the thread bridge that joins the two beads (shown in the drawing), then come back up through your new bead.
Row 10
Row 10
1 bead • 1 white
Work from left to right. Add 1 bead in each gap: 1 bead total.
Row 11

Row 11
1 bead • 1 white
Weave through the beadwork (pass your thread through the beads you already added) until it comes out at the dot, pointing right.
Work from left to right. Add 1 bead in each gap: 1 bead total.
Row 12

Row 12
1 bead • 1 white
Weave through the beadwork until your thread comes out at the dot, pointing right.
Work from left to right. Add 1 bead in each gap: 1 bead total.
Turn in brick stitch.
Row 13
Row 13
2 beads • 2 pink
Weave through the beadwork until your thread comes out at the dot, pointing right.
Work from left to right. Add 1 bead in each gap: 2 beads total.
Row 14

Row 14
3 beads • 1 white, 1 pink, 1 white
Work from right to left. Add 1 bead in each gap: 3 beads total.
Turn with a ladder stitch.
Row 15

Row 15
2 beads • 1 white, 1 pink
Work from left to right. Add 1 bead in each gap: 2 beads total.
Row 16
Row 16
2 beads • 1 white, 1 pink
Work from right to left. Add 1 bead in each gap: 2 beads total.
Row 17

Row 17
2 beads • 1 white, 1 pink
Work from left to right. Add 1 bead in each gap: 2 beads total.
Row 18
Row 18
2 beads • 2 white
Work from right to left. Add 1 bead in each gap: 2 beads total.
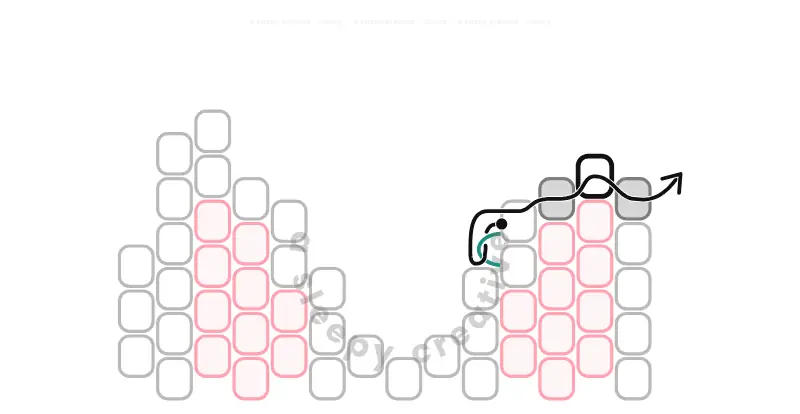
Row 19
Row 19
1 bead • 1 white
Work from left to right. First, turn without a bead. Then add 1 bead in each of the other gaps: 1 bead total.
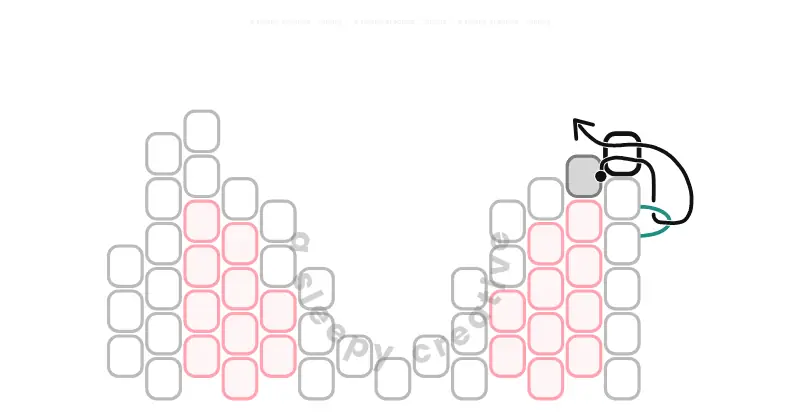
Row 20
Row 20
1 bead • 1 white
Weave through the beadwork until your thread comes out at the dot, pointing right.
Work from left to right. Add 1 bead in each gap: 1 bead total.
Turn in brick stitch.
Row 21

Row 21
1 bead • 1 white
Work from right to left. Add 1 bead in each gap: 1 bead total.
Turn in brick stitch.
Flat Beaded Bunny Pattern – The Head (Rows 22 to 43)
Now we turn the work over and use the long tail from the start to bead the head.
Row 22

Row 22
6 beads • 6 white
Turn the work over, top to bottom, so the bottom edge is now at the top.
Thread a needle onto the tail (it comes out at the dot) and keep going from here, row by row.
Work from left to right. First, turn without a bead. Then add 1 bead in each of the other gaps: 6 beads total.
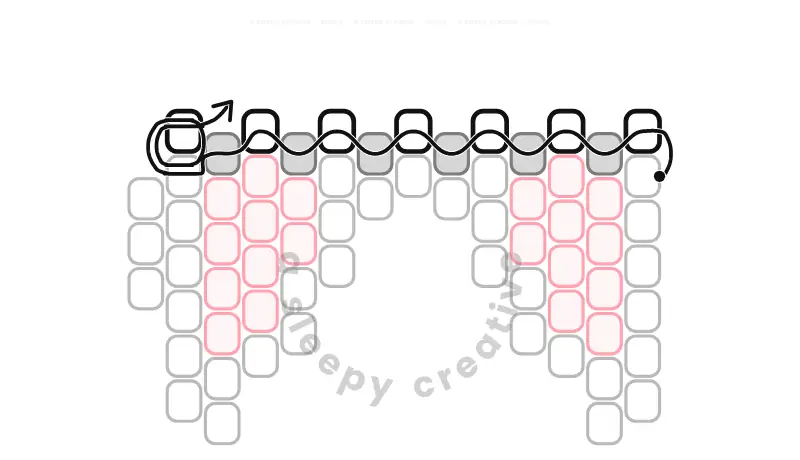
Row 23
Row 23
7 beads • 7 white
Work from right to left. Add 1 bead in each gap: 7 beads total.
Turn with a ladder stitch.
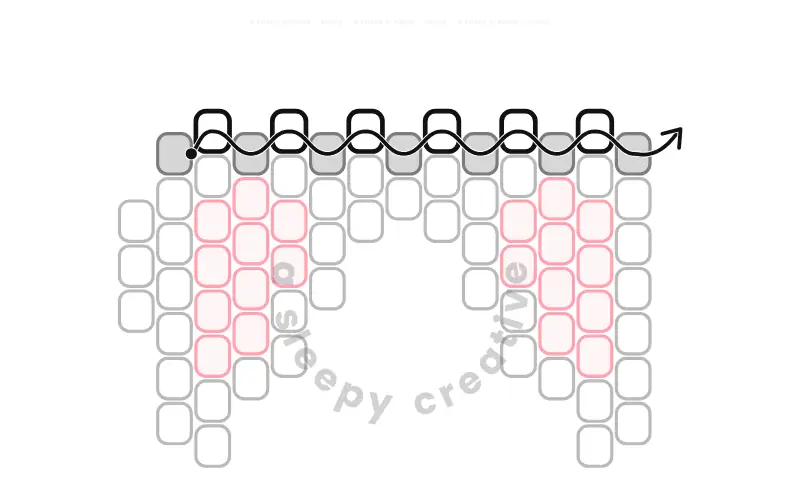
Row 24
Row 24
6 beads • 6 white
Work from left to right. Add 1 bead in each gap: 6 beads total.
Row 25
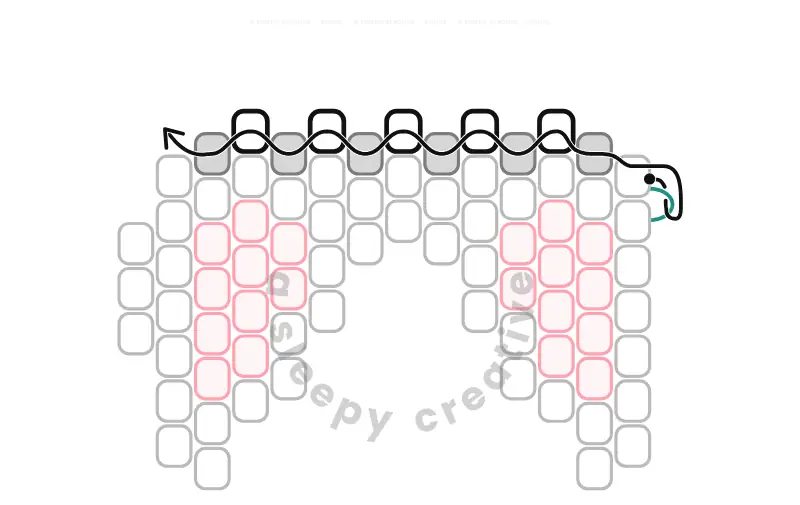
Row 25
5 beads • 5 white
Work from right to left. First, turn without a bead. Then add 1 bead in each of the other gaps: 5 beads total.
Row 26

Row 26
6 beads • 6 white
Work from left to right. Add 1 bead in each gap: 6 beads total.
Turn in brick stitch.
Row 27
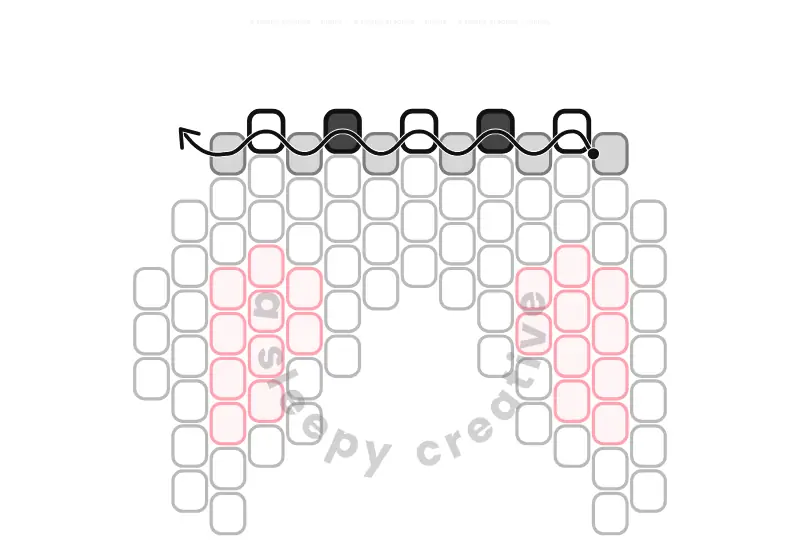
Row 27
5 beads • 1 white, 1 charcoal, 1 white, 1 charcoal, 1 white
Work from right to left. Add 1 bead in each gap: 5 beads total.
You start using charcoal beads here.
Row 28
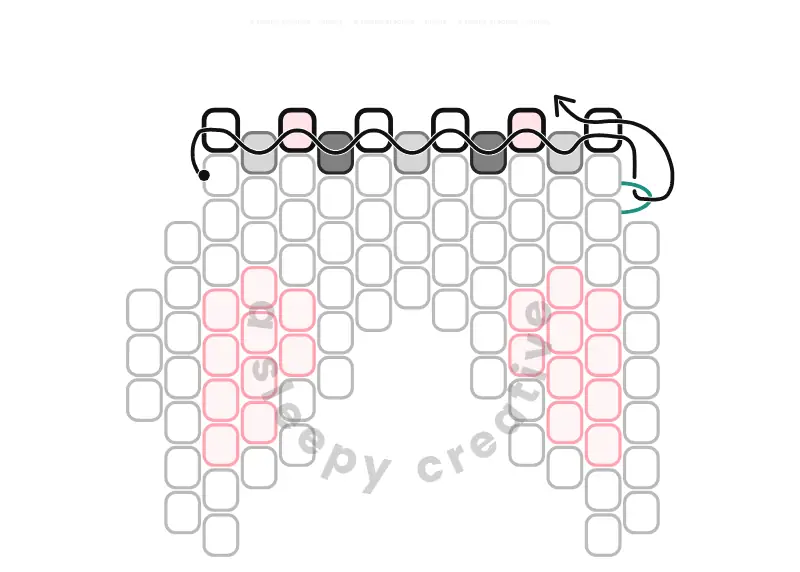
Row 28
6 beads • 1 white, 1 pink, 2 white, 1 pink, 1 white
Work from left to right. Add 1 bead in each gap: 6 beads total.
Turn in brick stitch.
Row 29

Row 29
5 beads • 5 white
Work from right to left. Add 1 bead in each gap: 5 beads total.
Row 30
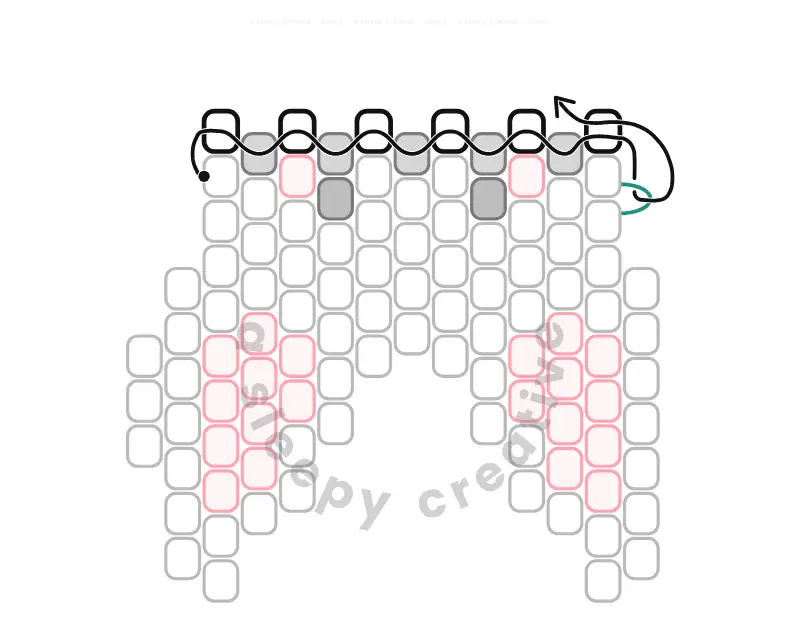
Row 30
6 beads • 6 white
Work from left to right. Add 1 bead in each gap: 6 beads total.
Turn in brick stitch.
Row 31

Row 31
5 beads • 5 white
Work from right to left. Add 1 bead in each gap: 5 beads total.
Row 32
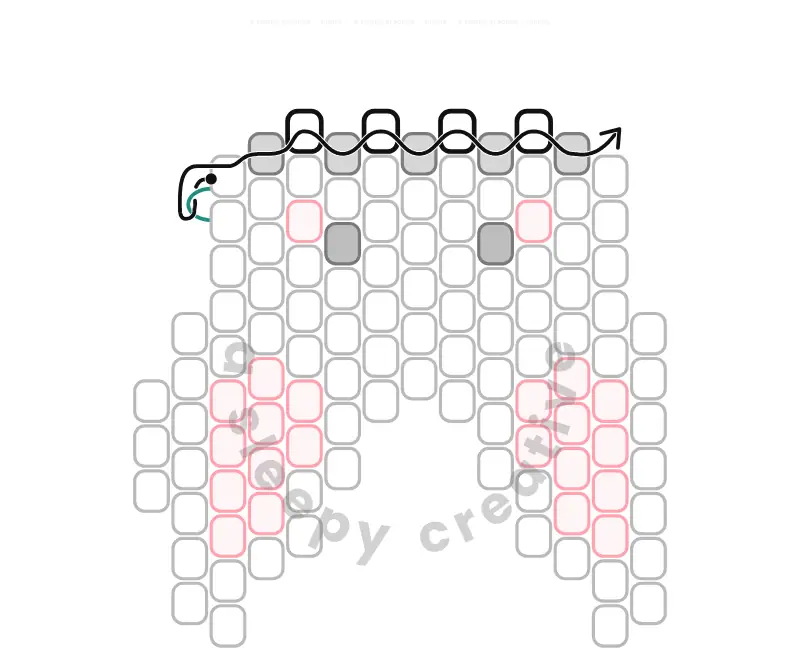
Row 32
4 beads • 4 white
Work from left to right. First, turn without a bead. Then add 1 bead in each of the other gaps: 4 beads total.
Row 33

Row 33
3 beads • 3 white
Work from right to left. First, turn without a bead. Then add 1 bead in each of the other gaps: 3 beads total.
Row 34

Row 34
4 beads • 4 white
Work from left to right. Add 1 bead in each gap: 4 beads total.
Turn in brick stitch.
Row 35

Row 35
3 beads • 3 white
Work from right to left. Add 1 bead in each gap: 3 beads total.
Row 36
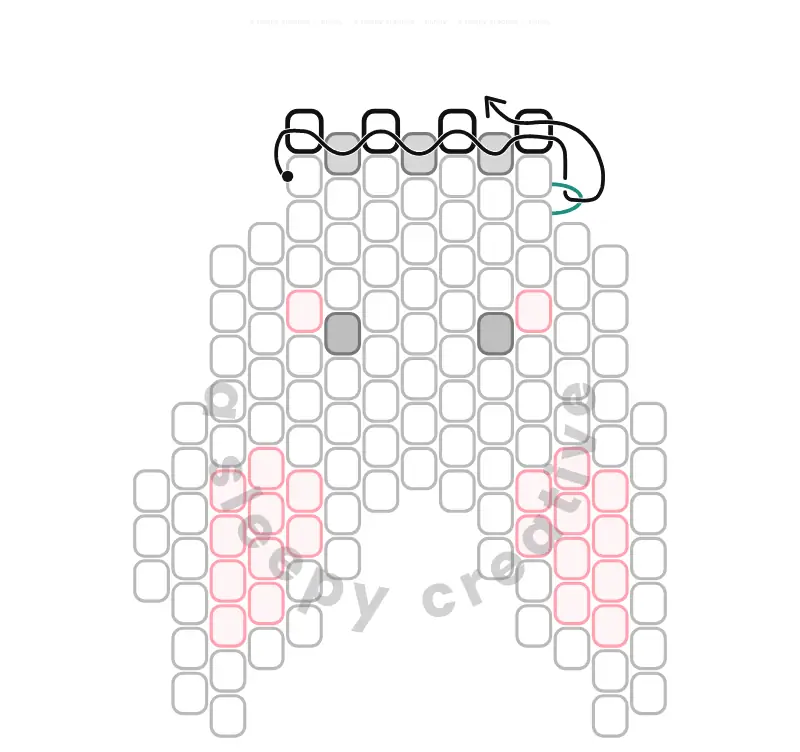
Row 36
4 beads • 4 white
Work from left to right. Add 1 bead in each gap: 4 beads total.
Turn in brick stitch.
Row 37

Row 37
3 beads • 3 white
Work from right to left. Add 1 bead in each gap: 3 beads total.
Row 38

Row 38
4 beads • 4 white
Work from left to right. Add 1 bead in each gap: 4 beads total.
Turn in brick stitch.
Row 39

Row 39
3 beads • 3 white
Work from right to left. Add 1 bead in each gap: 3 beads total.
Row 40

Row 40
4 beads • 4 white
Work from left to right. Add 1 bead in each gap: 4 beads total.
Turn in brick stitch.
Row 41
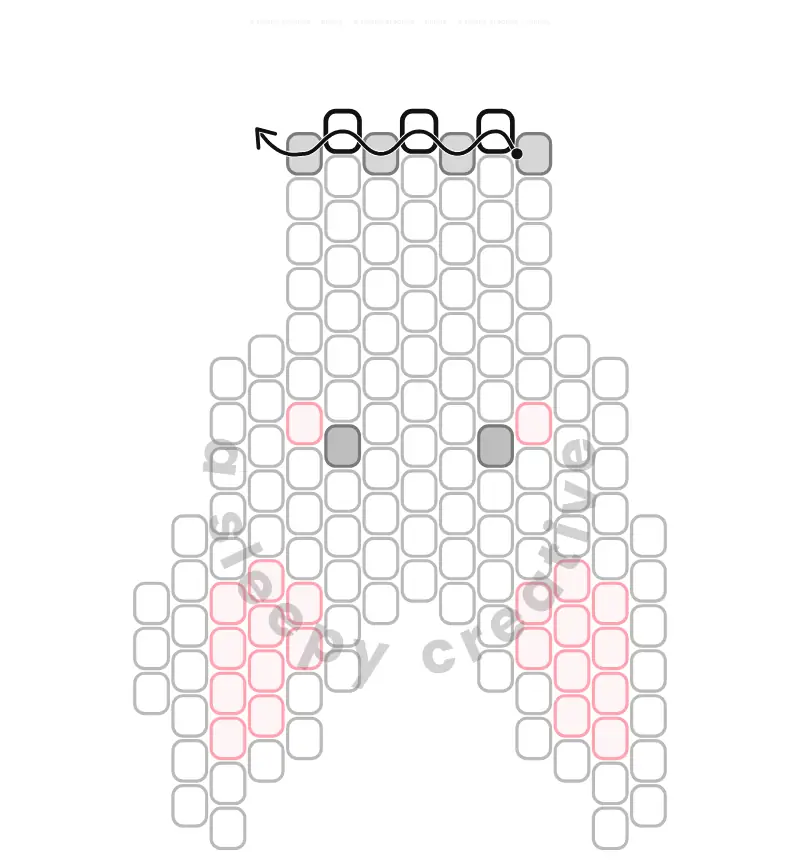
Row 41
3 beads • 3 white
Work from right to left. Add 1 bead in each gap: 3 beads total.
Row 42

Row 42
4 beads • 4 pink
Work from left to right. Add 1 bead in each gap: 4 beads total.
Turn in brick stitch.
Row 43
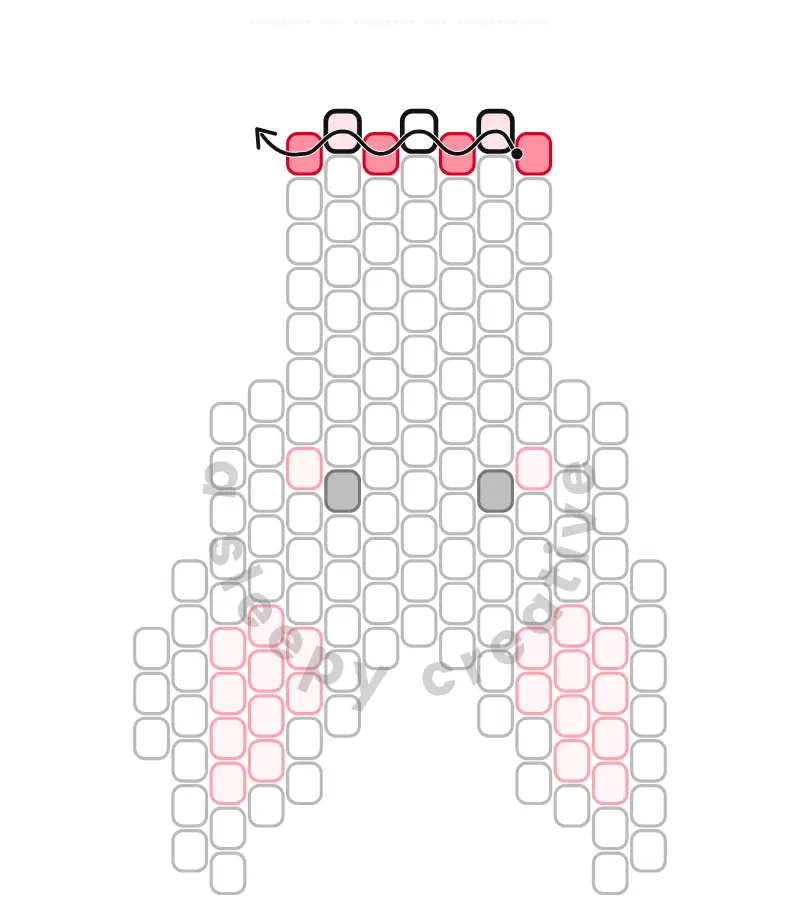
Row 43
3 beads • 1 pink, 1 white, 1 pink
Work from right to left. Add 1 bead in each gap: 3 beads total.
Flat Beaded Bunny Pattern – Brick Stitch Edges
The peyote part is done! Now we add 19 beads along the sides in brick stitch.
Brick 1

Brick 1
4 beads • 4 white
Turn the work back over, top to bottom, so it’s the right way up again.
Weave through the beadwork until your thread comes out at the dot.
Brick stitch up the right edge, from bottom to top: 4 beads.
To start: pick up beads 1 and 2. Go under the second thread bridge, then come back through bead 2. Go through bead 1 toward the beadwork, then through bead 2 away from it, so the two beads sit side by side. Pull tight.
Then add bead 3: pick up 1 bead, go under the next thread bridge and come back through the bead. Do the same for bead 4.
Step-by-step pictures of these stitches are just below if you need them.
A thread bridge is the thread between two beads of the column next to your new bead. It’s drawn in teal (blue-green).
How to start a brick stitch row

- Pick up beads 1 and 2.
- Go under the second thread bridge, then come back through bead 2.
- Go through bead 1 toward the beadwork, then through bead 2 away from it, so the two beads sit side by side. Pull tight.
How to add a brick stitch bead

- Pick up 1 bead.
- Go under the next thread bridge, then come back through the bead.
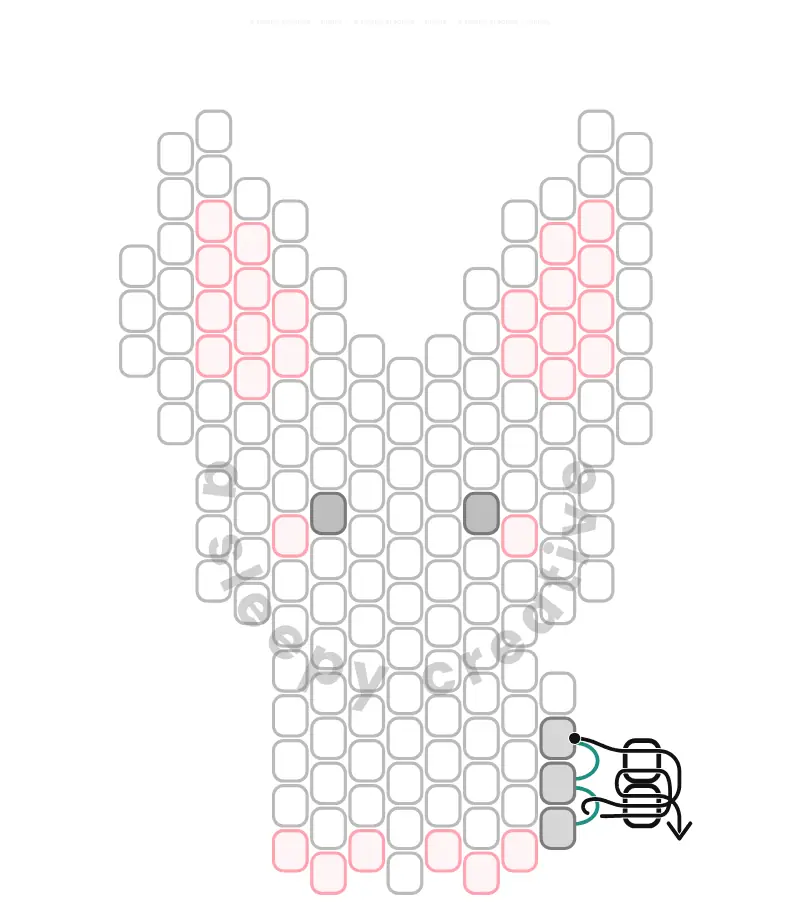
Brick 2
Brick 2
2 beads • 2 white
Weave through the beadwork until your thread comes out at the dot.
Keep going in brick stitch down the right edge, from top to bottom: 2 more beads.
Brick 3

Brick 3
2 beads • 2 white
Weave through the beadwork until your thread comes out at the dot.
Keep going in brick stitch up the right edge, from bottom to top: 2 more beads.
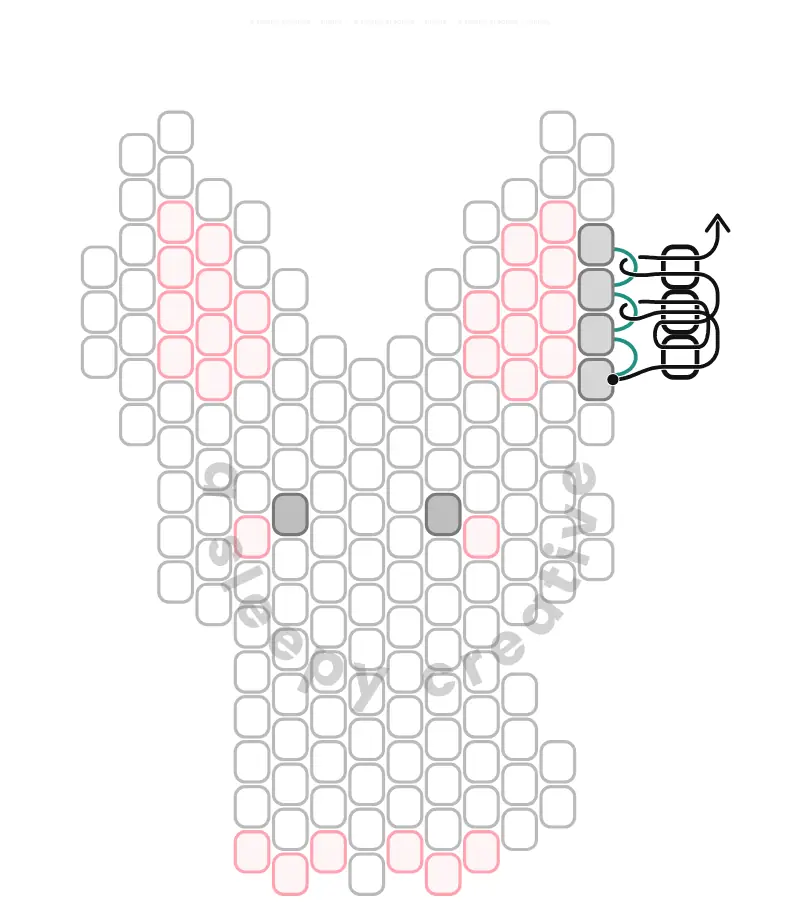
Brick 4
Brick 4
3 beads • 3 white
Weave through the beadwork until your thread comes out at the dot.
Keep going in brick stitch up the right edge, from bottom to top: 3 more beads.
Brick 5

Brick 5
4 beads • 4 white
Weave through the beadwork until your thread comes out at the dot.
Keep going in brick stitch up the left edge, from bottom to top: 4 more beads.
Brick 6

Brick 6
2 beads • 2 white
Weave through the beadwork until your thread comes out at the dot.
Keep going in brick stitch down the left edge, from top to bottom: 2 more beads.
Brick 7

Brick 7
2 beads • 2 white
Weave through the beadwork until your thread comes out at the dot.
Keep going in brick stitch up the left edge, from bottom to top: 2 more beads.
Finishing
When the last brick stitch bead is in place, weave your thread through a few beads in different directions, then trim it. Do the same with any other loose ends. (Need help? See how to hide your ends.)
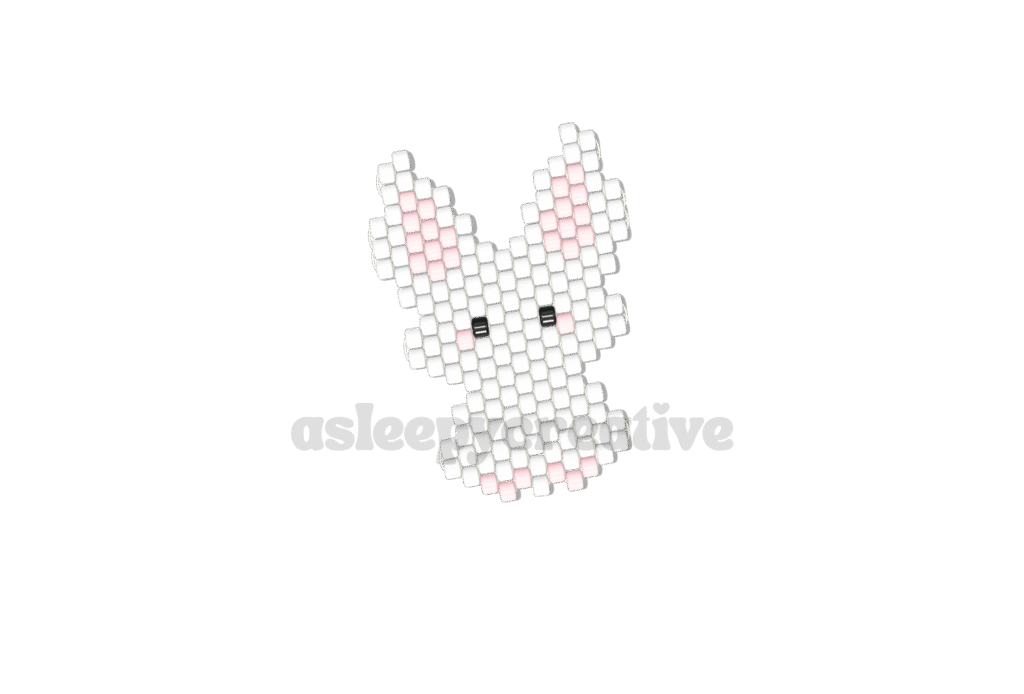
And we’re done with our little bunny! You can turn it into a keychain, a phone charm or a cute little brooch. ♥