
Beading is one of those hobbies that just makes sense. It’s meditative, creative, and you end up with gorgeous jewelry or accessories you can actually wear or gift to friends. (seriously, isn’t it the best?) Plus, you don’t need fancy equipment or years of experience to get started.
If you’ve been curious about beading but felt intimidated by all those complex patterns online, this guide is for you. We’re starting with the absolute basics. These are simple, beginner-friendly patterns that look way more impressive than they actually are to make.
About Materials
For all the patterns in this guide, you’ll need just a few basic supplies that won’t break the bank. Most beaders start with 11/0 (2mm) seed beads (the most commonly available size), though I personally love working with 8/0 (3mm) seed beads for these. But that’s just a personal preference!
For stringing material, I typically use 0.2mm transparent nylon wire or clear beading cord. It’s practically invisible once your piece is finished, which gives it a really clean look. Some projects work better with slightly elastic cord (around 0.5mm to 0.8mm), especially for bracelets where you want a bit of stretch for comfort. Popular thread brands that other creators swear by include FireLine, Nymo, and One-G, but honestly, for these beginner patterns, any clear beading wire from your local craft store will do the trick. Especially if you don’t know yet if you really want to dedicate a bit of your budget in this hobby, I’d suggest you just take the cheapest option for you!
Here’s what we’ll cover
- Easy step-by-step tutorials with clear visual guides
- Patterns perfect for your first beading projects
- Tips that’ll save you from common beginner mistakes
- Cute designs you’ll actually want to wear
Looking for a new cozy hobby to unwind after work? Want to make personalized gifts for your loved ones? These patterns will give you that satisfying “I made this!” feeling without the headache.
Cute Bow Pattern
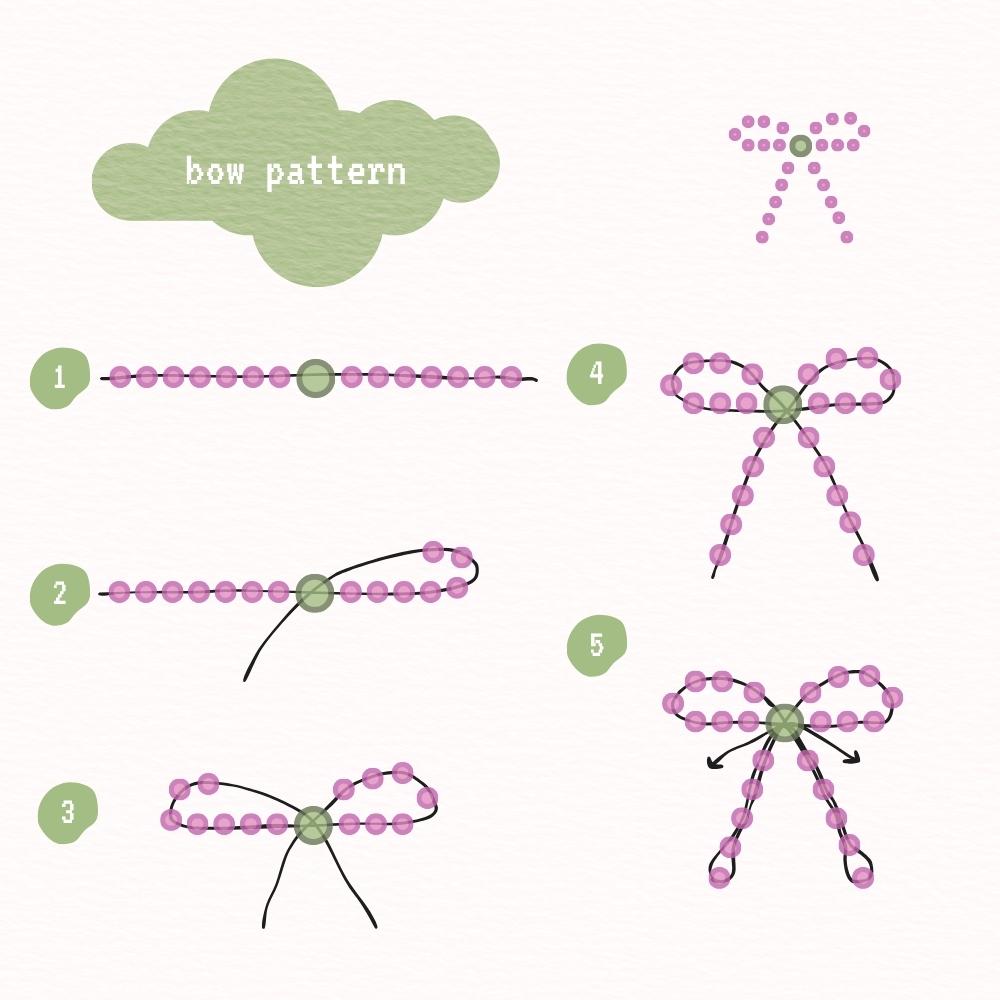
Bow Pattern – Step-by-Step Instructions
Materials needed: Pink beads (2 or 3 mm), 1 green bead (6 mm), transparent wire
Step 1: Create the base strand
Thread 7 pink beads, 1 green bead, and 7 pink beads – the green bead must be positioned in the center. This will serve as the foundation for your bow pattern, with the green bead acting as the center knot of the bow. You can of course have all the beads of the same color, but I chose to draw them different for clarity!
Step 2: Form the first bow loop
Starting from one end, create a loop by bringing the pink beads around and threading back through the green center bead. The curved black line on the drawing shows how to form the first side of the bow by looping the beads back to the center point.
Step 3: Create the second bow loop
Form the second loop on the opposite side by threading the remaining pink beads in a loop pattern, again passing through the green center bead. This creates the classic bow shape with two symmetrical loops meeting at the green center.
Step 4: Add the bow tails
From the green center bead, add two strands of pink beads extending downward to create the bow’s hanging tails. Each tail should be approximately 6 beads long, giving the bow a realistic dangling appearance. If you want to achieve more of a cute look, you can make it smaller!
Step 5: Finish threading
To finish threading your bow, follow the black lines shown (number 5). You have to thread back in the tails of the bow (4 pink beads) and then through the green bead. The black lines indicate the threading path that holds the entire bow structure together, since it’s a little tricky to explain with words.
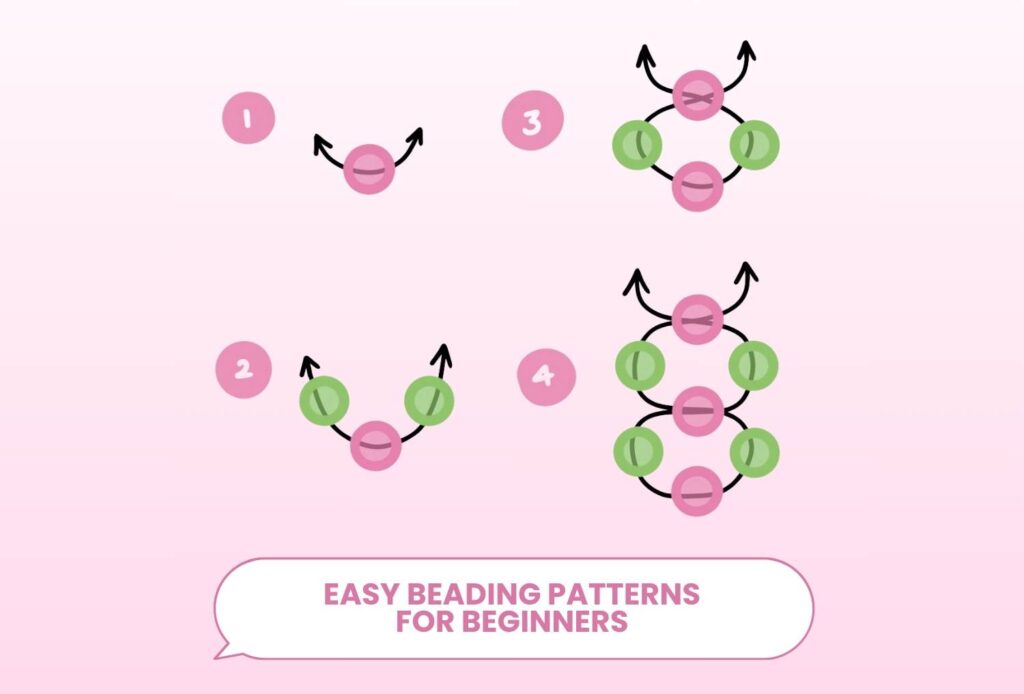
Chain Pattern: Step-by-Step Instructions
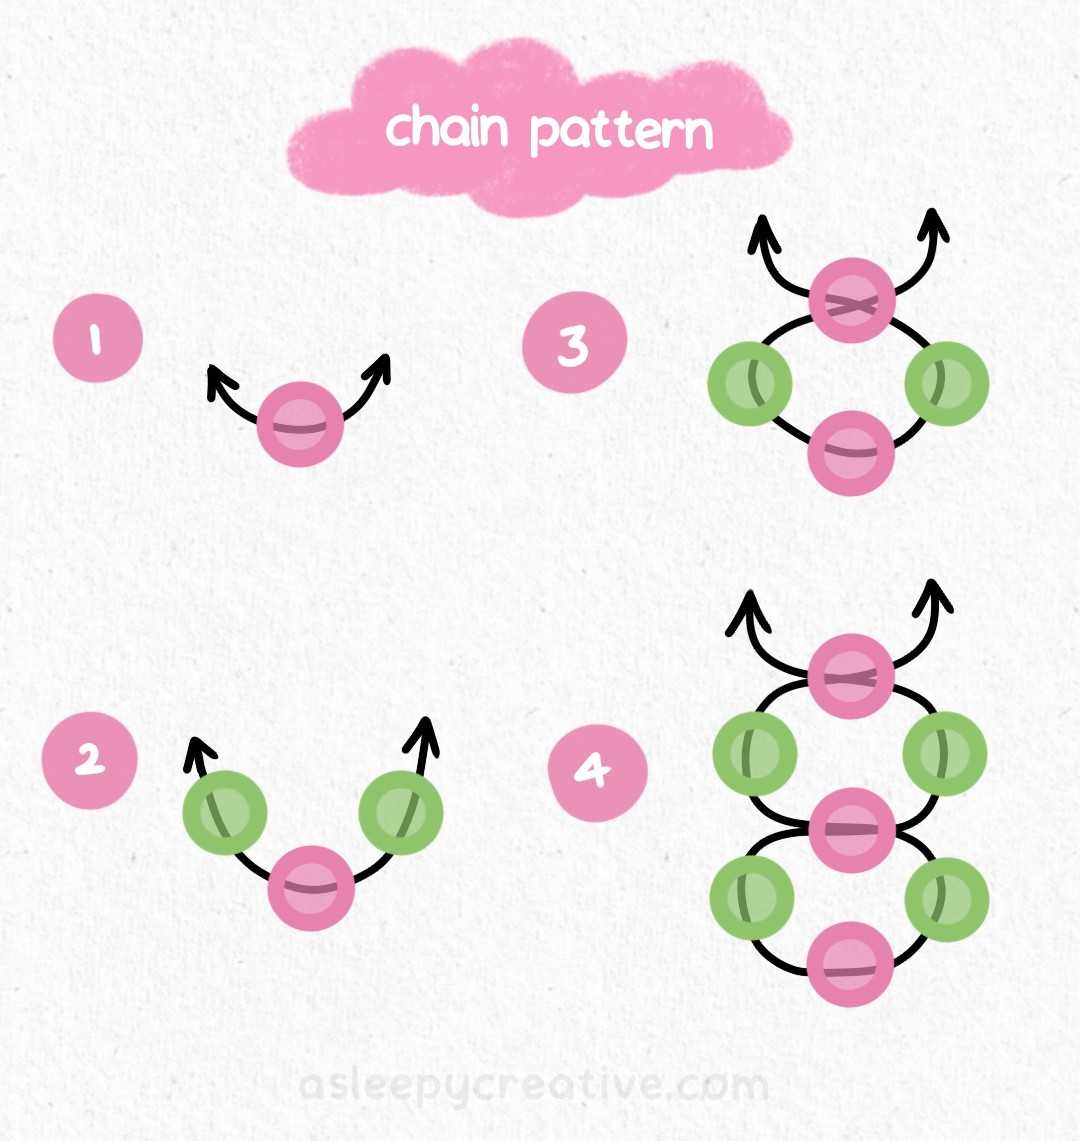
Materials needed: Pink seed beads, green seed beads, beading thread or wire
Step 1: Start with the first link
Begin by threading one pink bead (or any color you chose!). Pass your thread through the bead as shown by the black arrows. Super simple first step, right?
Step 2: Add the side beads
Thread two green beads, one on each side of the pink bead.
Step 3: Passing through
Add another pink bead above the three beads you’ve got so far. Thread your right side through this new pink bead, then do the same with your left side. The pink beads will serve as the connection point between chain links.
Step 4: Complete the chain link and continue
Add two more green beads on either side of the second pink bead, following the same threading pattern as Step 2. Then add a third pink bead below to complete the chain link. And again, you need to pass through both sides of your thread through the pink bead, in the middle. Continue this pattern to create a chain of desired length.
The finished pattern creates an elegant chain with alternating pink connector beads and green side beads, forming decorative links that can be used for bracelets, necklaces, or even cute rings! It’s a super simple pattern that’s a little more complex than just one row of beads.
Bee Pattern
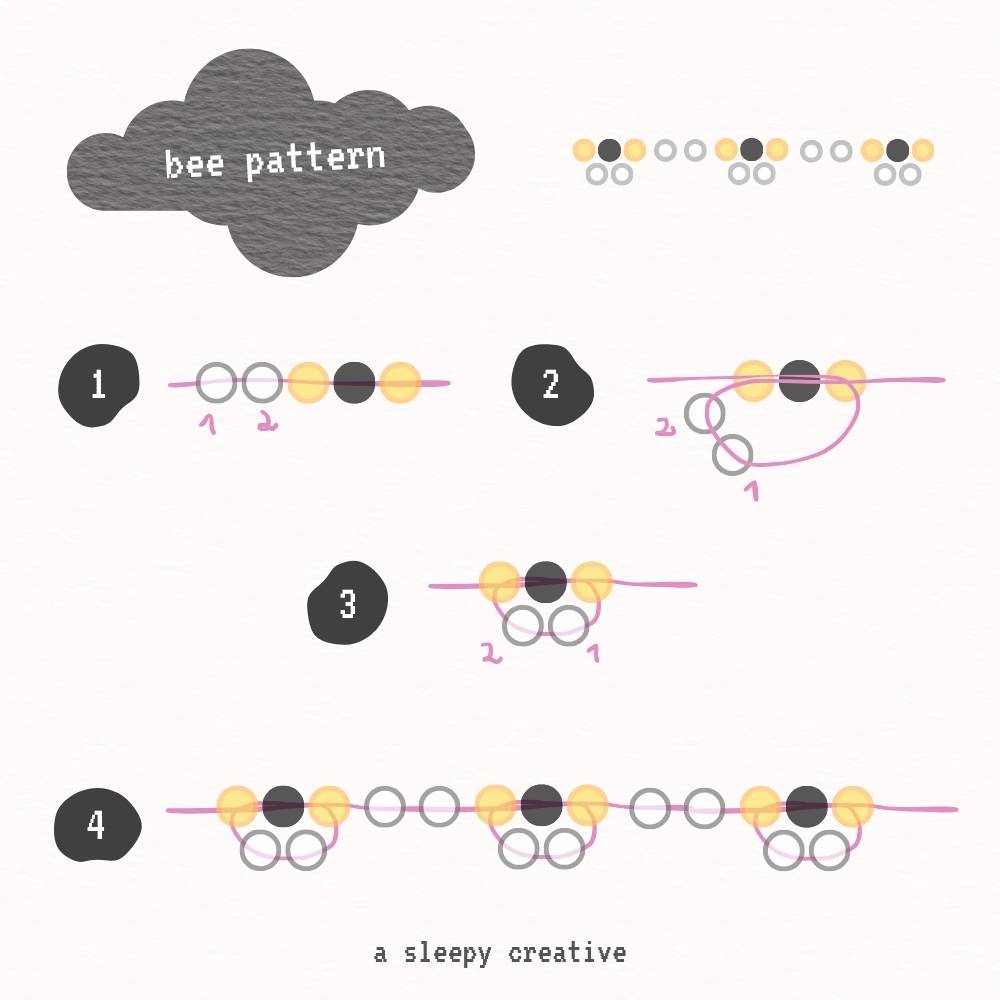
Materials needed: Yellow beads, black/dark gray beads, clear/white beads, beading thread or wire
Step 1: Create the bee body base
Thread your beads in the following sequence: 2 clear beads, 1 yellow bead, 1 black bead, 1 yellow bead. Keep them in a straight line on your thread for now. The pink arrows show the threading direction through each bead to create the striped bee body pattern.
Step 2: Add the first set of wings
Without adding any beads, create a loop for the wings by threading the 2 clear beads through theyellow, black and yellow beads consecutively.. The pink curved lines and numbered arrows (showing “2” and “1”) indicate how to loop these clear beads back through to form the first pair of wings on one side of the bee body.
Step 3: Pull to see your bee!
After threading the loop, pull carefully to visualize your bee!
Step 4: Continue the bee chain pattern
Extend the pattern by repeating the bee sequence along your strand. Thread the alternating yellow and black beads for additional bee bodies, then add clear bead wing loops for each bee. Remember that you need 2 white/transparent beads for the wings, so you’ll need to thread an additional 4 white/transparent beads in between bees.
This adorable bee pattern creates a charming spring or summer-themed piece perfect for nature lovers. ♥ It’s just so cute!
Cherry Bead Pattern

Materials needed: White seed beads, green beads, red beads, beading thread or wire ♥
Step 1: Create the base strand
Thread your beads in sequence onto your wire or thread: white beads (that’s the body of your bracelet/necklace), 1 green bead (representing the stem/leaf), and 2 pink beads (cherries!). Keep them in a straight line as shown for now, with the thread running through all beads from left to right.
Step 2: Form the cherry loop
Pull the thread tight to bring the beads together, then create a loop by passing your thread back through the green bead. Then, you just pull the thread, as shown on the drawing.
Step 3: Complete the cherry and continue the pattern
After pulling the pink beads into their loop position (forming the “cherry”), you’ll see the two pink beads now hang below the green “stem” bead. The white beads remain on the main strand. Add more white beads to continue the pattern (as many as you wish, depending on the look you want to give your work), then repeat the process – add 1 green bead and 2 pink beads, pull them into a loop, and continue.
This creates an adorable cherry-themed beaded strand where each “cherry” consists of two pink beads hanging from a green stem bead, spaced along a strand of white beads. Perfect for summer jewelry or cute accessories!
Zigzag Bead Pattern
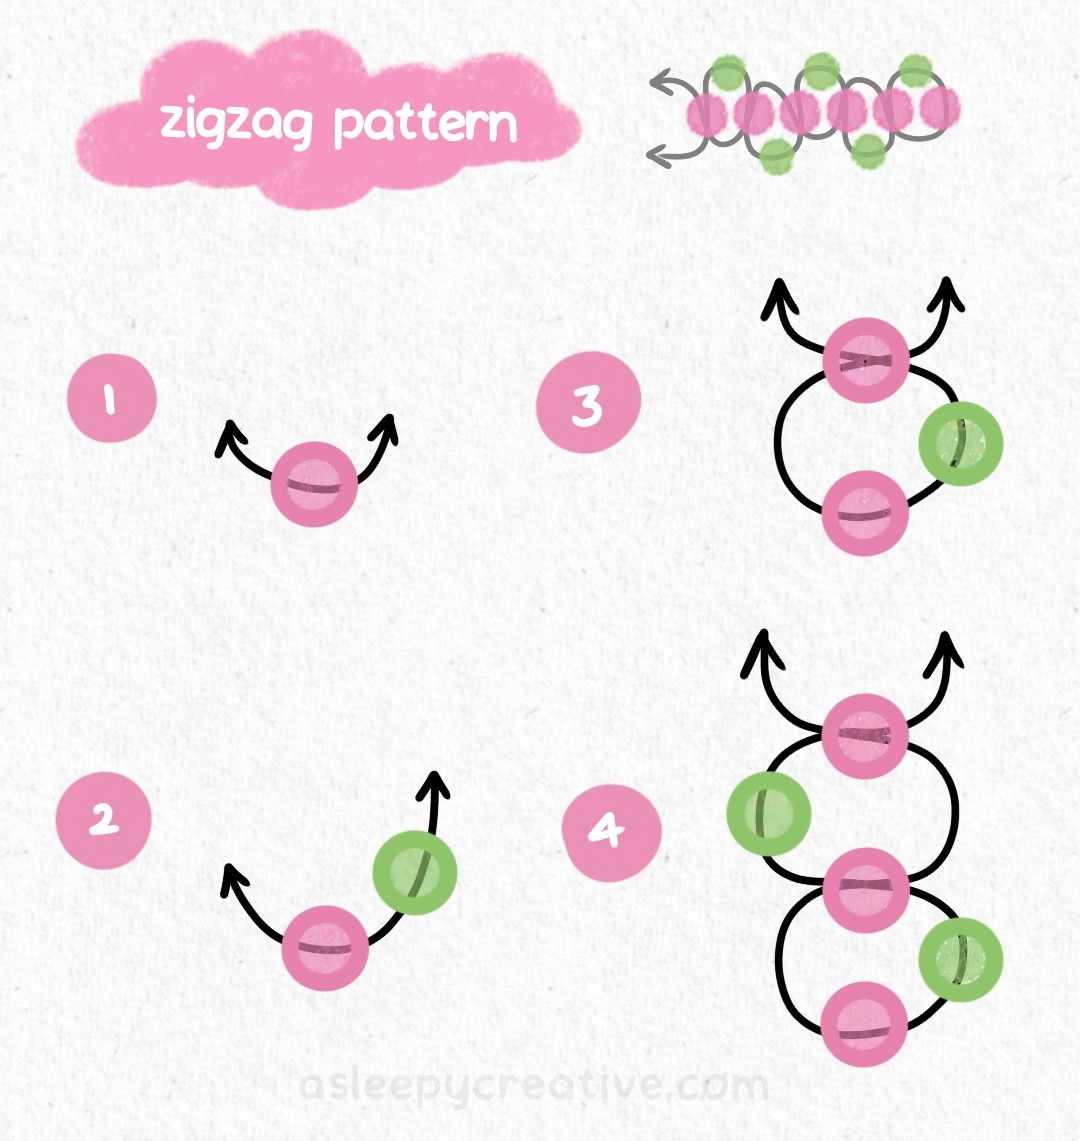
Materials needed: Pink seed beads, green seed beads, beading thread or wire
Step 1: Start with the first link
Begin by threading one pink bead (or any color of your liking). Pass your thread through the bead as shown by the black arrows.
Step 2: Add the first green bead
Thread one green bead on the right side of your thread
Step 3: Create the zigzag
Add another pink bead as shown on the picture. You need to thread through this bead with both side of your thread (left and right). The black thread on the drawing show how it moves in a zigzag motion – up through the pink bead, through the green bead, creating the characteristic back-and-forth pattern.
Step 4: Continue the zigzag pattern
Add another green bead, but this time, on the left side of the thread. The right side remains empty. Then, add a new pink bead in which you will pass through with both sides of your thread once again!
The finished pattern creates a distinctive zigzag design that’s perfect for bracelets or necklaces in my opinion. The zigzag structure adds texture and movement to your beadwork.
Cat Ring Bead Pattern
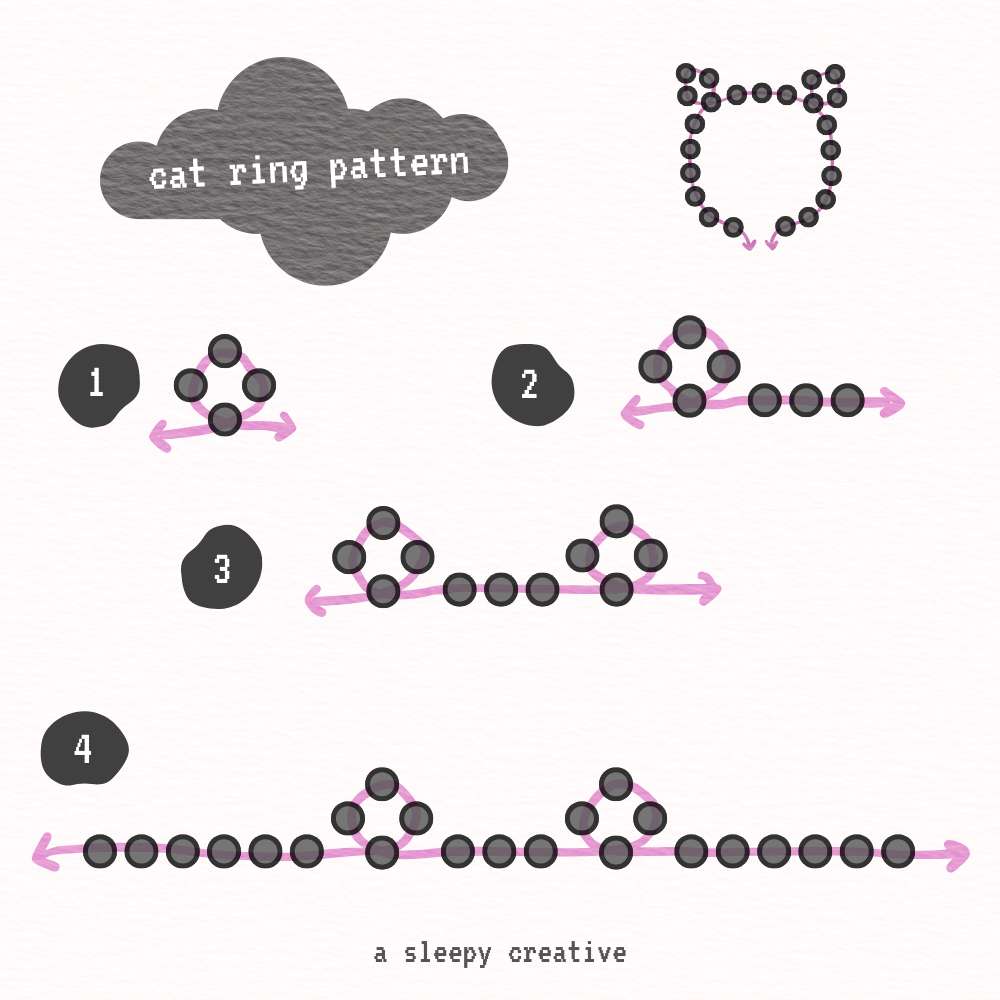
Materials needed: Small seed beads (shown in dark gray/black), beading thread or wire (shown in pink, but it should be transparent! It’s best if it’s slightly elastic.)
Step 1: Create one cat ear
Start by making a small triangular ear shape using 4 beads. Thread the beads to form a pointed triangle – one bead at the top point, two beads forming the sides, and one bead at the base. The pink arrows show the threading path through each bead to secure the triangular ear shape.
Step 2: Begin the ring band
From the base of the first ear, thread 3 beads horizontally to start forming the ring band. (it’s the top of the head!) The pink arrows indicate the direction of threading as you move away from the completed ear section.
Note: if you want, you can put more beads for this step. It depends on the look you want to achieve, and the size of your finger as well!
Step 3: Create the second cat ear
After the three beads you just added, add another triangular ear section identical to Step 1. This creates the second cat ear along the ring band, positioned opposite to the first ear.
Step 4: Complete the ring
Continue threading beads in a straight line to complete the full circumference of the ring. The final result is a continuous ring with two small cat ears pointing upward, creating an adorable cat-themed ring perfect for beginners. ♥ You’ll have to put as many seed beads as needed to wrap around your finger.
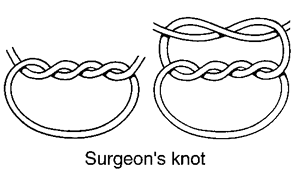
Step 4: Close the ring
To close the ring, I suggest you make a surgeon knot, as it is a very secure one that works well with slightly elastic threads.
Frog Ring Bead Pattern
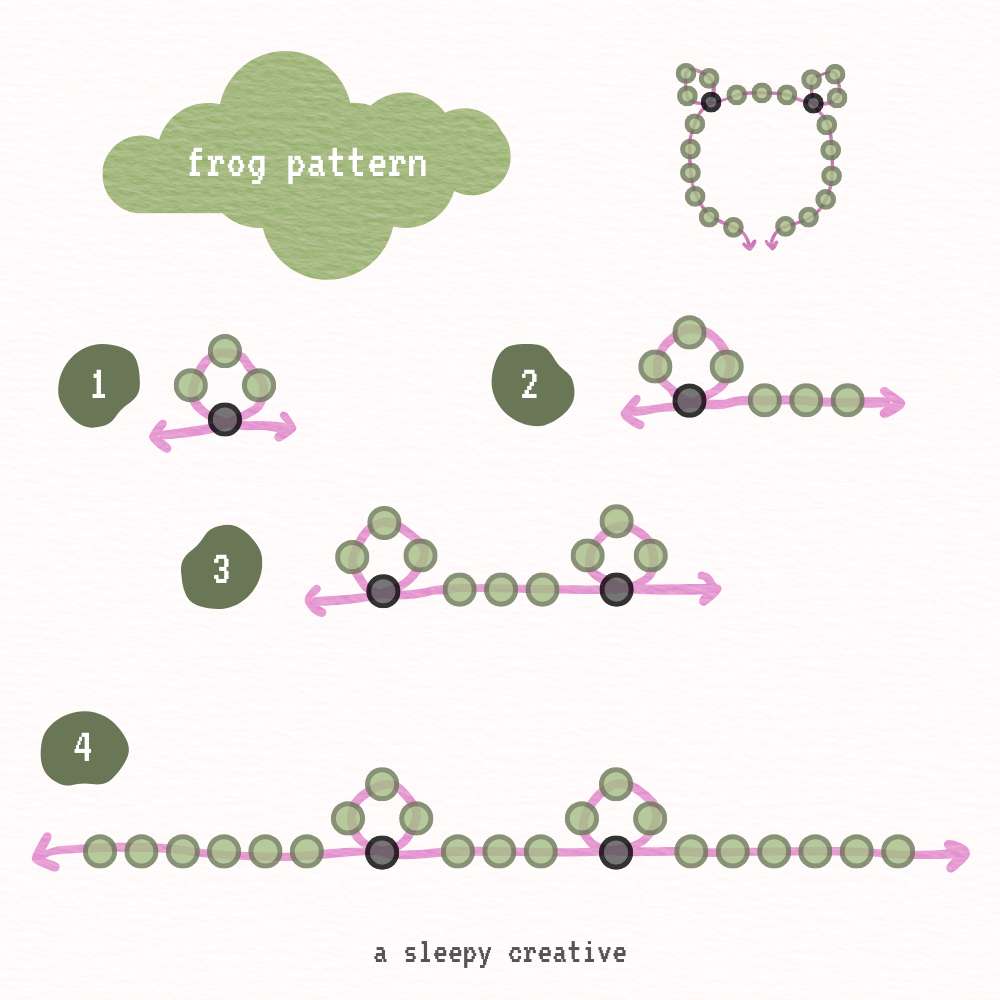
This pattern is extremely similar to the one we’ve just studied. Actually, you just need to change up the colors!
The black beads represent the eyes of the frog, and the rest of it represent its skin. It’s super cute & simple. ♥
Daisy Bead Pattern
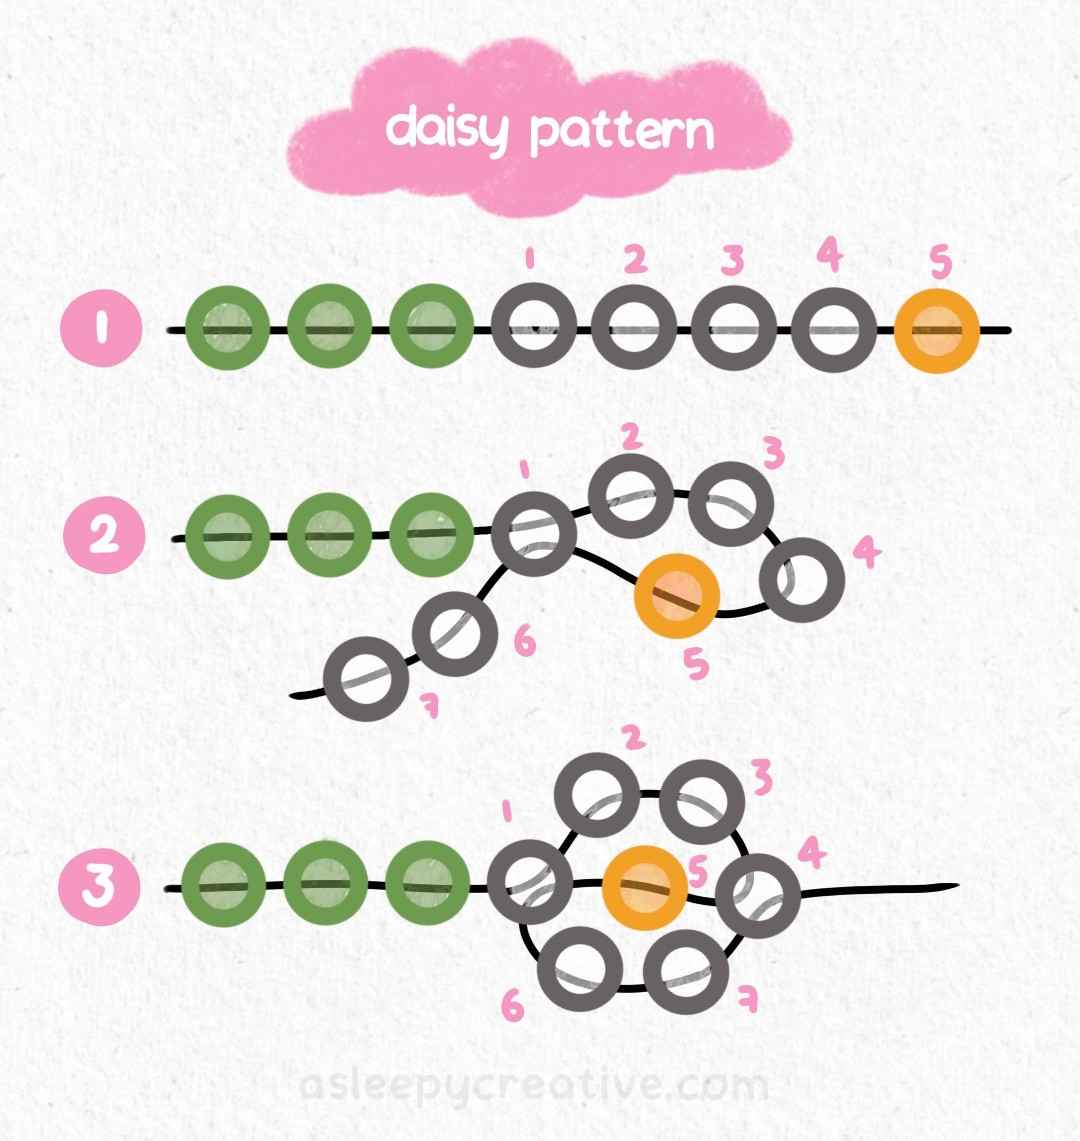
Materials needed: Green beads, white beads, yellow beads, beading thread or wire
Step 1: Create the base
Thread your beads in sequence: 3 green beads, followed by 5 white beads, then 1 yellow bead. Keep them in a straight line as shown, with the thread running through all beads from left to right. The numbers above each bead (1-5) indicate the order of threading for clarity, as it is a little more complex than the other patterns.
Step 2: Begin forming the daisy petals
Starting from the yellow center bead, thread back through the white beads in a specific pattern to create the flower petals. The numbered sequence (1-6) shows the threading path: go through bead 1 then add 2 additional white beads (marked as 6 & 7), creating the first part of the petal formation around the yellow center.
Step 3: Complete the daisy flower
Continue the threading pattern to form a complete circle of petals around the yellow center. Again, the drawing shows you how to thread: go through bead 4 to close & complete your daisy flower. After that, you can put as many beads of your main color as you wish before restarting the pattern.
This creates the super popular daisy design that you’ve probably seen all around. You can change up the colors as you wish ♥ It’s one of my favorites!
Daisy Pattern: Double Thread

Materials needed: Pink beads, white beads, beading thread or wire
Step 1: 5 Petals
Start by threading five beads on your wire/thread (the color you want for your petals, here: pink!)
Step 2: The center of the daisy
Now take both ends of your thread and thread your center bead on it (with the color you want, I chose white).
Step 3 & 4: Put the last bead at the right position
Now we’re gonna thread the wire to put that center bead in the right position. You want to position it in between all the petals. To do so, take both ends of the thread you just passed through the white bead. Thread both of them individually. The left side will thread through the beads 2, and 1. The right side will thread through the beads 4 and 5.
Step 5: Finalize the daisy
We’re almost done! The remaining step is to thread an additional pink bead (the color of your petal) as shown on the picture, and you’re done! You can now thread as many daisies as you want ♥
This creates another variant of a daisy design – it looks exactly the same as the single thread one, but it can be used in different situations. I make this kind of daisy super often~
Grape Bead Pattern

Materials needed: White beads (or any color you prefer), green beads, purple beads, beading thread or wire
Step 1: Create the base strand
Thread your beads in sequence onto your wire or thread: white beads, 1 green bead, and 3 purple beads. Keep them in a straight line as shown for now, with the thread running through all beads from left to right. Very similar to the cherry pattern instructions!
Step 2: Form the grape cluster
Pull the thread tight to bring the beads together, then create a loop by passing your thread back through the green bead (as shown on the drawing). Then, pull on your thread. I’ll bring the three purple beads into a cluster that hangs from the green bead, creating the grape shape.
Step 3: Complete the grape cluster and continue the pattern
After pulling the purple beads into their cluster position, you’ll see the three purple beads now form a small triangular grape bunch hanging below the green “stem” bead. Add more white beads to continue the pattern, then repeat the process – add 1 green bead and 3 purple beads, pull them into a cluster, and continue as many times as necessary!
This creates a cute grape-themed beaded strand where each “grape cluster” consists of three purple beads arranged in a small bunch hanging from a green stem bead. If you switch it to read beads, you can also make strawberries, or raspberries.
Wrap Up
So we’ve covered a bunch of adorable bead patterns to keep your hands busy and your creativity going. The best part about beading? There’s no pressure to be perfect. Some of your first attempts might look a little wonky, and that’s totally fine. Every beader has been there. (me first lol)
Start with whichever pattern caught your eye first, and don’t stress about getting it exactly right on your first try. The more you practice, the more natural the threading becomes, and soon you’ll be mixing colors and creating your own variations.
Take breaks when your fingers get tired, and don’t be afraid to experiment with different color combinations. Sometimes the “oops” moments end up being the most beautiful pieces. And if you’re feeling proud of what you’ve created (which you should be), share it with friends or post it online. The beading community is super supportive.
Most importantly, have fun with it. This is your time to slow down, create something beautiful, and maybe find your new obsession. ♥
ok I need to try the cherry one I LOVE cherryes