Hello there!
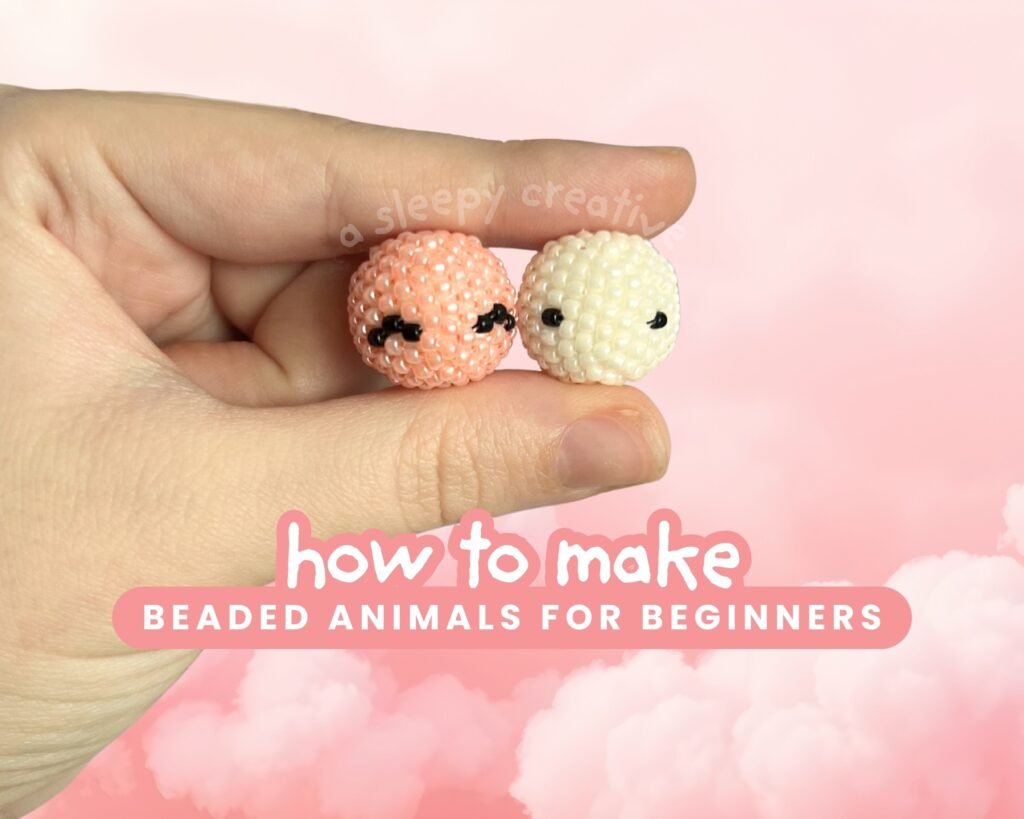
Still in my beading era, I’m back again with another article about it! Recently, I’ve made a lot of cute beaded whales and spheres… If you haven’t read about it yet, I can recommend you to check it out, because they’re super cute.
But anyway – I wanted to discover more about peyote and make some Christmas related beaded crafts. So today, we’re making a cute beaded Christmas wreath!

There are many kind of Christmas Wreaths, and this one was one of my inspiration to make my own cute mini beaded Christmas wreath.

I wanted to give this twirl movement to the wreath and I tried to mix peyote stitch with some movement from front to behind to make it look like the red ribbons – but anyway, it’s a little complex for me to explain it: you can see it on the picture!
You can achieve several crafts with this beaded wreath base: cute earrings, keychain, pendant, christmas tree ornament, or anything that you can think of. You can also create a bigger version of it by increasing the size of the beads. But I think it’ll be super cute as earrings, personally♥
Let’s discover the list of materials first!
Materials
- 11/0 beads
For this project, I used toho 11/0 round seed beads. You can use any beads that are around 2mm. You can also use 3mm beads if that’s all you have, since we’re using only one size!
I’m using 3 colors: dark green, red, gold. - Nylon thread (or similar) – max 0.2mm thickness
Length: around 12 inches / 30cm (wreath) & 8 inches / 20 cm (bow)
In my case, I used KO beading thread (330dtex) but you can use another as long as it is not too thick! - Beading needle
I personally use a 11/0 beading needle for most of my beading work, but if you don’t have any, I recommend buying a pack with sizes 10, 11 and 12.
How to Make a Christmas Wreath Bead Pendant
1. The Christmas Wreath
For the wreath itself, you’ll need your longest thread (12 inches), as well as your 11/0 beads in all the colors (green, red and gold)!
Step 1

Start by threading 20 beads on your 12 inches thread. This will create the base of our wreath!
Step 2
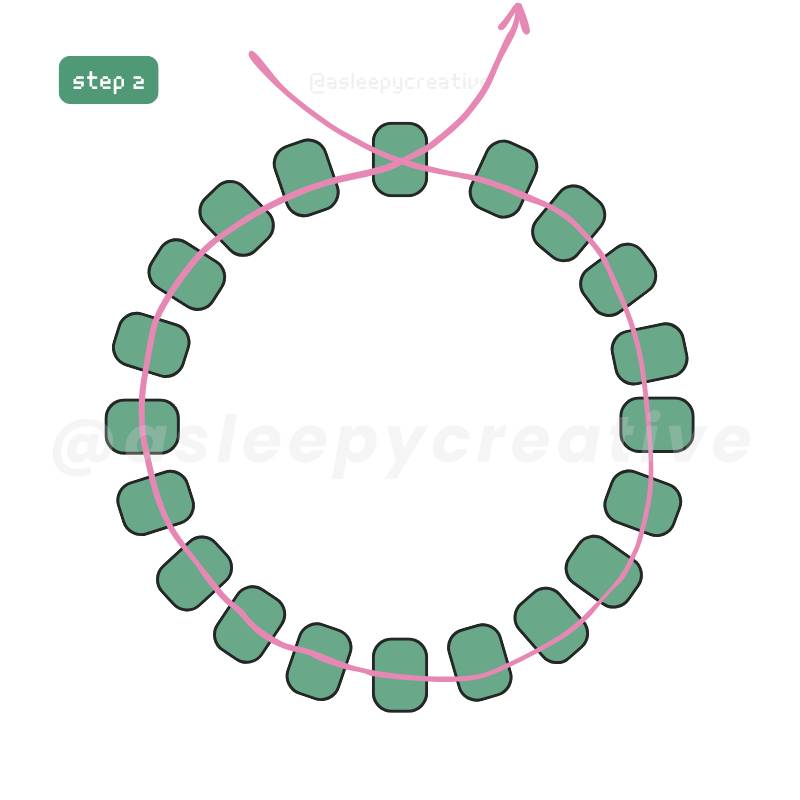
Continue by passing your thread through the first bead you’ve threaded amongst these 20 beads. Pull tight to create a circle.
Step 3
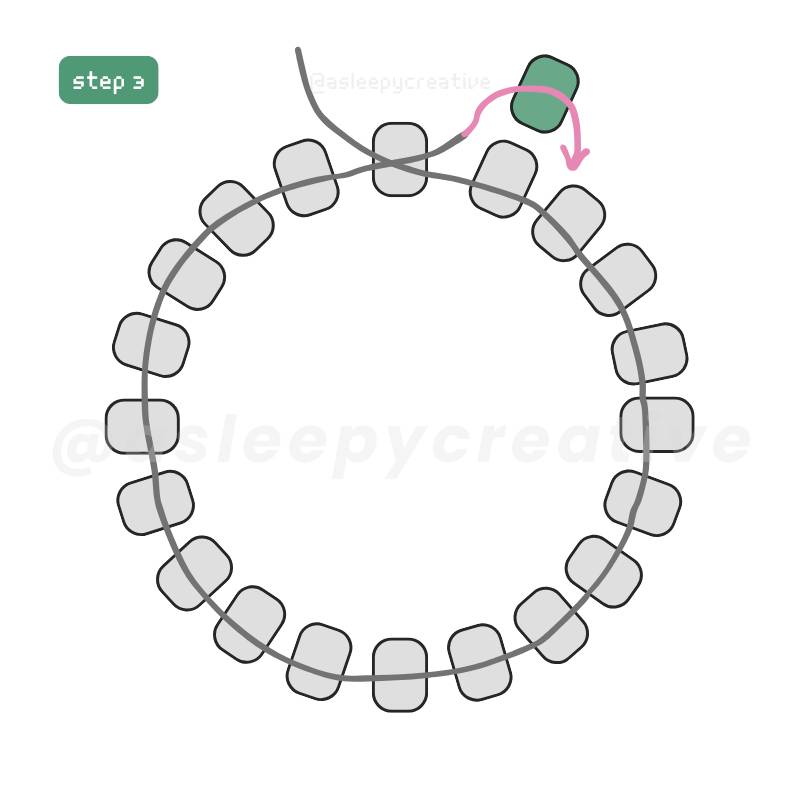
We’re now gonna use peyote stitch to reinforce the circle we’ve just made as well as giving it some irregular look (and make it look like an actual wreath!)
Take an extra bead that you pass on to your thread.
Step 4

Then, pass your thread in the 2nd bead, passing the first one of your foundation circle. (make sure you’re doing it correctly by looking at the step 4’s picture just above!)
Step 5

After that, you’ll do the exact same for the next spot.
It’s basic peyote stitch, so if you don’t understand well, you can either check the basics of peyote stitch in this article, or follow the diagram and pictures very closely. It’s really not hard, it just takes a bit of focus to get the hang of it. 🙂
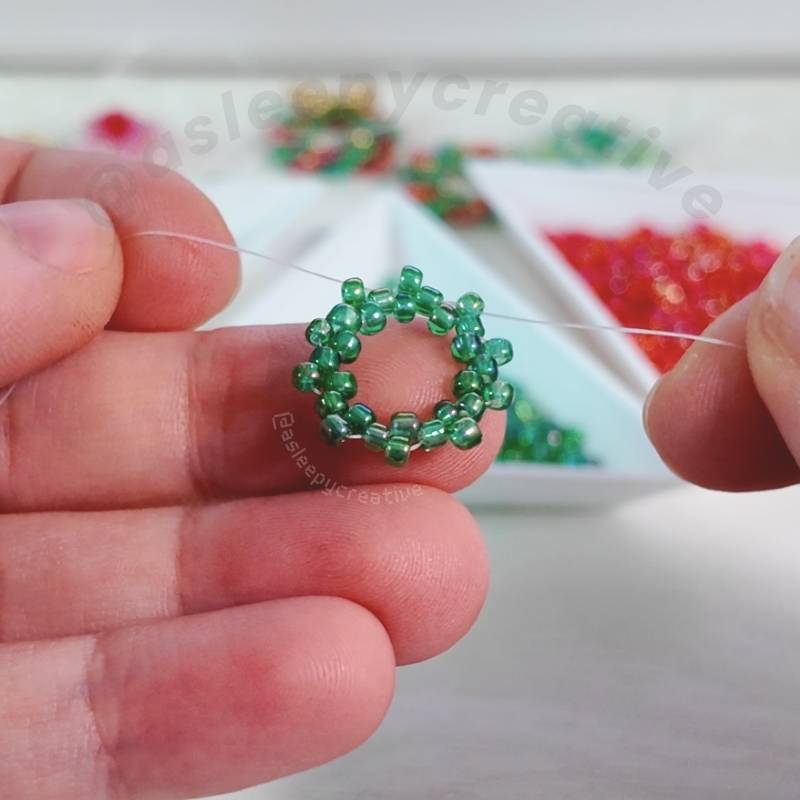
Full Circle

And you continue doing this for the whole circle : it’s basic peyote stitch that you make all around the circle. In total, you’ll add 10 beads to form the inforced (peyote stitch) circle.
Once you’re done with that step, your wreath will look like this:
Make sure you maintain a good tension through all your work when you make these as it will make the result better! Also, if you’re working with beads of different sizes (if you bought seed beads from Aliexpress for example, some are rather large, and other thin); try to select beads that are overall the same width.
It will give you a better result!
Now that we’re done with the base, we’re gonna thread more beads around the whole circle.
Step 7

Take six additional green seed beads, and pass them on your thread.
On your circle, you have all the beads you’ve added during the previous step (in peyote stitch). You need to look at them only: they’re the protuding beads on your base.
For clarity:
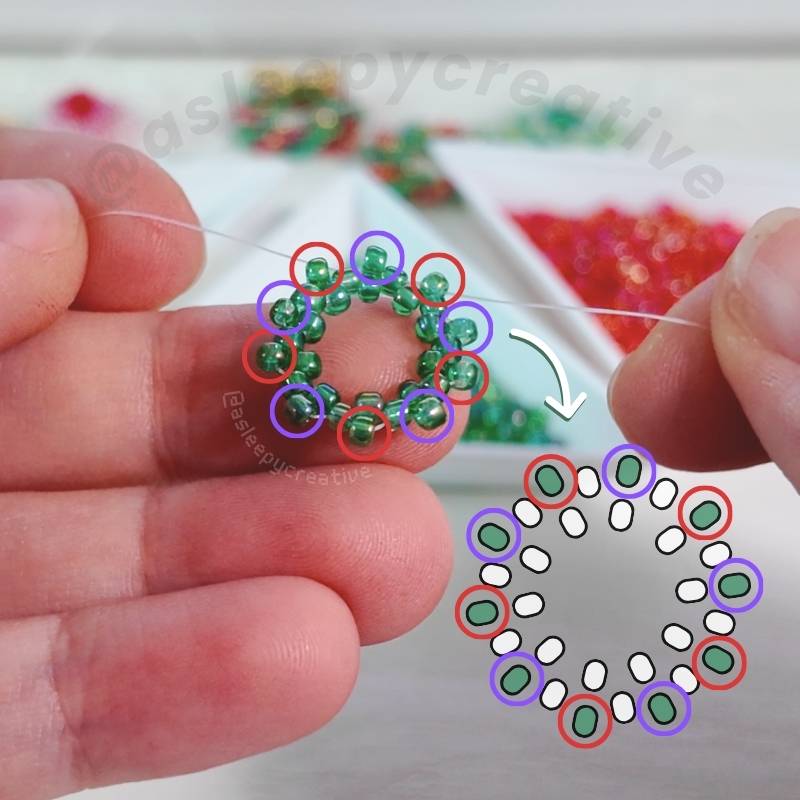
All the beads added during the last step are circled in purple and red.
During this step and after passing the six beads on your thread, you need to skip the bead circle in red, and pass your thread through the next bead circled in purple. So for this step, it gives:

Step 8

From now on, we will repeat the same for each branch up until we create a star shape with all the beaded added.
Take 6 beads and thread as shown on the picture (by following the instructions I’ve given at the previous step if you’re confused about where to pass your thread!) 🙂
Step 9

Step 9, we thread our 3rd branch with six additional beads.
Step 10

Repeating the same gestures again, we add six additional beads. At this point, we start identifying the star shape we’re trying to create.
Step 11
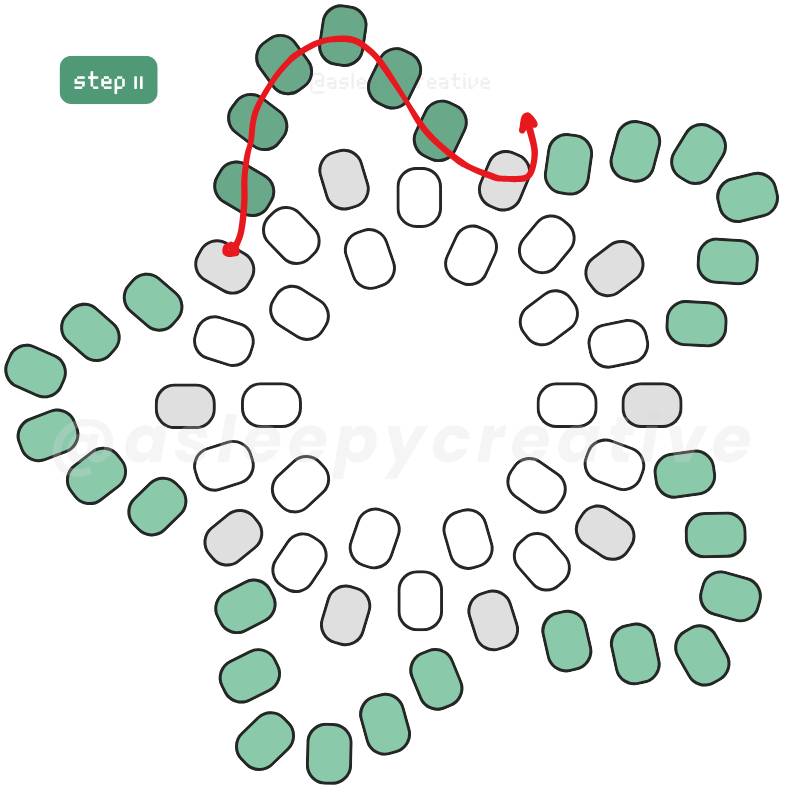
And last branch for the star! Add the last six beads and pass your thread through the bead shown on the diagram. Now, your wreath should look similar to a green star of some sort:

As always, make sure you pull tight on your thread to make it look pretty, and get ready to add your red beads!
Step 12
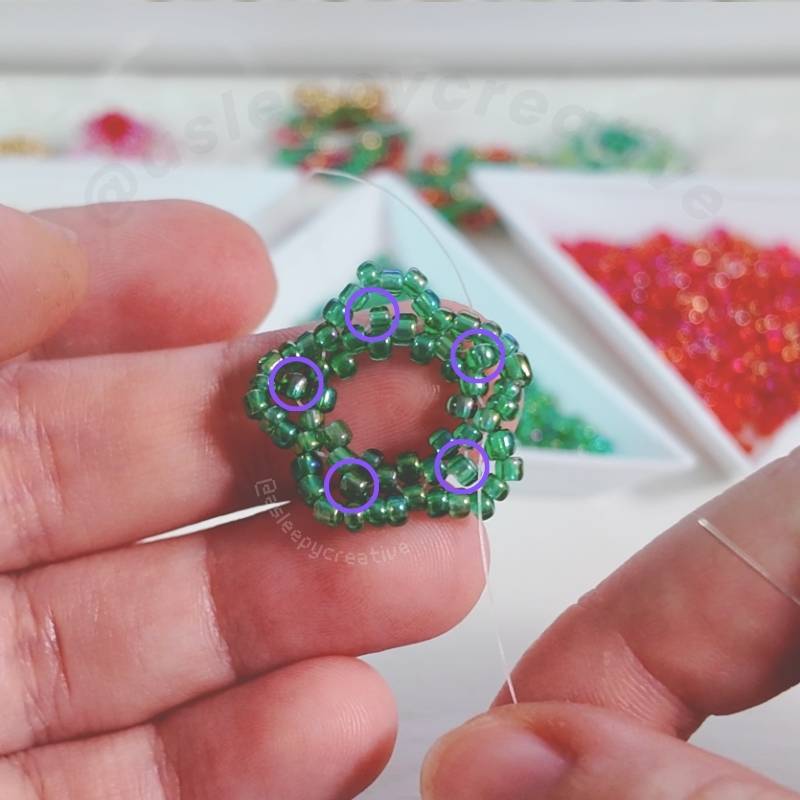
First, you need to position yourself correctly on your star. Your thread needs to come out of any of the beads circled in purple on the picture above.
They’re basically the beads positioned at the center of all the star’s branches you’ve just created previously.
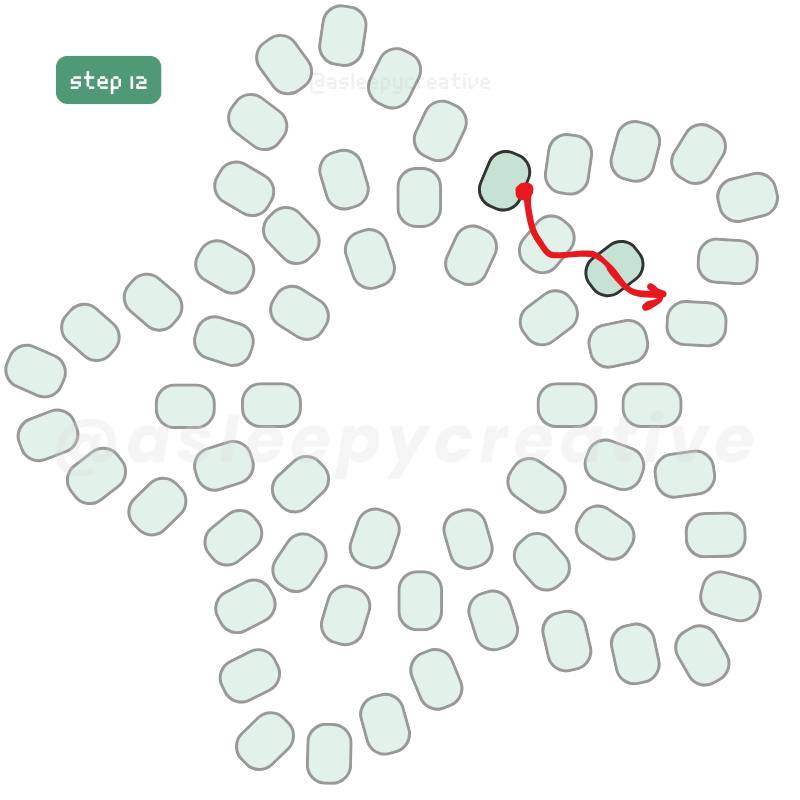
You can take the most straight forward path to position your thread, or reinforce your thread a little before doing so. It’s up to you (and the length of your thread)!
Dont forget to keep your thread hidden and go through beads in order to position yourself, not on top of your beads, or behind them.
Step 13
So from step 13, you’ll need your red beads. You can also choose gold beads if you want to create a variation, as there can be a lot of different sorts of wreaths.
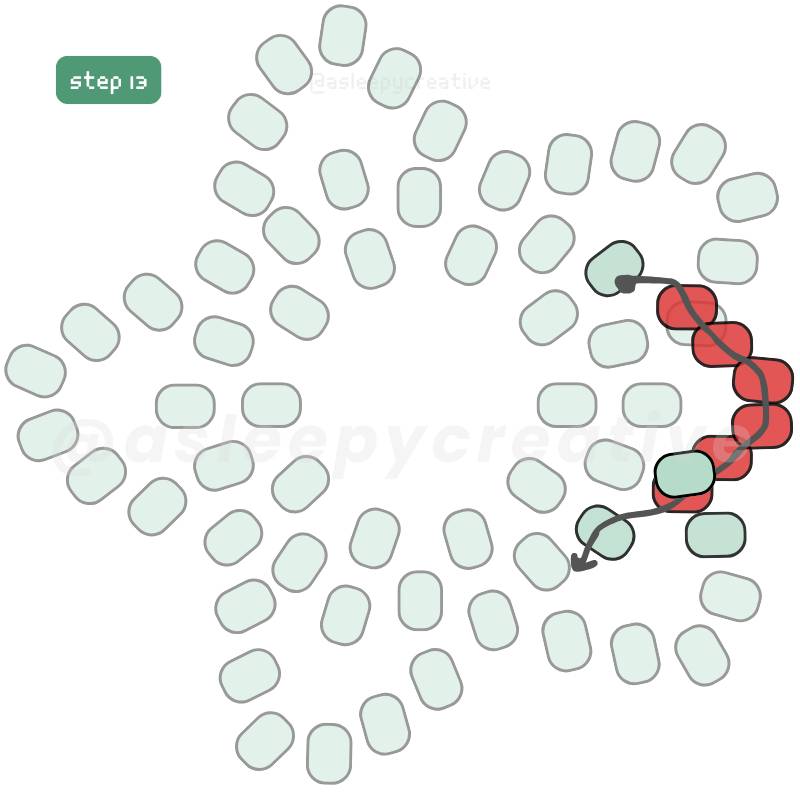
Your thread needs to be coming out IN FRONT of your star. This is super important for the final look.
Take six beads, pass them on your thread. Then, pass your thread through the next bead (at the center of the next star’s branch).
IMPORTANT: this time, your thread needs to come from behind your star.
As always, if you’re unsure, just look carefully at the diagram and the pictures I’m attaching to the post. Your needle needs to be positioned behind your star, and come up in the bead, then through.
Step 14
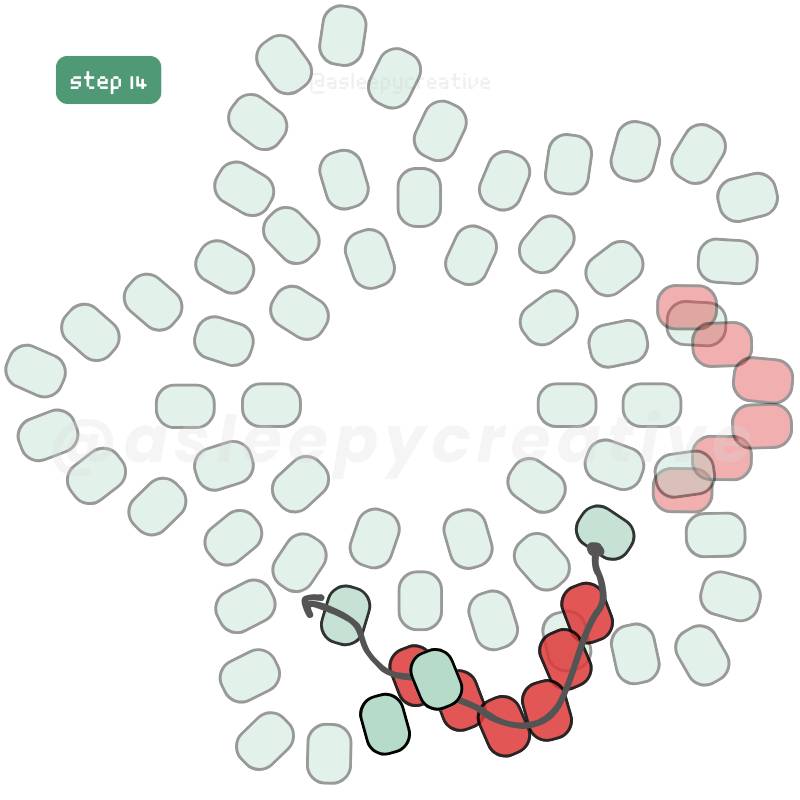
And we follow up by doing the exact same with six additional red beads for the next branch. Don’t forget: we get out of the first bead from the front, and we go in the next bead from behind.
Step 15
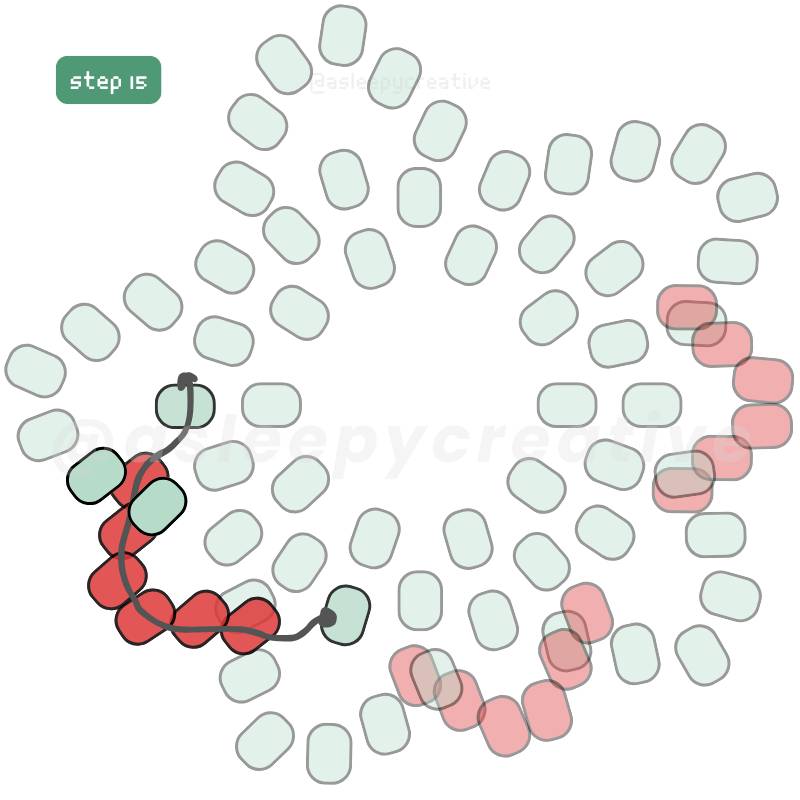
We’re doing the same all around the star shape we’ve created previously with the following steps. Take six beads, thread them and pass through the bead at the center of the next green star’s branch.
Step 16
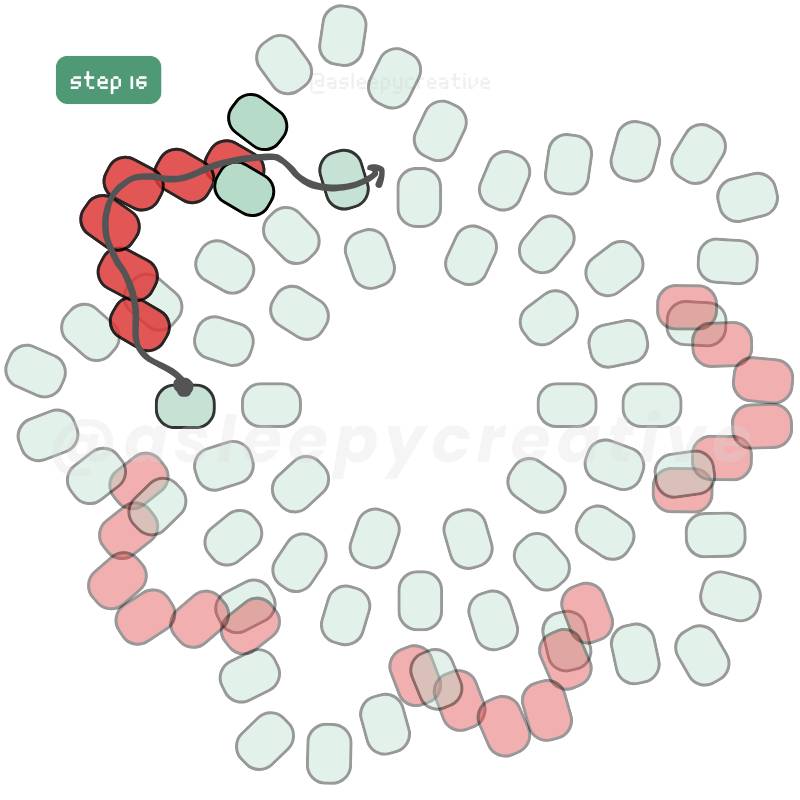
At this point, you get it. Take six beads, repeat the same gesture. As previously with the green star, you can start identifying the red star shape by now!
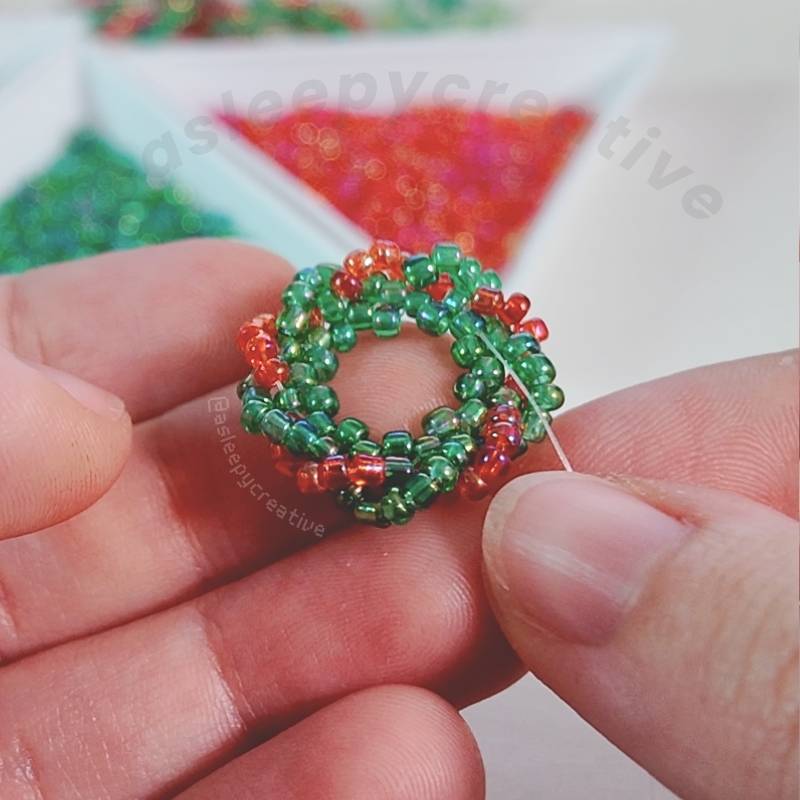
Final Star

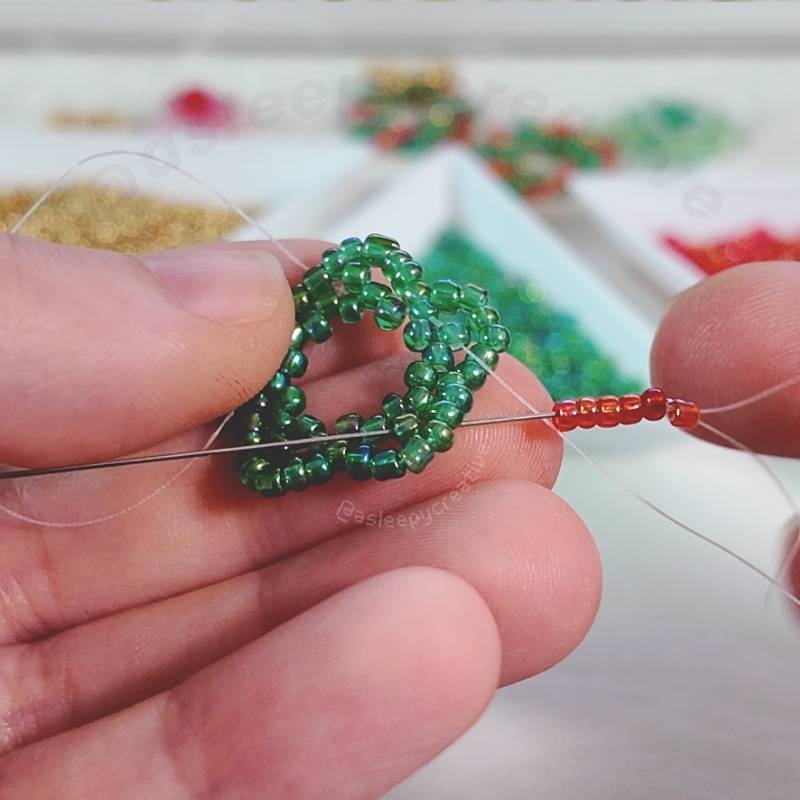
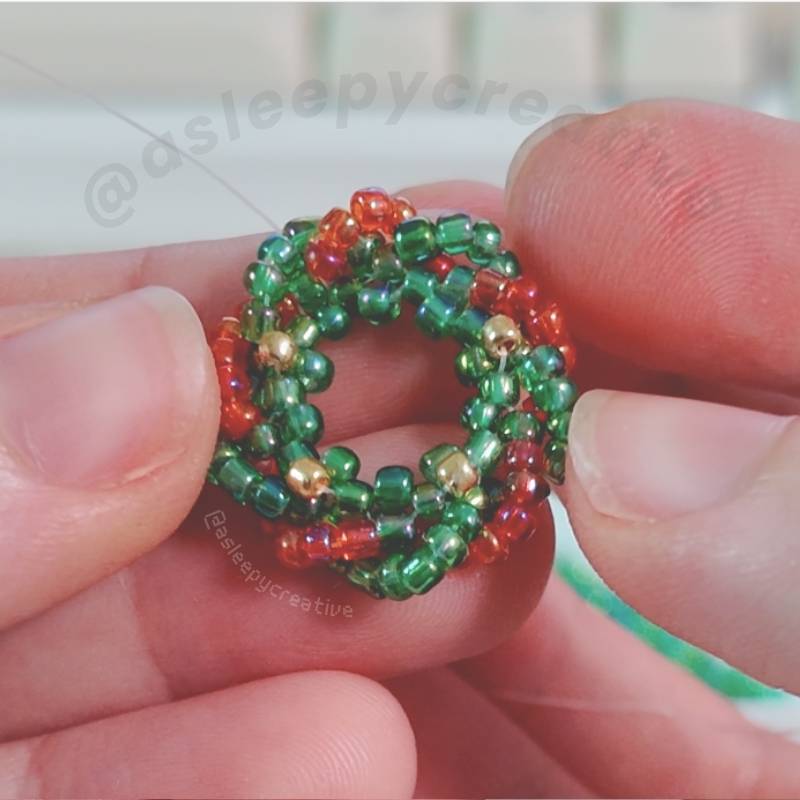
The final star should look like this, with all the red beads added. And since it’s way easier to visualize with a real picture, here it is:
On the picture, you can clearly see that each red section comes from the front, and disappears behind the green wreath. It gives the wreath a really cool look, in my opinion!
Step 17
Now, let’s take our gold beads!

For now, you need 4 golden beads. I suggest you use good quality beads, as Aliexpress quality will lose their color pretty fast (I used them for this tutorial as I didn’t have any other option, and as I was finishing my craft, the colors were already lifting, lol).
If you don’t have any, you can also use yellow beads, it will work just fine!
Anyway – we want to position the golden beads as shown on the diagram. As always, an important point is to start by positioning the thread in the right spot before adding any bead. Then, you follow the diagram with your beads!
At this point, it should look like the picture above.

You might be wondering: what about the spot left? Do we leave it empty? Well, you have several choices for this empty spot:
Option 1: A Bead
The first option is just to finish it with a bead. If you choose this option, you’ll be done with your mini beaded Christmas wreath at this step!

Option 2: A Bow
The second option is to fill the space with a little bow to give it a cute look. It’s up to you and your preference for the final look of your Christmas wreath, really.
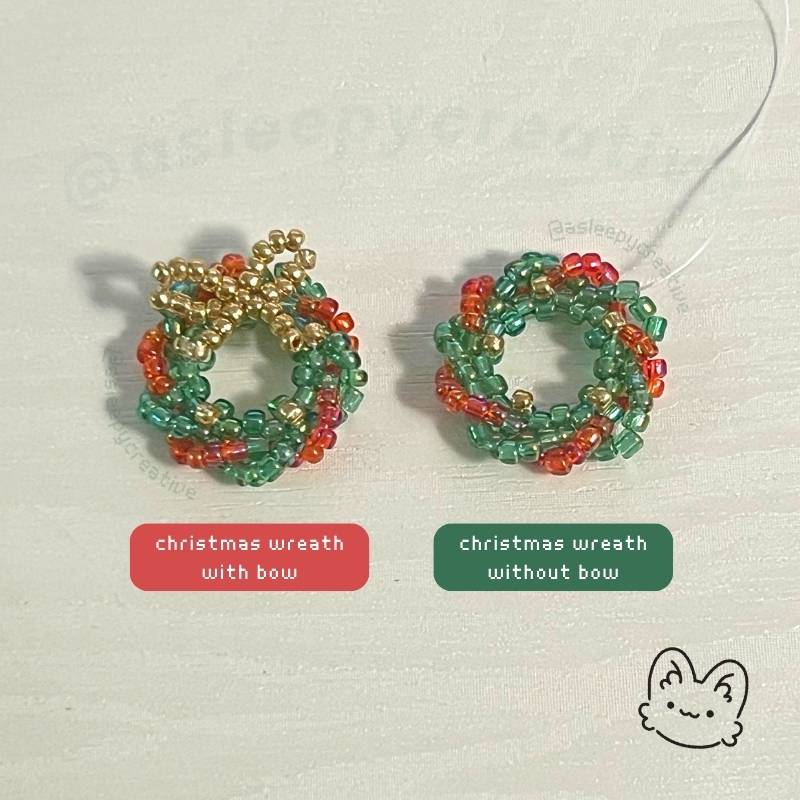
And if you want to add the bow, just continue reading! 🙂
2. The Bow
Step 1
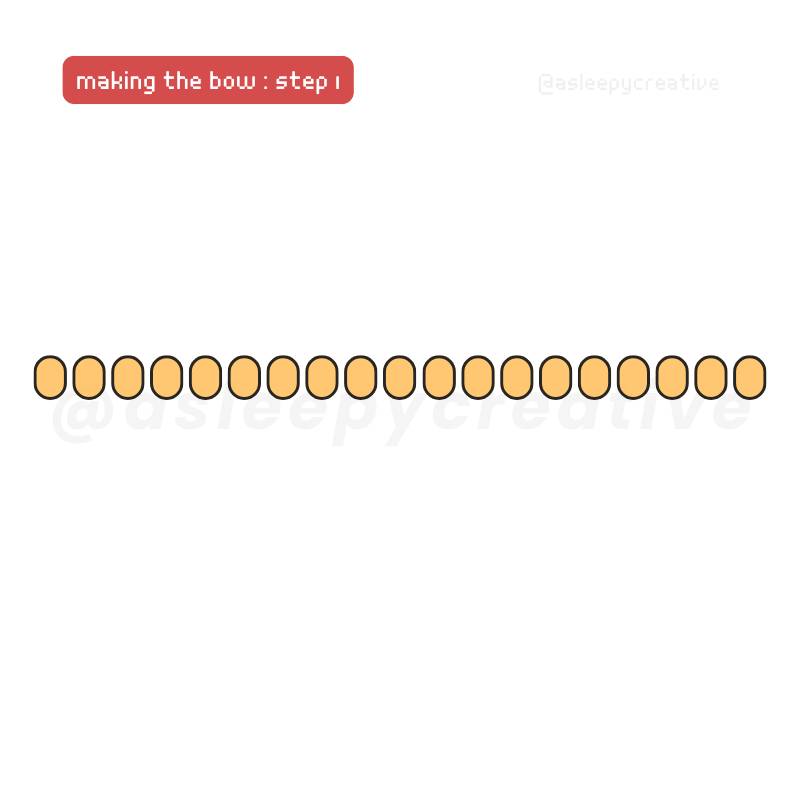
To make the bow, start by threading 19 beads on your 12 inches thread. We use 19 beads to make 9 beads (left loop) – 1 bead (center) – 9 beads (right loop).
Make sure these beads are positioned around the middle of your thread!
Step 2
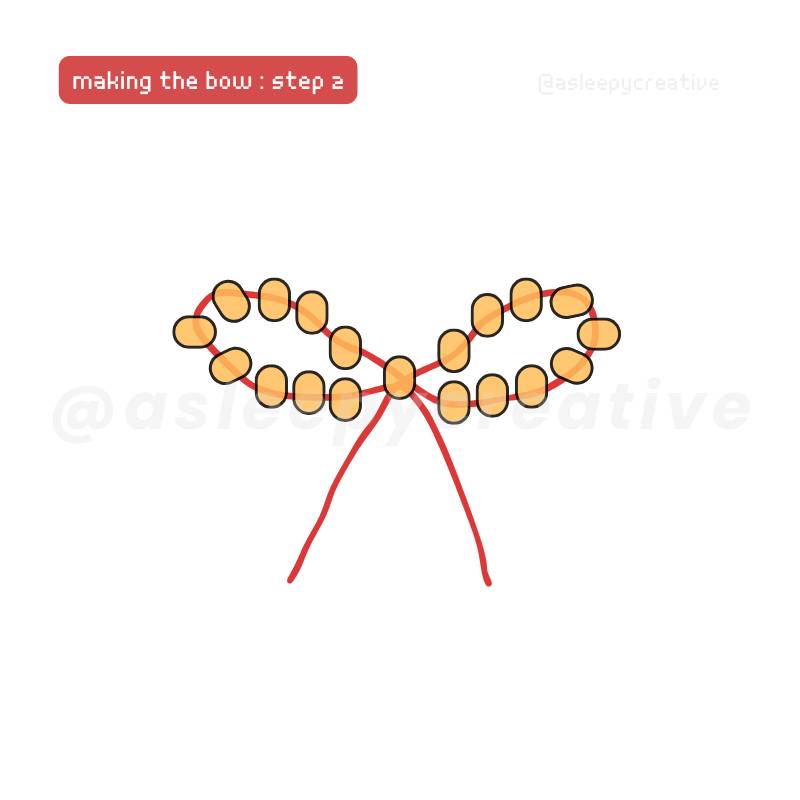
To make the loops, take both ends of your thread and pass them both through the bead in the middle.
As I wrote just before, there should be 9 beads in one loop. (and you can make bigger loops by adding more beads if you want!)
Step 3
Pull the ends of your thread tightly, making sure the loop are not loose, but not too rigid either.
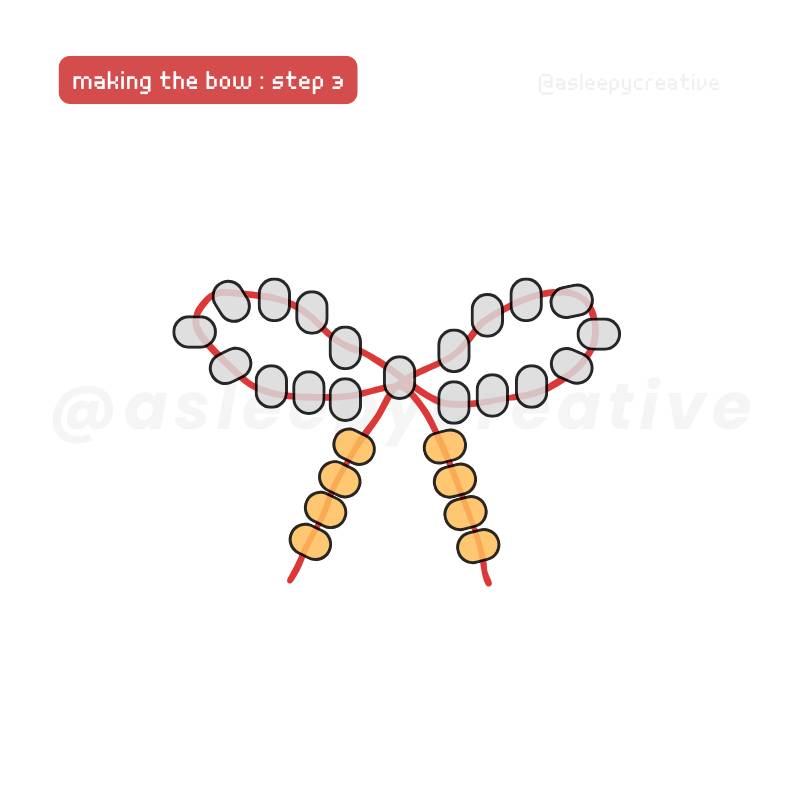
Then, take 8 beads, four for each leg of the bow. Thread them on each leg.
Step 4

To secure the legs, pass yoru thread through each leg respectively as shown on the diagram.
Note: if you use a thread like fireline, I suggest you don’t pull on it too tight, as it would make the bow too rigid at this point.
Step 5

To secure it further and ensure everything stays in place, pass your thread through the loops once again, and get out of the middle bead.
Before attaching the bow, I suggest you check if your bow is too loose for your liking. If it is, you can secure it further , which will give it a stiffer look.
Attaching the Bow
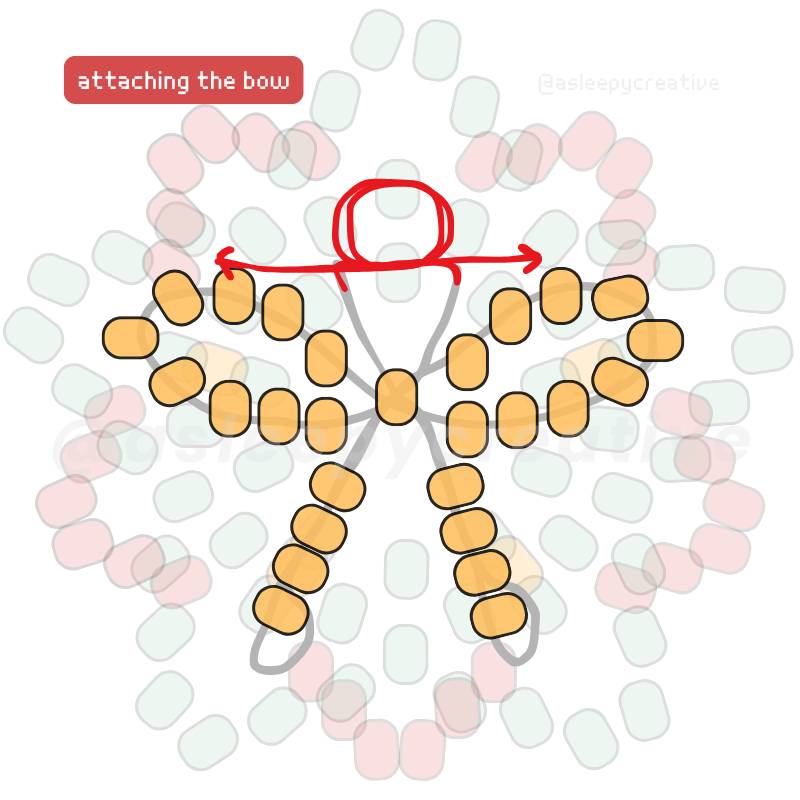
To attach the bow, you need to take your wreath and position your bow in the empty spot we left on it earlier. Follow the diagram to secure the bow on the wreath.
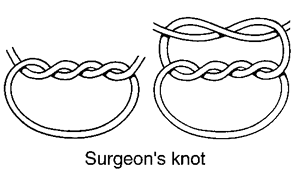
Once you’re done going through the beads a couple of times (2 for me, but again, it depends on your thread, its thickness, etc.), you can tie a knot. In my case, I (almost always) use a surgeon’s knot to tie my work.
Then, you can cut the remaining ends OR thread them through the work (at least 10 beads for each end) to make sure it’s 100% secure.
Final Look

And here is the final look! In my case, for now, I used a jump ring and some golden finding to transform it into a keychain for my planner, but I ordered some earring finding to make earrings with it.
The final wreath measures around 0.8 inches (2cm), which makes a perfect size for earrings in my opinion!
Wrap Up
And we’re done for our first Christmas craft! ♥
Isn’t it cute? It’s the very first pair of earrings I make with beads (well, as soon as I receive the earring component) and I really enjoy making small and intricate designs.
If you want to make it bigger, you can just choose bigger beads or add more beads to your base. 🙂