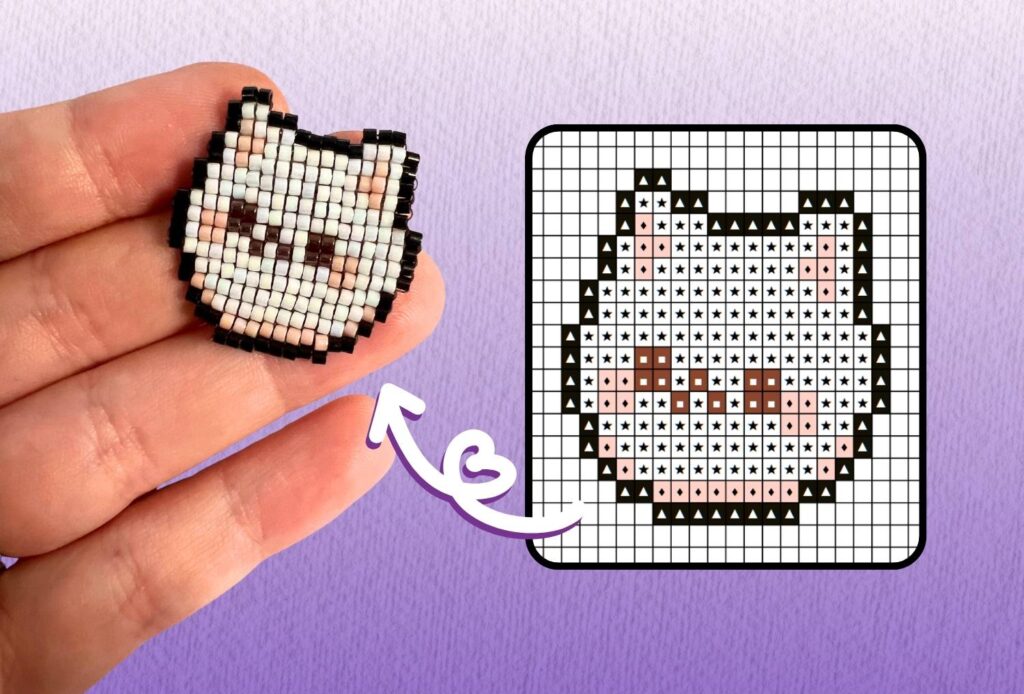
So, I’m pretty new to beading – like, embarrassingly new – but I’ve already fallen down the rabbit hole hard. I’ve always been obsessed with pixel art and those cozy indie games that nail that retro aesthetic, so when I stumbled across square stitch beading, it was basically love at first sight.
If you’ve ever done cross-stitch, square stitch will feel incredibly familiar. Both techniques work on a grid system where you’re essentially filling in squares to create your design. The main difference? Instead of making X’s with thread on fabric, you’re placing individual beads in a grid pattern.
The moment I realized I could take any pixel art design and turn it into actual jewelry, keychains (etc), I knew I’d found my craft (or well, one of many). This tutorial covers everything I’ve learned so far about making that magic happen, from basic techniques through all the tricks for shaping and material choices that make the difference between okay beadwork and pieces that truly shine. Oh and, there will be some affiliate links through the article!
What is Square Stitch?
As I just wrote, square stitch is an off-loom beading technique that creates a fabric-like structure where beads are arranged in a perfect grid pattern. Each bead sits directly above and below its neighbors, forming distinct rows and columns that mirror the pixels on a computer screen. Unlike stitches that create flowing or curved patterns, square stitch produces sharp, geometric designs with precise edges and corners.
The technique gets its name from the square grid it creates, though the actual shape depends on your bead choice. The stitch works by connecting each new bead to the bead directly below it in the previous row, creating a strong interlocked structure that can support detailed patterns and withstand regular wear.
Square Stitch is Perfect for Pixel Art
Square stitch translates pixel art into beadwork more accurately than any other technique. Here’s why it’s the go-to choice for pixel art beading:
(Almost) One-to-One Translation: Each bead corresponds almost exactly to one pixel in your digital pattern. This direct relationship makes it simple to follow computer-generated charts or create your own designs using pixel art software.
Precise Grid Alignment: The rigid structure ensures your design maintains its intended proportions without distortion (or almost none – a bead is not 100% square). Colors stay exactly where they should be, and fine details remain crisp and readable.
Scalability: You can easily resize pixel art patterns for square stitch by simply changing your bead size while maintaining the same grid structure.
How to Square Stitch: Step-by-Step Tutorial
Square stitch is one of the most versatile and beginner-friendly beading techniques you can learn.
The beauty of square stitch lies in its simplicity – once you master the basic technique, you can create complex patterns by simply following a chart or graph. Each bead sits directly on top of the bead below it, creating columns and rows that are easy to follow and count. This makes square stitch perfect for beginners who want predictable results and experienced beaders who need precision for detailed work.
Quick Materials Overview
For square stitch, you’ll need three essentials: strong beading thread (like 4-6lb Fireline), thin beading needles (sizes 10-12 work great for beginners), and beads (cylindrical beads like Miyuki Delicas give the crispest results, but regular seed beads work too) – if you need specific recommendations, jump to the details materials section below. ♥
Basic Square Stitch Technique
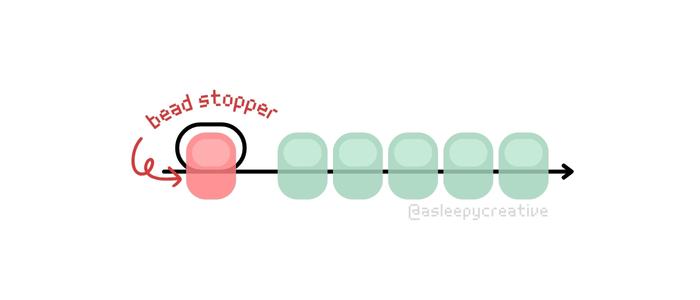
Step 1. Start by threading your beads for the first row. For this tutorial, we’re using 5 beads. Notice the bead stopper (shown in pink)! it prevents your beads from sliding off the thread while you work and gives you something to anchor against, super useful – I recommend you having a bead stopper in place. Just take any bead you want as a bead stopper.
Now we’re ready to start the second row! Simply add a new bead onto your thread:
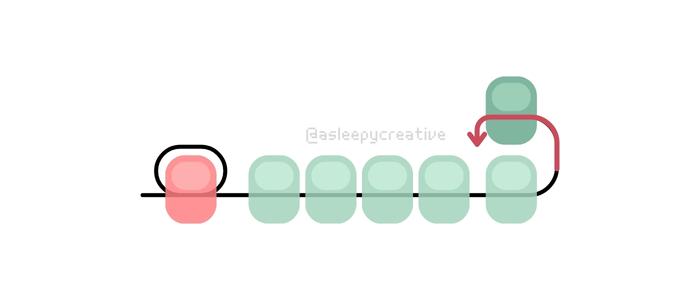
Step 2. This bead will sit directly above the last bead from your first row, creating the foundation for your square stitch pattern.
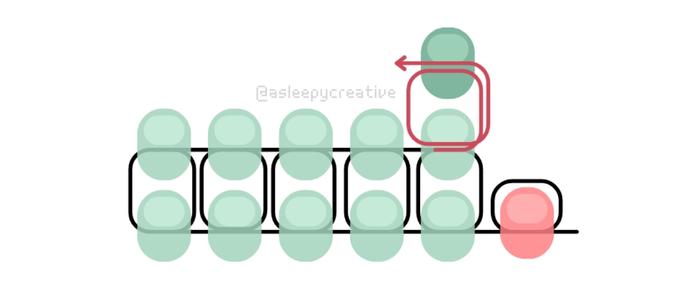
Step 3. Take your thread and go back through the last bead from the first row. This creates the connection between your rows and ensures your new bead sits perfectly on top.
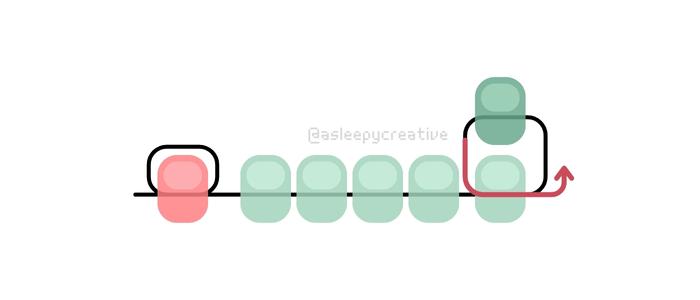
Step 4. Complete the stitch by bringing your thread back up through the bead you just added. This locks everything in place and positions your thread ready for the next bead. You can see how the new bead now sits securely on top of the previous row.
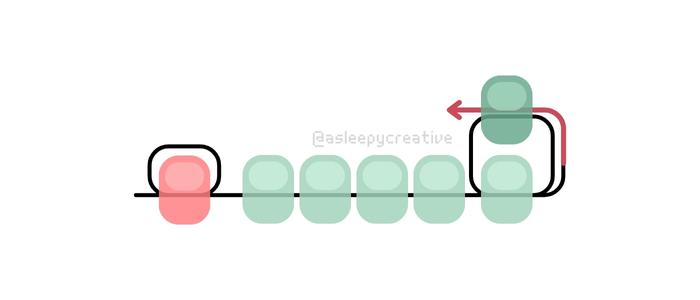
Step 5. Time to continue building your second row! Add another bead to your thread, then repeat the same process – go back through the bead directly below it from the first row. This consistent technique is what gives square stitch its neat, grid-like appearance.
Step 6. And again, complete the stitch by bringing your thread back up through the bead you just added!
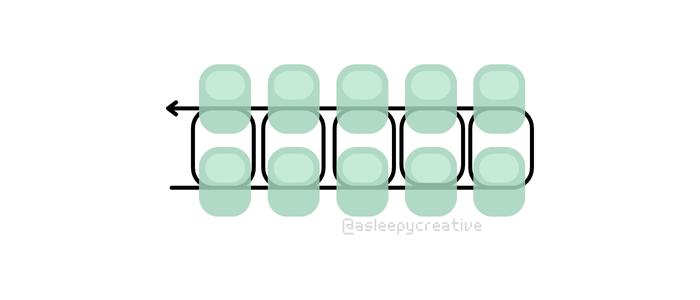
Step 7. Continue the same way until you finish the entire row – you can see the completed square stitch structure with two rows built up on the diagram! Each bead sits in perfect alignment, creating that characteristic grid pattern that makes square stitch so nice to use for pixel art. ♥
Step 8. To add additional beads and continue building your row, simply repeat the process! Add a new bead to your thread, then go back through the bead directly below it from the previous row, just like you did with the first bead of this row. Each time you add a bead, you’re creating that same secure connection that keeps your square stitch stable and perfectly aligned.
This step shows how the repetitive nature of square stitch makes it easy to continue – once you’ve mastered the basic technique of going through the bead below and back up through your new bead, you can build rows of any length by simply repeating this same motion over and over.
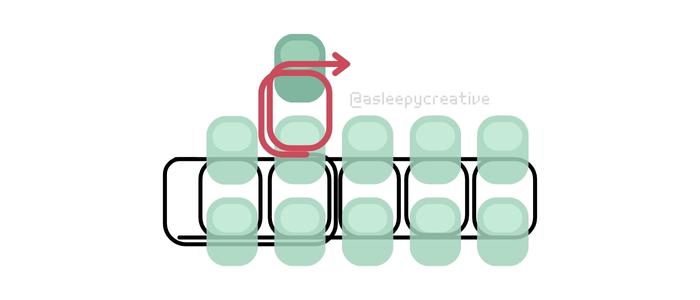
Note: You can flip your work if needed at this step, so you can always view the beads from the same angle and repeat the exact same motion. Many beaders find it more comfortable to work consistently in one direction – so definitely consider this technique if you’re a beginner! Here’s how it would look with the work flipped:
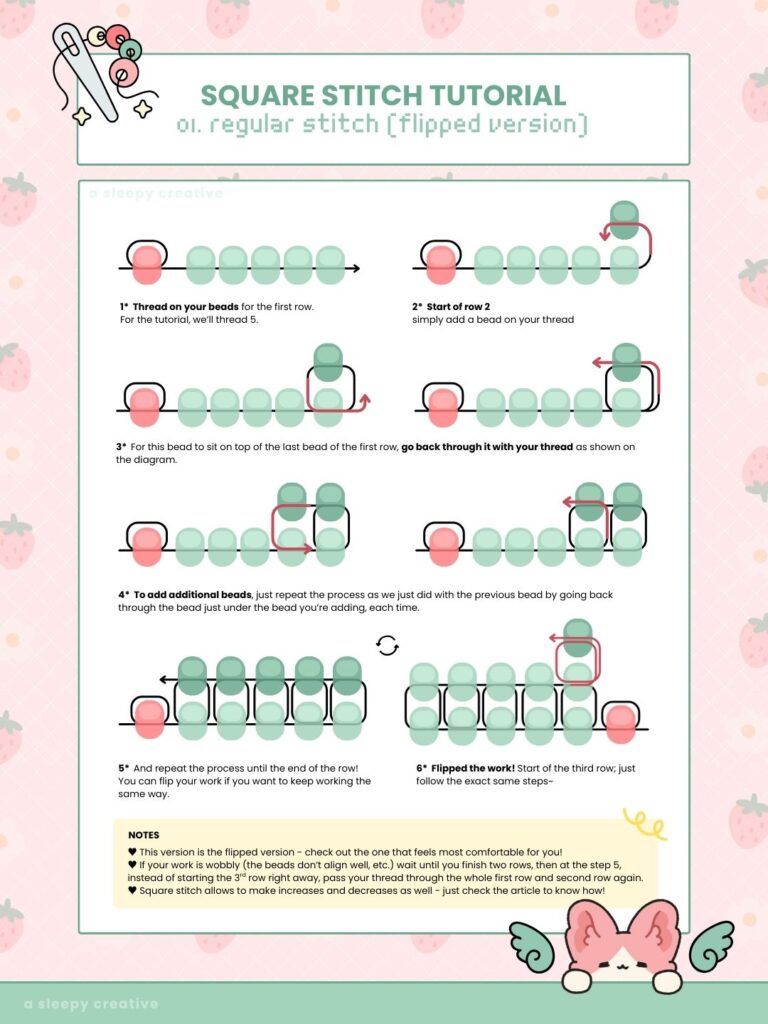
Infographic
Now that you’ve learned the basic square stitch technique, you’re good to go! I created a little infographic to show it step by step as well. This is the flipped version! (all the infographics will show the flipped versions) This approach allows you to maintain the same hand position and viewing angle throughout your project. Many beaders find this method more comfortable and consistent, especially when working on larger pieces where rhythm and muscle memory become important.
Now that you understand the basic square stitch technique, let’s explore how to modify your work by adding and removing beads to create different shapes and patterns.
How to Increase in Square Stitch
Increasing in square stitch allows you to make your rows wider than the previous ones, creating shapes that expand outward. This technique is essential for creating triangular shapes, adding width to patterns, or designing pieces that gradually grow larger.
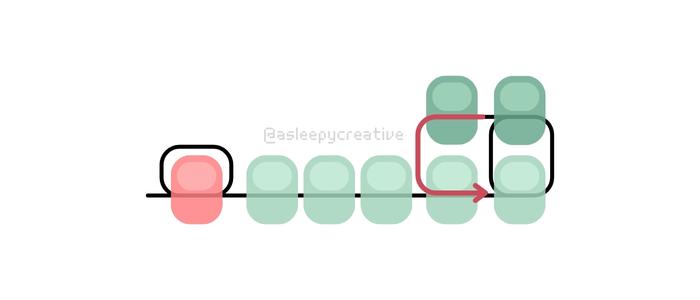
Single Bead Increase
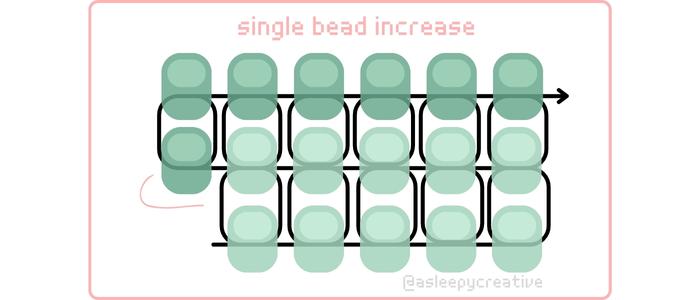
→ The result of a single bead increase in square stitch. Notice how the top rows have 6 beads while the bottom row has 5 beads – that’s your increase of one bead. Now let’s learn how to make it!
Step 1. We’ll start from where we ended with the basic tutorial (or more like at the step 7) with two rows of five beads. Notice how your thread is positioned at the end of the completed row.
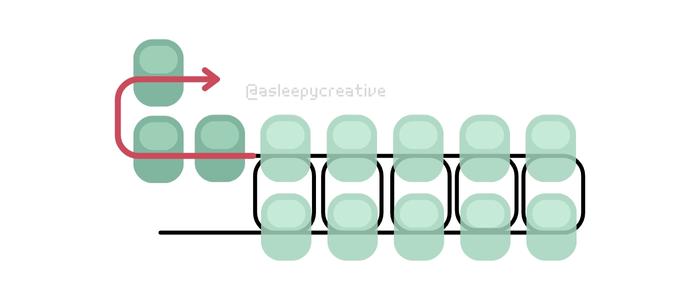
Step 2. Add two beads to your thread. The first bead will be your increase (making the row one bead wider), and the second bead continues the regular pattern.
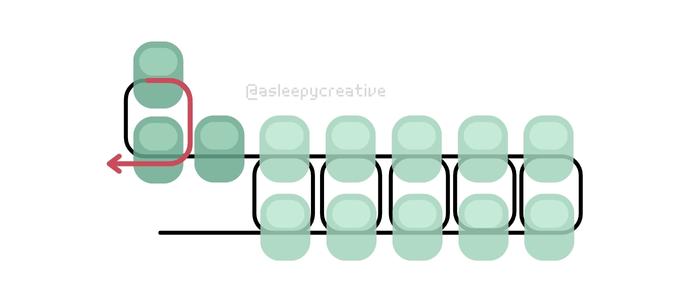
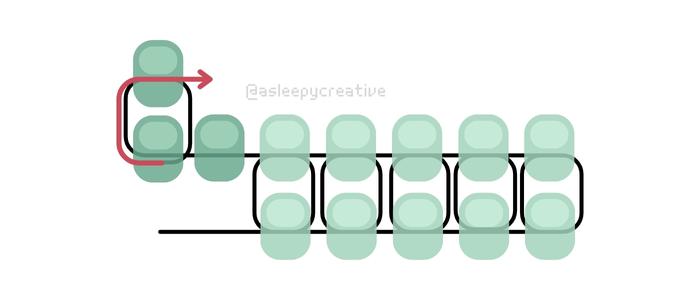
Step 3. Thread back through the first bead you just added.
Step 4. Then thread through the second bead again, just like a regular square stitch. This secures your increase bead in place. Now you can proceed with regular square stitch from there. Your row is now one bead wider than the previous row – you’ve successfully created an increase of one bead! ♥
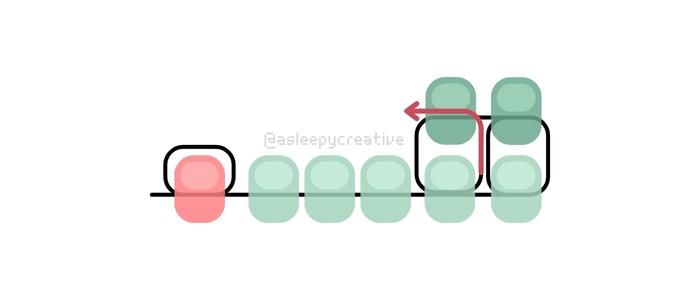
Two Beads Increase
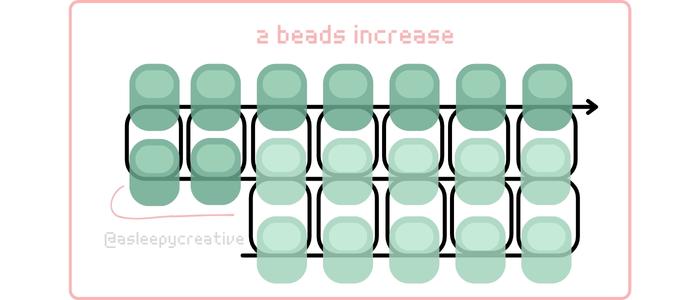
→ Here you can see a two-bead increase. The top rows now have 7 beads compared to the 5 beads in the bottom row – that’s your increase of two beads! Just like for the single bead increase, let’s discover how to achieve this result.
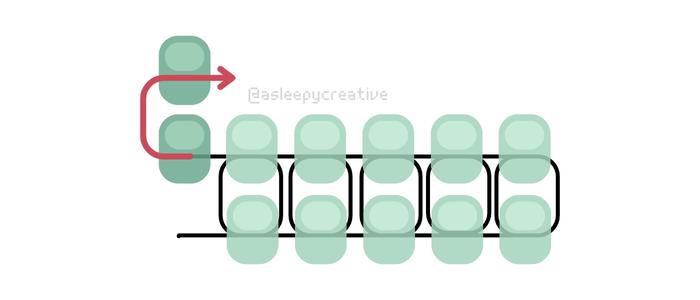
Step 1. Once again, we start from the step 7 of the basic square stitch: with two rows of five beads!
Step 2. To create a two-bead increase, add three beads to your thread at the start of the new row. The first two beads will be your increase (making the row two beads wider), and the third bead continues the regular pattern.
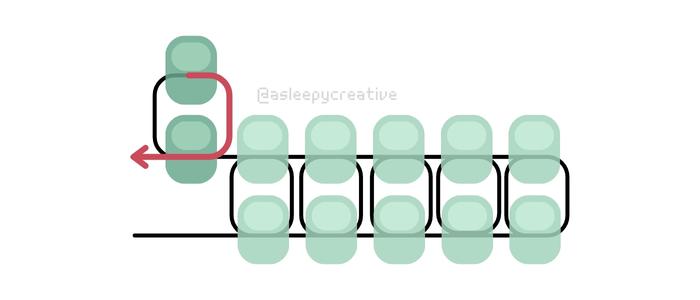
Step 3. Thread back through the second bead you added
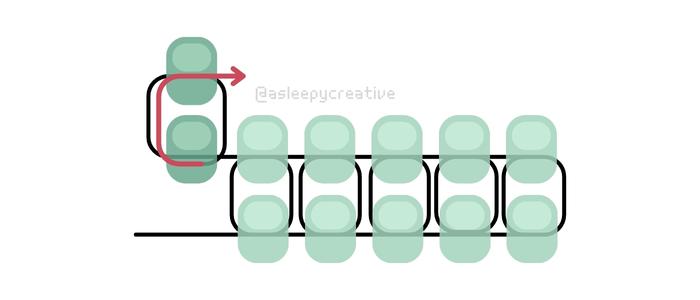
Step 4. Then thread up through the third bead. This creates the connection that secures your two increase beads at the edge of your work. You have successfully created a two-bead increase! ♥ Your new row is two beads wider than the previous row. You can continue with regular square stitch across the rest of the row, working from left to right as shown. (and as always, you can flip your work!)
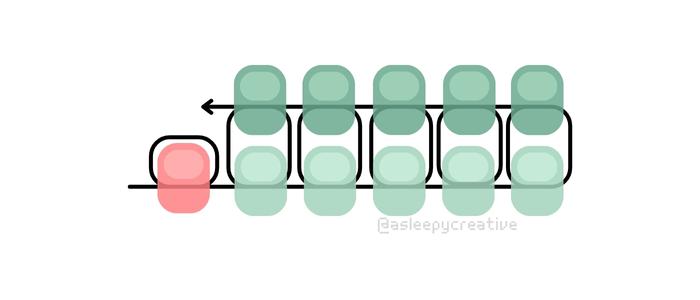
Infographic
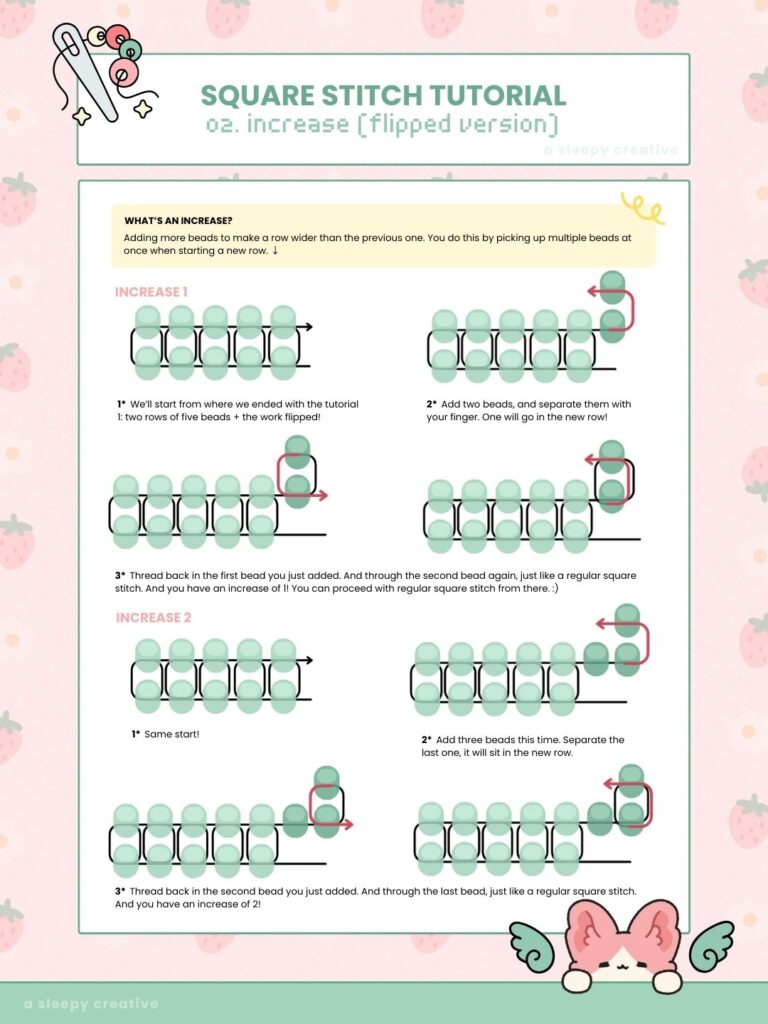
Having mastered the increase techniques, you can see how they appear when using the flipped work method. The same principles apply (adding extra beads at the start of your row) but now you’re maintaining that consistent working direction. This can be particularly helpful when working complex increase patterns where keeping track of your progress is easier with a uniform approach.
How to Decrease in Square Stitch
Decreasing in square stitch allows you to make your rows narrower than the previous ones, creating shapes that taper inward. This technique is essential for creating triangular points, reducing width in patterns, or designing pieces that gradually grow smaller.
What is a Decrease?
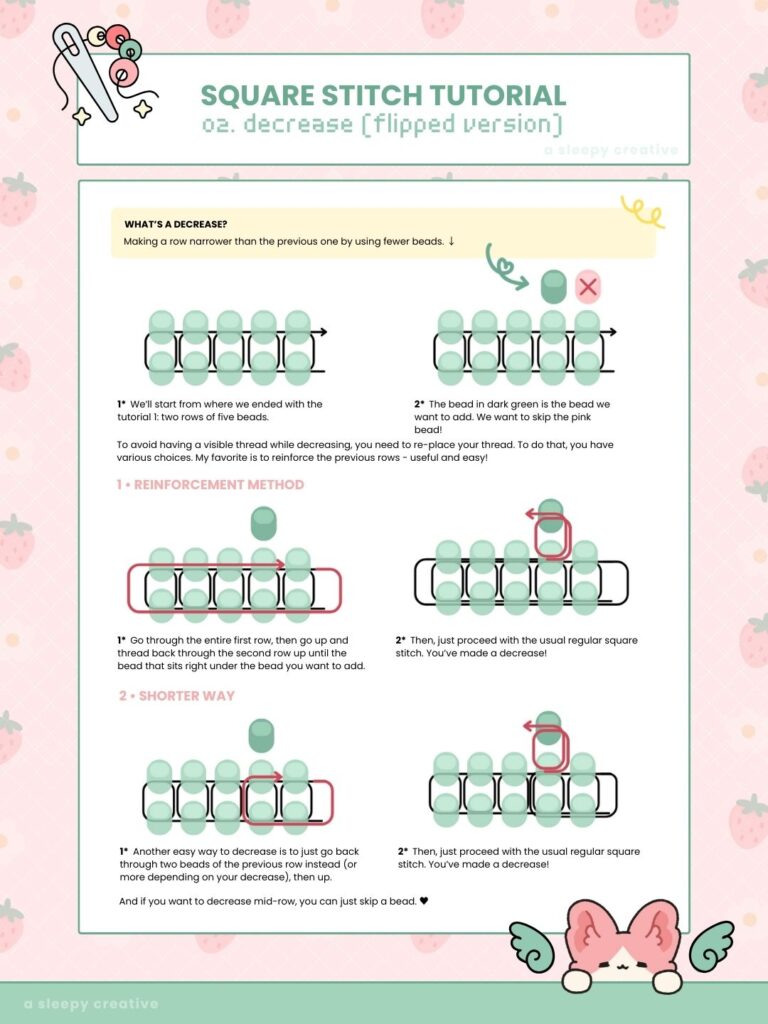
Making a row narrower than the previous one by using fewer beads. The key challenge with decreasing is avoiding visible thread while maintaining clean edges.

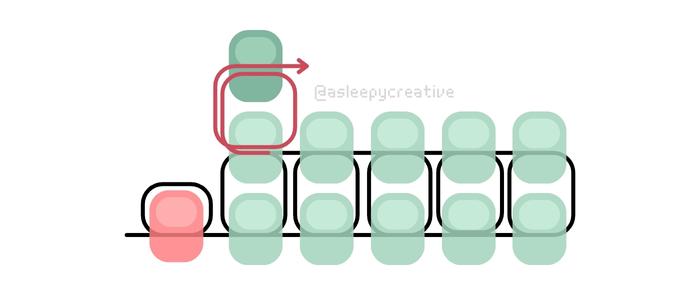
Step 1. Plan Your Decrease
We’ll start from where we ended with two rows of five beads. The bead shown in dark green is the one we want to add, but we want to skip the position shown with the pink X to create our decrease.
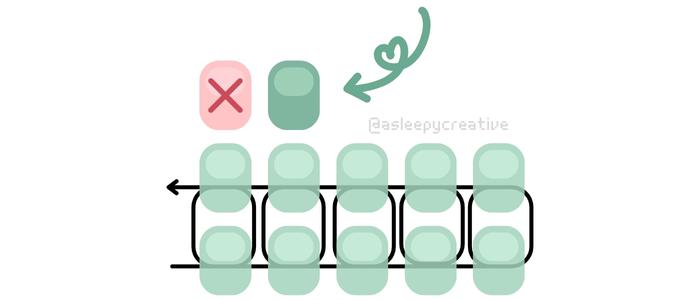
To avoid having visible thread while decreasing, you need to re-route your thread. There are several methods to accomplish this, but I’ll show you two effective approaches.
Method 1: Reinforcement Method
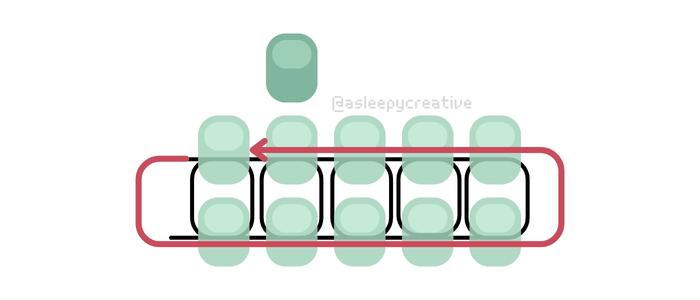
Step 2. Go through the entire first row, then go up and thread back through the second row up until the bead that sits right under the bead you want to add. This creates a strong foundation (which is why it’s called “reinforcement method”) and hides your thread path.
Step 3. Add your new bead and proceed with the usual regular square stitch technique. You’ve successfully made a decrease while keeping your thread hidden and your work reinforced.
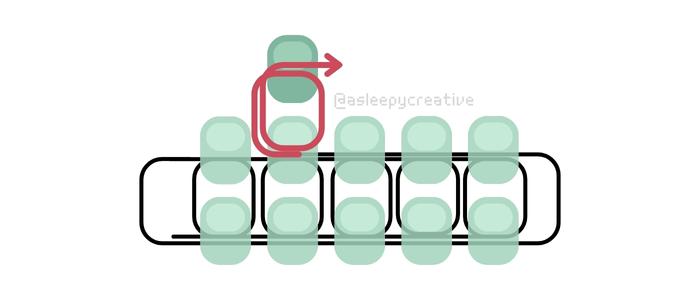
Method 2: Shorter Way
Step 2 (version 2). Another easy way to decrease is to go back through two beads of the previous row instead of the full row(or more depending on your decrease), then come up through the bead you want to connect to.
Step 3 (version 2). Add your new bead and proceed with the usual regular square stitch technique. You’ve made a clean decrease with fewer steps.
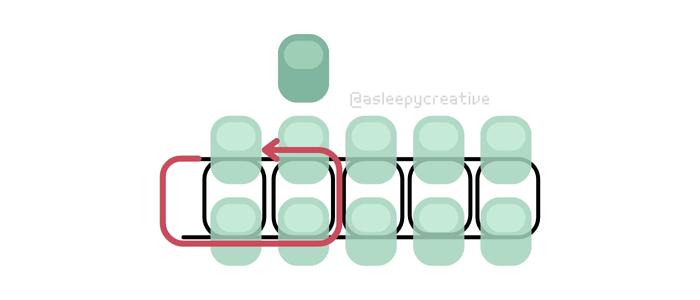
Infographic
And here’s the infographic for decreases! As the previous infographics, this will show the flipped version for people who prefer working from the original direction (the one you see in the tutorial at the beginning!)~
Materials for Square Stitch
Thread
Square stitch is particularly thread-dependent because it involves multiple thread passes that make this a strong stitch, perfect for jewelry that will see lots of wear. You need a thread that can hold firm tension while allowing smooth passes through small beads, often multiple times.
Top Recommended Threads
Fireline Beading Thread (4lb (0.15mm) or 6lb (0.20mm))
This is the one I’m using personally. I like using 6lb for my 11/0 beads because I tend to pass through the same bead multiple times (especially for square stitch). But 4lb works just fine for 11/0 beads as well.
Nymo Beading Thread (Size D (0.3mm), Size B (0.2mm), Size A/OO Nymo (0.1mm))
Classic nylon thread, easy to work with, readily available
Miyuki Beading Thread (0.2mm diameter, approximately 4lb)
Strong nylon construction, smooth surface for easy threading, available in many colors, good for beginners!
Thread Thickness Guide:
- Size 15/0 beads to 12/0: 4lb Fireline (0.15mm) or Size A/OO Nymo (0.1mm)
- Size 11/0 beads: 4lb Fireline (0.15mm), 6lb Fireline (0.20mm) or Size B Nymo (0.2mm)
- Size 8/0 beads: Size D Nymo (0.3mm) or 8lb Fireline (0.25mm)
The thickness will depend on how many times you need to pass through the bead, as well as the hole of the bead itself. Two sorts of beads can be labelled as 11/0 and be slightly different in size / hole size.
Needles
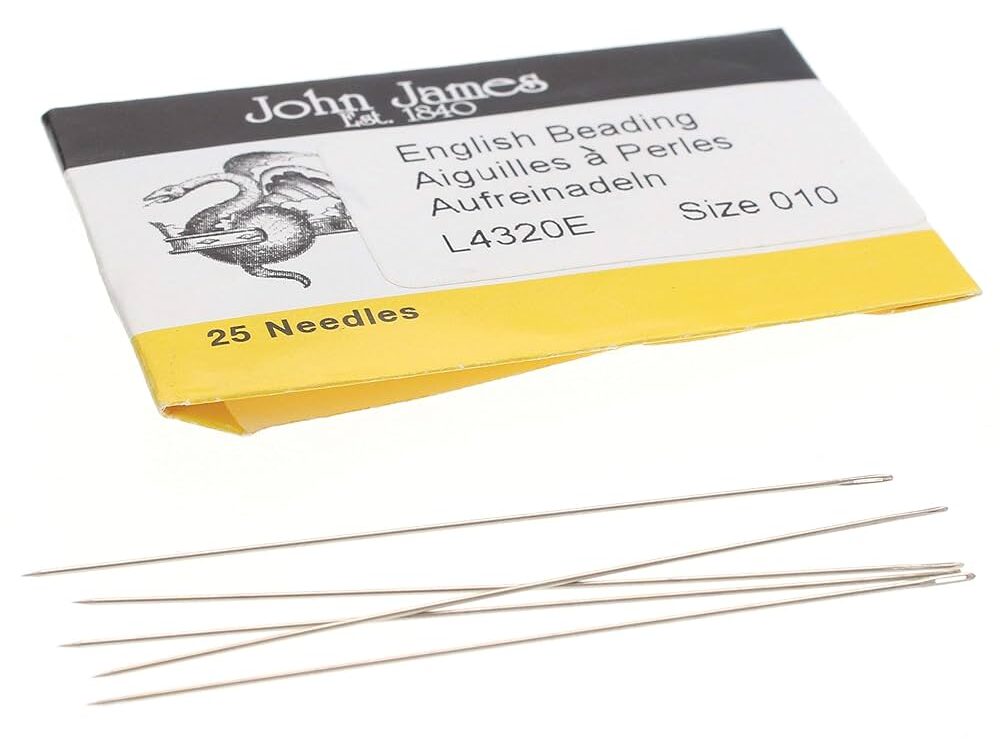
Needle choice is crucial for square stitch success. You need a needle thin enough to pass through beads multiple times while strong enough not to bend(or worse: break;;) under tension.
Size Guide
- Size 10 needles: Thickest option – 11/0 beads and larger
- Size 11 needles: Medium thickness – for size 11/0 beads
- Size 12 needles: Thinner – for size 11/0 and 15/0 beads, good for multiple passes
- Size 15 needles: Very thin – for size 15/0 beads and smaller, or when many thread passes are needed
For Beginners: Start with size 10 and 12 – 10 is forgiving enough for learning while 12 is thin enough for most projects.
Your needle should pass through your bead hole at least 3-4 times comfortably. If the needle feels tight on the first pass, go smaller. If it wobbles loose in the hole, you can use a slightly larger needle for better control. I’d say it’s better to go too thin rather than too thick, because small cylindrical beads (11/0 that I use for my square stitch work personally) can explode easily, they are quite fragile.

- EUROPEAN QUALITY: Packed and inspected in England using needles made in China to European quality and specification.
- SPECIFICATIONS: Made of steel, this assortment pack contains 4 needles to a card, 2 of each #10 and #12. Each needle mea…
- THREADING: Ball point beading needles enable the user to embellish pieces without splitting the fibers of the base canva…
Keep multiple needle sizes handy. You might start with a size 10 needle but switch to a size 12 for areas with many thread passes.
Beads
Here’s something crucial to understand: standard round seed beads are not perfectly square. Most seed beads are slightly rounded, which means your finished piece will have a softer, more organic appearance compared to the sharp, geometric look of digital pixel art.
Cylindrical beads (like Miyuki Delicas or TOHO Treasures) are game-changers for square stitch – and pixel art – but also for brick stitch, peyote stitch, and other precise techniques. These beads offer:
- Nearly square profiles when viewed from above
- Sharp, clean edges that create crisp lines between colors
- Consistent sizing for uniform grids without gaps or overlaps
- Large holes relative to their size, accommodating multiple thread passes

- SIZE & QUANTITY: The size of glass miyuki delica beads is 11/0 and 1.6 mm, diameter of hole is 0.80 mm. The glass beads …
- BEADS MATERIAL AND TYPE: Our glass beads are made of glass. The beads are durable, sturdy and resistant to fading or chi…
- WIDE APPLICATION: Our miyuki delica glass seed beads are versatile and suitable for a wide range of creative application…
Size Comparison
- Size 11/0 Delicas: 1.6mm wide × 1.3mm tall (most popular for detailed work)
- Size 10/0 Delicas: 2.2mm wide × 1.4mm tall (faster coverage, bolder look)
- Size 8/0 Delicas: 3.0mm wide × 1.8mm tall (statement pieces, quick projects)
- Note: different brands will have different measurements! Size 11/0 for Miyuki Delicas is different than size 11/0 for Toho seed beads.
The investment in quality cylindrical beads pays off in the precision and professional appearance of your finished work, especially for square stitch where the grid structure is so prominent.
You can also get chinese cylindrical beads of websites like Aliexpress. I have tried them, and they’re okay. They’re relatively consistent in sizing, and are available in a lot of colors. But you’ll need to be careful:
- they tend to explode more easily than Miyuki or Toho cylindrical beads.
- they’re not consistent in colors (if you order the same color twice, it might come different the second time).
- the color can peel off easily
I think it’s a nice alternative when you’re on a budget or not sure you want to invest in this hobby at first!
Square Stitch vs Loom Work
You might’ve heard of “loom” as well. And now you’re wondering: if there is loom work, why would I even start square stitch?
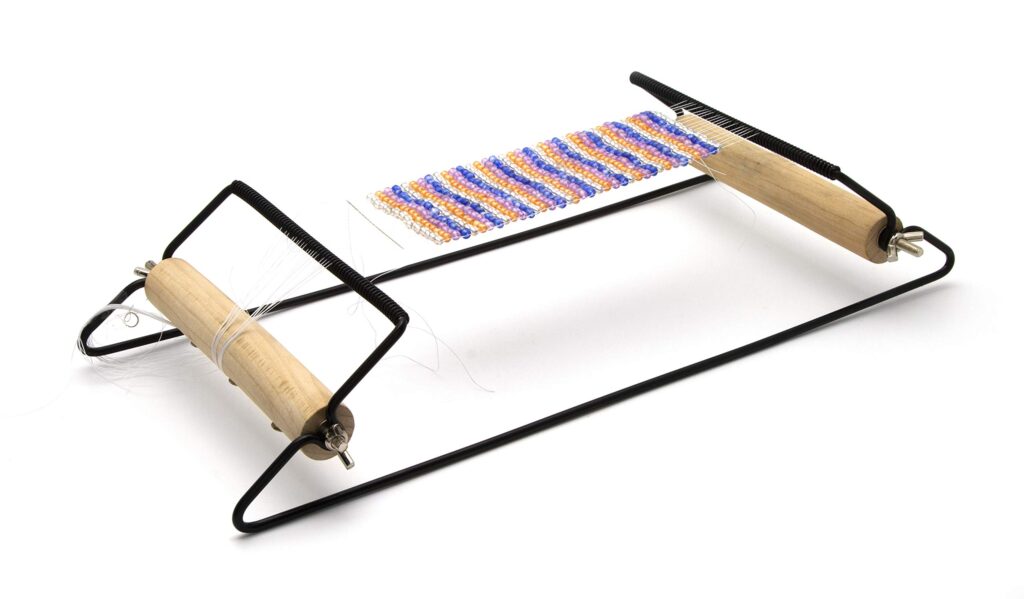
Both techniques create grid-like beadwork, but they have distinct characteristics that make each suitable for different projects.
Strengths of Square Stitch
- Portability: No bulky loom equipment required – work anywhere with just thread, needle, and beads
- Flexibility: Easy to add irregular shapes, increases, and decreases mid-project
- Durability: Multiple thread passes create an extremely strong finished piece
- No finishing issues: No loose warp threads to weave in at the end
- Cost-effective: No additional equipment investment beyond basic beading supplies
Strengths of Loom Work
- Speed: Once set up, you can complete rows very quickly
- Consistent tension: The loom maintains even spacing automatically
- Less hand fatigue: The loom supports the work weight
- Straight edges: Perfect rectangular shapes with minimal effort
Weaknesses of Square Stitch
- Time-intensive: Each bead requires individual attachment
- Hand strain: Supporting the work weight during longer sessions
- Tension management: Requires consistent hand tension for even results
Weaknesses of Loom Work
- Equipment dependency: Requires a loom and setup time
- Limited shaping: Difficult to create increases, decreases, or irregular shapes
- Finishing complexity: Warp threads need careful weaving and securing
- Portability: Less convenient for travel or small spaces
I would personally use the loom for big pieces, work that I want to hang on the wall, etc. I keep square stitch to keyrings and small items that are not regular in shape, in general.
But truthfully, once you’re skilled at one, you’ll probably stick to it. I’m getting used to make square stitches by now, so I think I would be faster at it than by working with a loom. I just feel like it’s comfortable for me at this point.
Wrap Up
And that’s square stitch in a nutshell! Honestly, I’m still pretty amazed by the results of square stitching. The fact that you can take any pixel art you love and turn it into cute keychains and such, it’s just too cool.
I’m already working on a bunch of free patterns that I’ll be sharing here on the blog soon. I figure if I’m going to be obsessing over this craft anyway, might as well share the fun, right?
Square stitch is definitely just the beginning for me though. I’m planning to tackle brick stitch next, then dive into peyote stitch, which seems to be like the holy grail of seed bead techniques. The coolest part about getting into beading is realizing how many techniques exist and how each one opens up totally different creative possibilities. Square stitch has me thinking in pixels and grids, but I can already imagine how other stitches might change the way I approach design entirely.
For now though, grab some beads and give square stitch a try. Start with something simple – maybe a small pixel heart or a tiny 8-bit character – and just enjoy the process of watching your design come together one bead at a time. Trust me, once you complete that first piece, you’ll understand why I’ve been so obsessed with this whole beading thing.