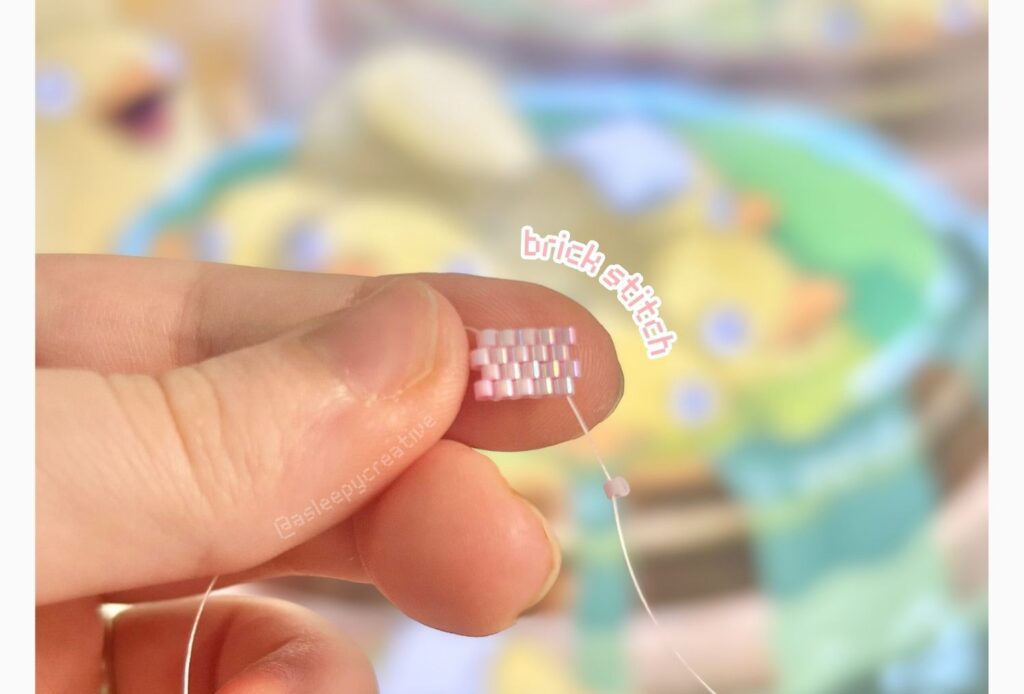
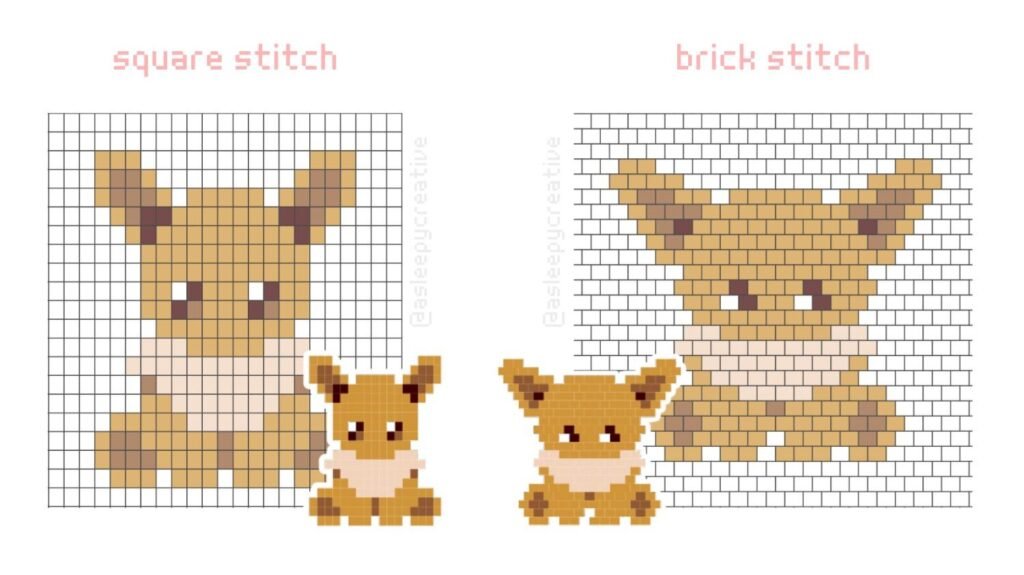
After learning square stitch and falling head-over-heels for the whole beading world, I knew I had to tackle brick stitch next. (or peyote actually, but I ended up choosing brick stitch) While square stitch had me obsessing over pixel-perfect designs, brick stitch caught my attention for completely different reasons – mainly because everyone kept saying how much stiffer and more structured it was.
Turns out brick stitch has this fascinating relationship with peyote stitch – they’re like siblings that look almost identical but behave completely differently. And while it shares some visual similarities with square stitch when you look at finished pieces, the actual construction process is totally unique. Let me walk you through everything I’ve learned about this versatile technique.
Just so you know, some of the links in this post are affiliate links, which means I might earn a small commission if you decide to purchase something (at no extra cost for you). Thanks for supporting my work!
What is Brick Stitch?
Brick stitch is a bead weaving technique where beads are arranged in offset rows that resemble bricks stacked in a wall. Unlike other stitches that connect bead to bead, brick stitch attaches each new bead to the thread bridges between beads in the previous row.
The technique creates a strong, structured fabric that’s particularly well-suited for pieces that need to hold their shape.
The defining characteristic of brick stitch is how each row is offset by half a bead width from the row below it, creating that distinctive brick-like pattern. The beginning of brick stitch can be created in various ways:
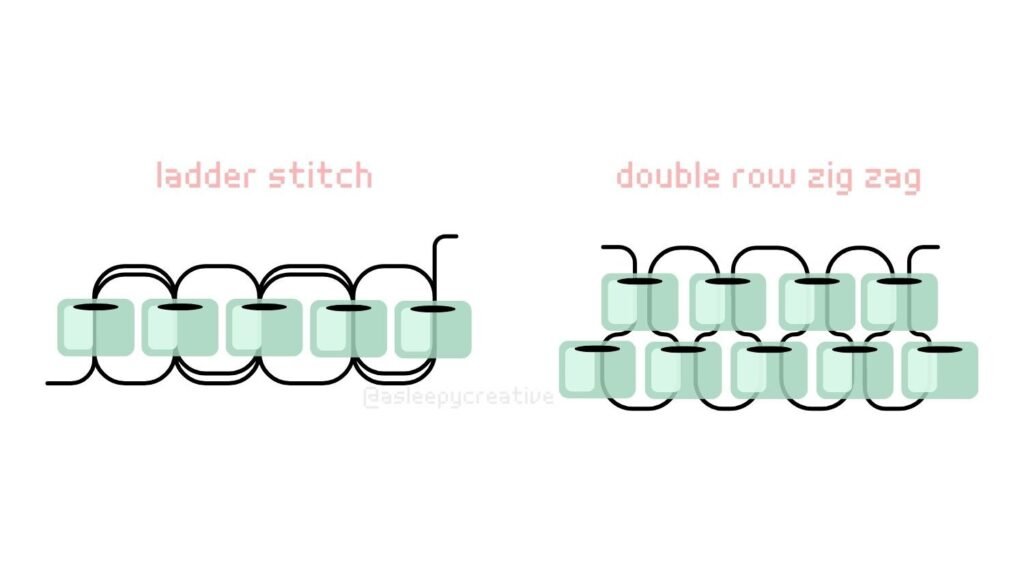
- creating a ladder stitch foundation – a series of beads sewn side-by-side that serves as the base for all subsequent rows.
- creating a double row foundation with zig zags (honestly easier lol)
The foundation row is crucial (whether you choose the ladder or zigzag foundation) because all the following brick stitch rows connect to it. So let’s discover all about it!
How to Brick Stitch: Step-by-Step Tutorial
Foundation 1: Ladder Stitch Base
One of the most common ways to start brick stitch is to start by creating a ladder stitch foundation – a base row of beads sewn side-by-side.
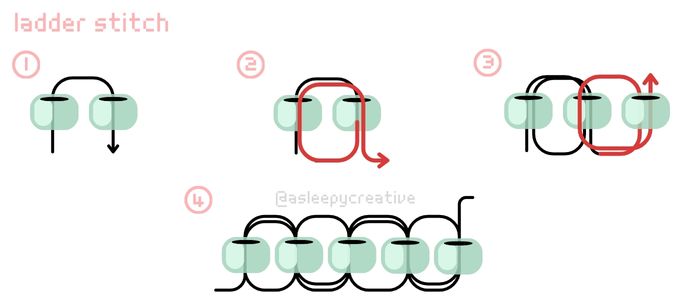
Step 1: Create your ladder stitch foundation with the desired number of beads
Step 2: Ensure your thread is exiting from the top of your last foundation bead
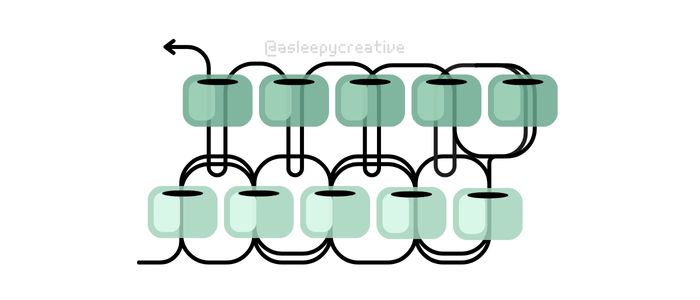
Foundation 2: Double Row Zig Zag
Another way (which I use most of the time because it’s much faster) is to thread both first two rows at the same time by making a zigzag. I’m not sure if this method has an official name, but I call it “double row zigzag”.
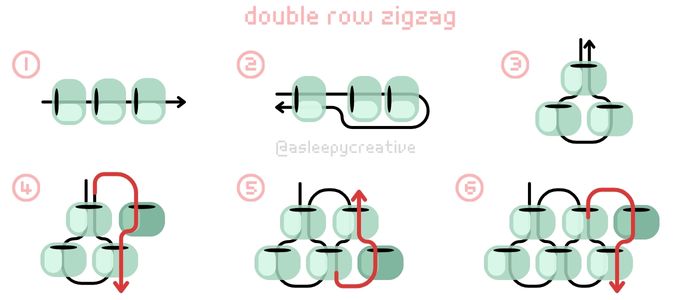
Step 1. Pass three beads through your thread, leaving a relatively long (6inches – 15cm) tail at its end. (I also suggest you thread a stopper bead, but that’s up to your preference)
Step 2. Pass your needle back through the first bead
Step 3. Pull your thread until the beads form a triangle (you’ll probably need to adjust them with your fingers)
Step 4. Now, add a new bead on your thread and pass the needle down through the third bead as shown on the diagram. The fourth bead (the one you just added) will sit right new to your first bead. You can already see the brick stitch pattern forming there.
Step 5. Continue by adding a new bead and threading back up through the bead you added in step 4.
Step 6. From there, you’ll continue the same pattern: passing the needle through the beads you add, either down or up, until your desired length.
Basic Brick Stitch Technique
Now that we’ve build the foundation, we can start the actual brick stitch! The following infographics will show the brick stitch on ladder stitch foundation, but you can also go with the double row zig zag foundation, it works the same way!
Choose one of both to start with before following the step 1! 🙂
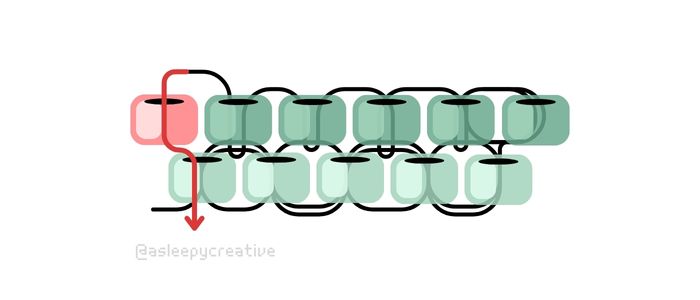
Step 1. Add two beads to your thread

Step 2. Pass the needle under the connecting thread between beads in the foundation row, and go back up through the last bead you just added. This gesture is the basic of brick stitch, you will do A LOT of it!

Step 3. Optionally, you can reinforce the row by going back through the first bead and back up the second bead again.
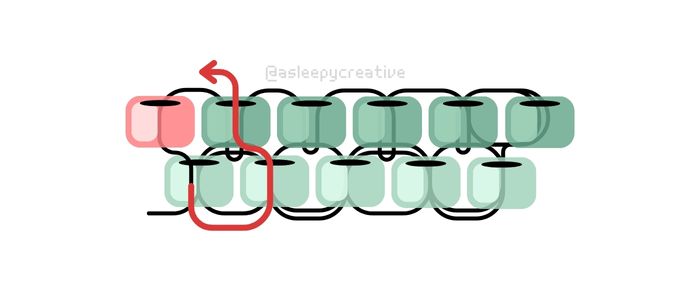
Step 4. Then, each time you add a bead, you follow the same pattern: passing the needle under the connecting thread between beads, and going back up this last bead you added.
Step 5. Continue until the end of the row~!
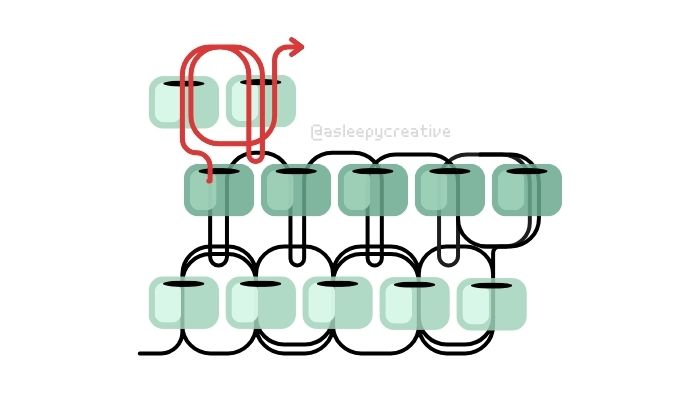
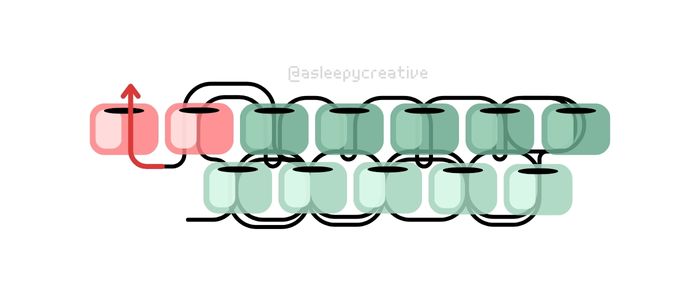
Step 6. Once you’re ready to start the new row, add two beads instead of one and proceed with the same pattern. This is the basic brick stitch!
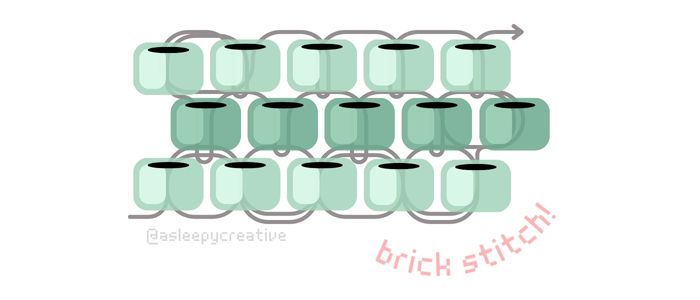
End result! A tidy brick stitch. It’s really easy to make and it looks really neat. As you can see, row 1 and row 3 are perfectly stacked on top of each other, while the row 2 has an offset. This is the very typical look of brick stitch (as well as peyote stitch). If you want your beads to align perfectly on each rows, you can try square stitch. 🙂
Infographic

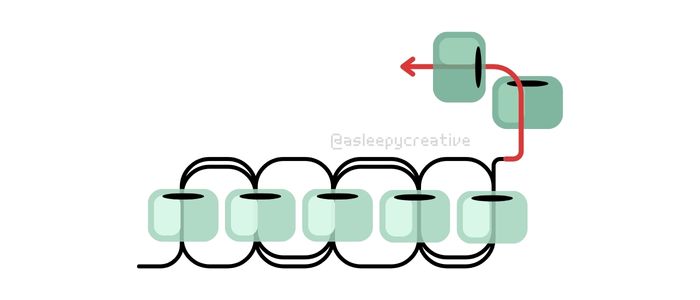
Row Completion
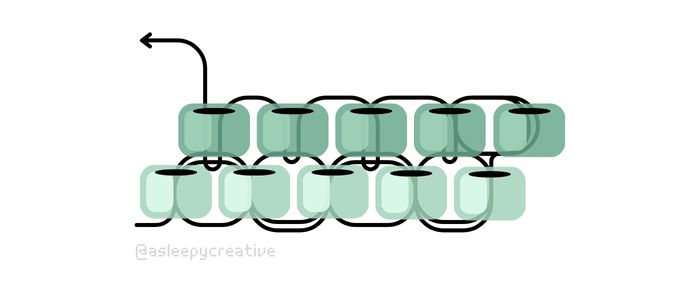
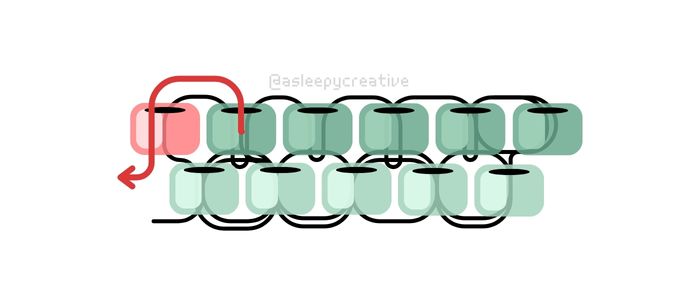
Once you reach the end of a row, go back through the last bead to ensure your thread is exiting out of the top of your last bead. This positioning is essential for starting the next row correctly.
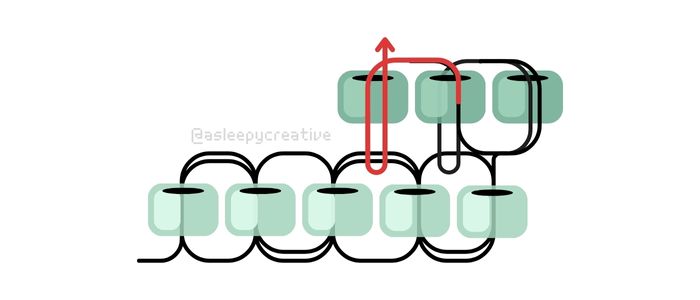
Next Rows
As you’ve now learned, each new row follows the same pattern: pick up two beads to start, attach to thread bridges, then add single beads for the rest of the row. You may find it easier to constantly turn the pattern so you are always working from right to left. You’ll get used to the pattern faster since your muscle memory will work in this way.
Advanced Brick Stitch Techniques
Now that we know how to make a brick stitch, we need to learn a couple of advanced techniques (that are still very easy!) ♥ It will allow us to make intricate designs easily~
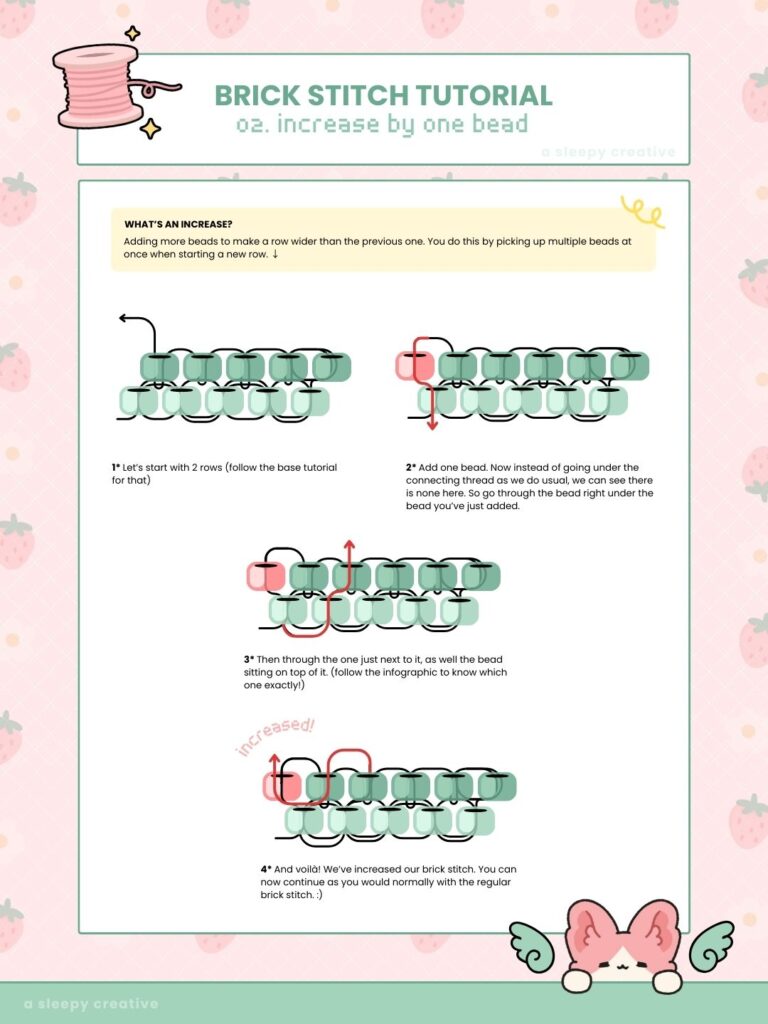
Increase by One Bead in Brick Stitch
The increase brick stitch works by increasing the number of beads on the end of the row, resulting in an even pattern. This technique is essential for creating triangular shapes, adding width to patterns, or designing pieces that gradually grow larger.
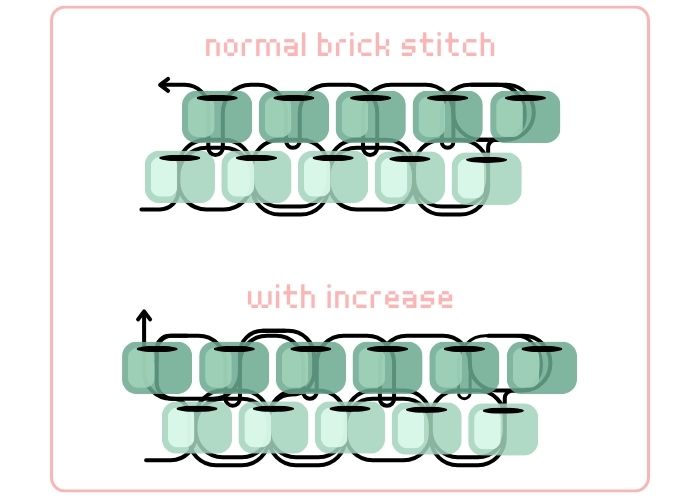
→ The result of a single bead increase in brick stitch. Notice how the top row has 6 beads while the bottom row has 5 beads – that’s your increase of one bead. We’ll learn how to make increases of one bead and multiple beads. 🙂 Soo, now, let’s learn how to make it!

Step 1. Let’s start with 2 rows (follow the base tutorial for that)

Step 2. Add one bead. Now instead of going under the connecting thread as we do usual, we can see there is none here. So go through the bead right under the bead you’ve just added.
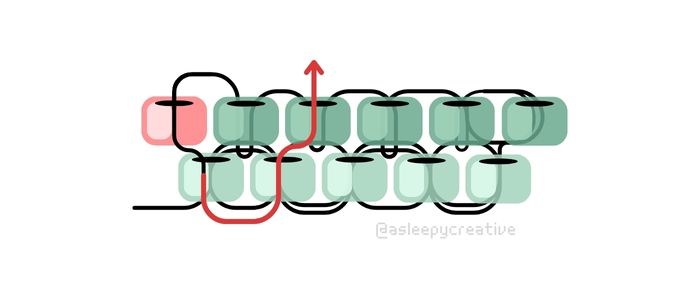
Step 3. Then through the one just next to it, as well the bead sitting on top of it. (follow the infographic to know which one exactly!)
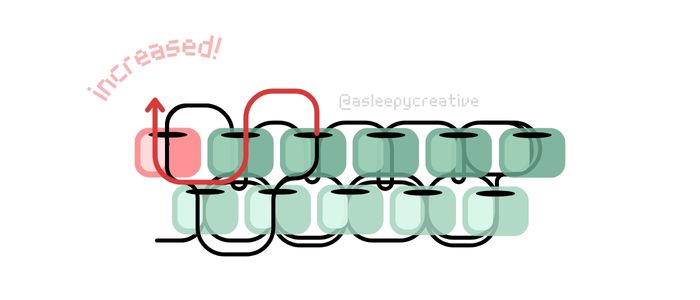
Step 4. And voilà! We’ve increased our brick stitch. You can now continue as you would normally with the regular brick stitch. 🙂
Infographic
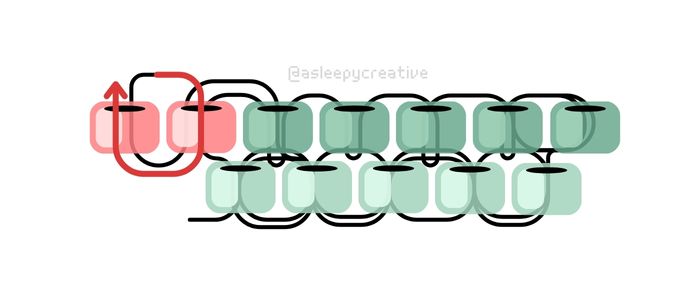
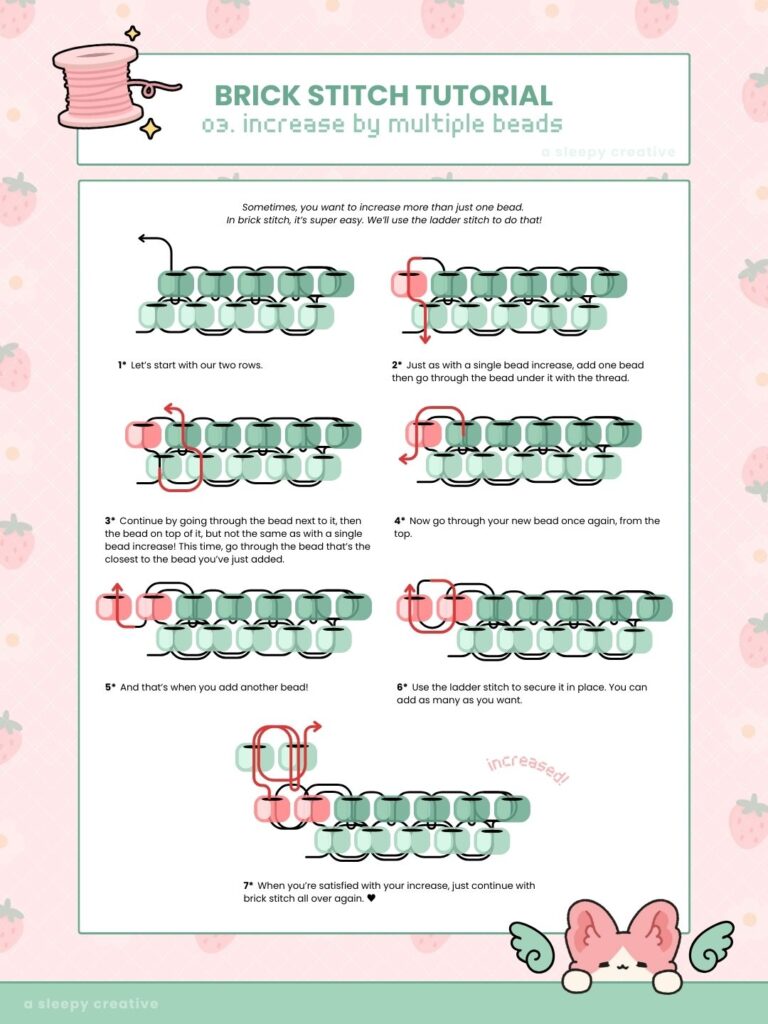
Increase by Multiple Beads in Brick Stitch
Step 1. Let’s start with our two rows.
Step 2. Just as with a single bead increase, add one bead then go through the bead under it with the thread.
Step 3. Continue by going through the bead next to it, then the bead on top of it, but not the same as with a single bead increase! This time, go through the bead that’s the closest to the bead you’ve just added.
Step 4. Now go through your new bead once again, from the top.
Step 5. And that’s when you add another bead!
Step 6. Use the ladder stitch to secure it in place. You can add as many as you want.
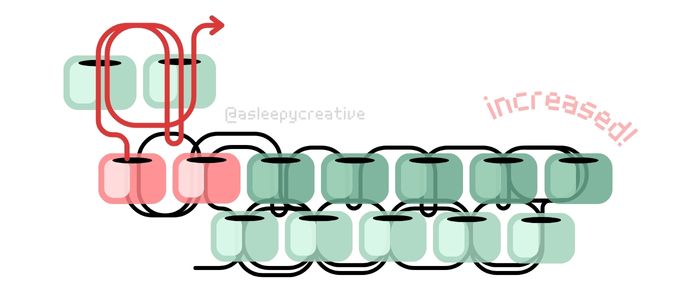
Step 7. When you’re satisfied with your increase, just continue with brick stitch all over again. ♥
Decreases in Brick Stitch
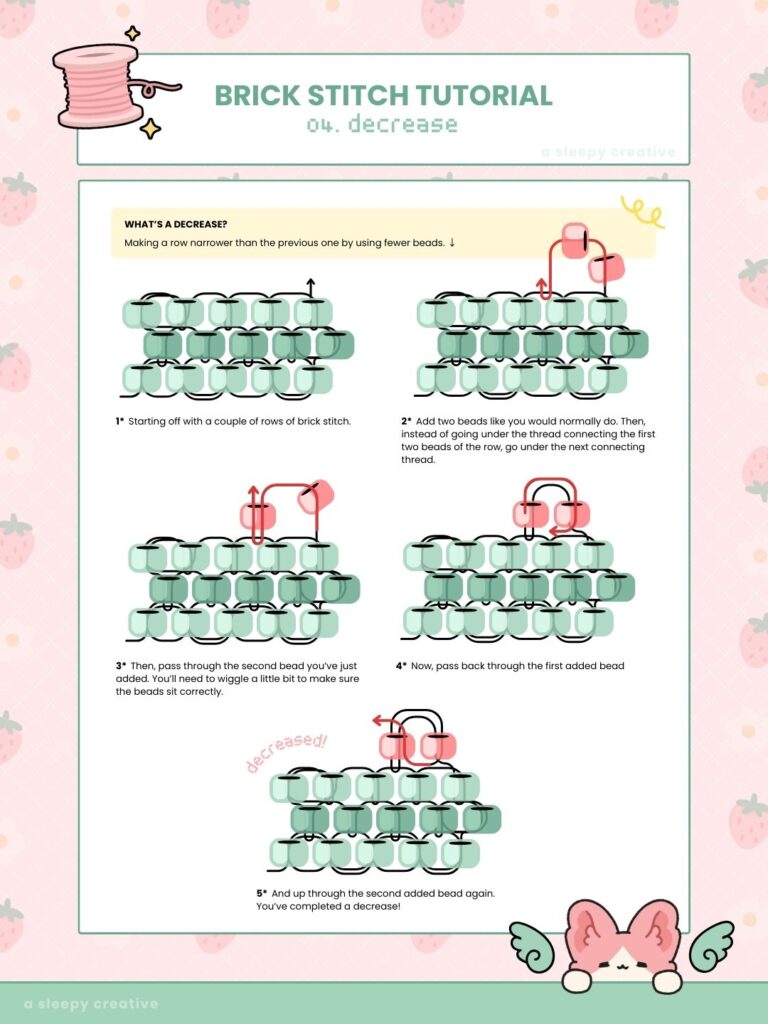
Decreasing in brick stitch allows you to make your rows narrower than the previous ones. This technique is essential for reducing width in patterns, or designing pieces that gradually grow smaller!
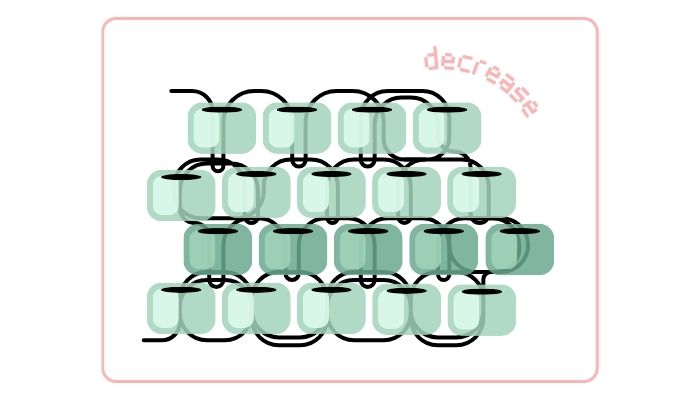
→ The result of a decrease in brick stitch. Notice how the top row isn’t as wide as the previous rows! Let’s learn how to make it!

Step 1. Starting off with a couple of rows of brick stitch.
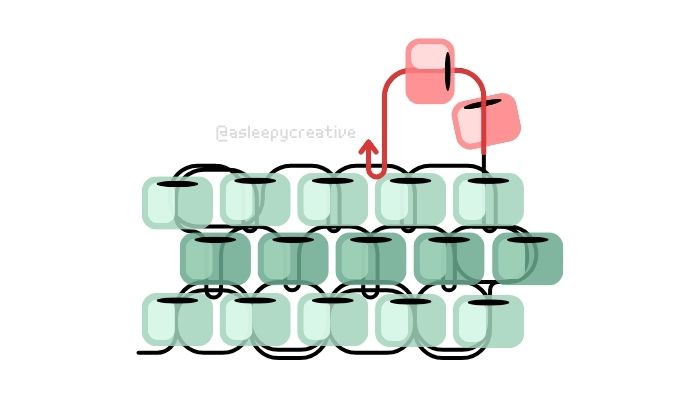
Step 2. Add two beads like you would normally do. Then, instead of going under the thread connecting the first two beads of the row, go under the next connecting thread. (skipping the first position)

Step 3. Then, pass through the second bead you’ve just added. You’ll need to wiggle a little bit to make sure the beads sit correctly.
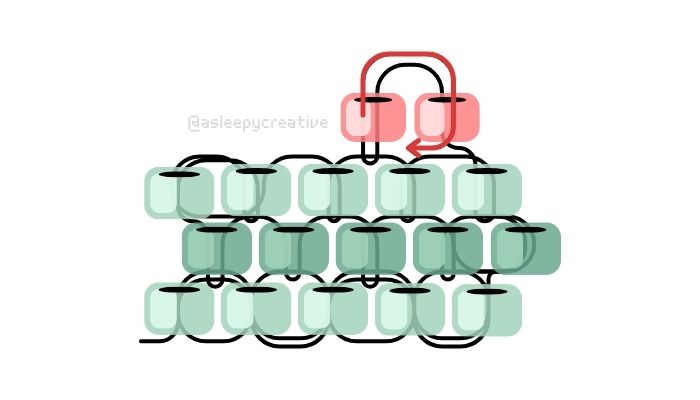
Step 4. Now, pass back through the first added bead
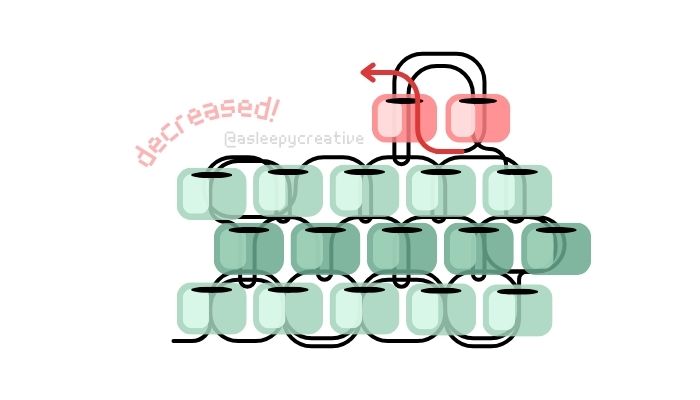
Step 5. And up through the second added bead again.
You’ve completed a decrease!
Infographic
Tips and Troubleshooting
Planning Your Work
Pick your starting row carefully – usually the longest or most central row is your best bet. If you’re making something complicated with lots of different sections, work the middle part first, then finish one whole section before moving to the next area.
For stuff with multiple parts sticking out (like making bat wing earrings), start from the longest center row and work your way outward. And you can totally flip your pattern upside down or sideways. There’s no “right way” to orient it, so just do whatever feels easier for you.
Getting the Right Stiffness
Want your work to be stiffer? Try switching to thicker thread or using Fireline – both will give you more structure. If your piece feels wobbly after you finish it, you can always go back and reinforce it by adding extra thread passes through the beads. Those optional reinforcement steps I mentioned in the tutorial? They’re super helpful for making everything feel more solid.
For stuff like keychains that really need to hold their shape, try making a piece with both a front and back side. You can even stuff something between them to give it some cool dimension!
Tension Troubles
Don’t stress too much if your tension isn’t perfect when you’re starting out. Yeah, you want to keep it even throughout your work, but honestly, this is something that just comes with practice. The more you bead, the more natural it becomes.
Thread Management
When you need to jump over multiple beads, go down through one bead, create your thread bridge, then come up through the target bead. Always plan your thread path to go through beads rather than creating visible bridges
Shaping Techniques
- Adding extra beads to sides = increases
- Removing beads or tapering = decreases
- You can work increases and decreases in the same project for complex shapes
Why Brick Stitch is More Difficult for Pixel Art
While brick stitch creates beautiful geometric patterns, it’s not ideal for replicating pixel art designs. A pattern that could be used for square stitch (beading) or cross stitch (thread) will need to be adjusted and will give off a completely different vibe than the original design.
Grid Alignment Issues
- Brick stitch’s offset pattern means beads don’t align in perfect vertical columns
- Each row is shifted by half a bead, disrupting the pixel grid
- Colors don’t stack directly above each other like pixels on a screen
Pattern Translation Challenges
- Digital patterns need adjustment to account for the brick offset
- Fine details become distorted due to the staggered alignment
- Sharp horizontal lines become zigzag patterns
- Pixel art’s rigid grid structure doesn’t translate well to brick stitch’s flowing brick pattern
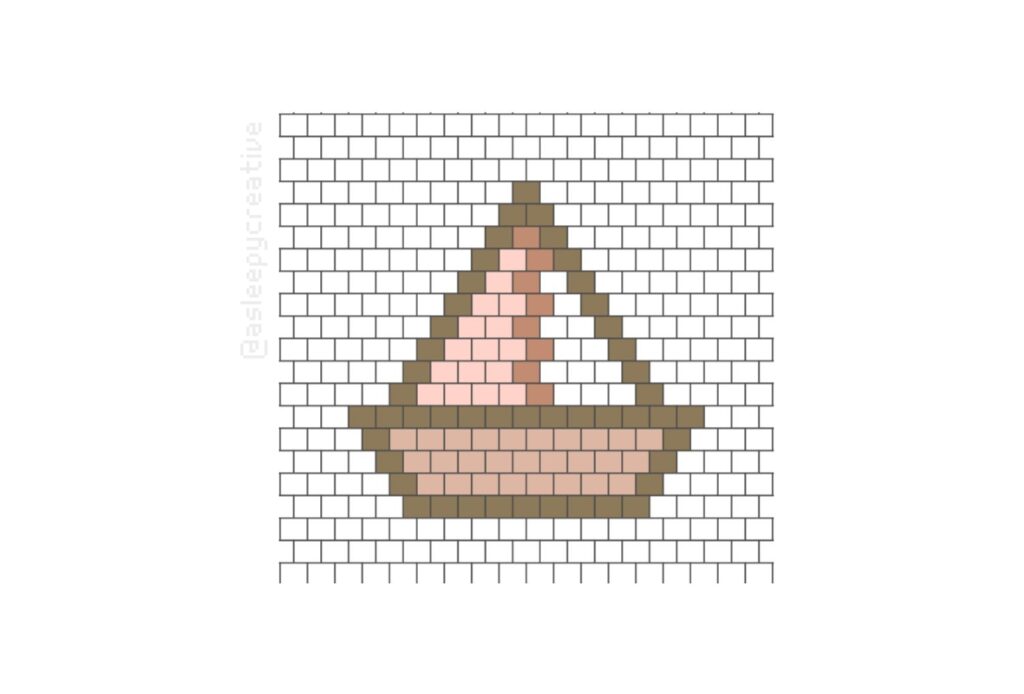
But so many things are achievable with brick stitch, even in terms of pixel art. It’s just a whole new way of designing it that you should take into consideration. Here’s one examples:
With time, you’ll identify how to work with brick stitch and what you can achieve.
Brick stitch opens up a world of creative applications for making stunning beaded accessories. You can craft unique items like earrings, bracelets, and rings. My favorite thing to craft is probably keychains and bracelet (I think brick stitch bracelet are just super cute).
In my opinion, brick stitch and peyote shine best for angular work like triangle and diamond shapes:
But once you get the hang of it, you can make believable more organic shapes as well. You just need a little bit of practice!
If you take my Eevee example from earlier:
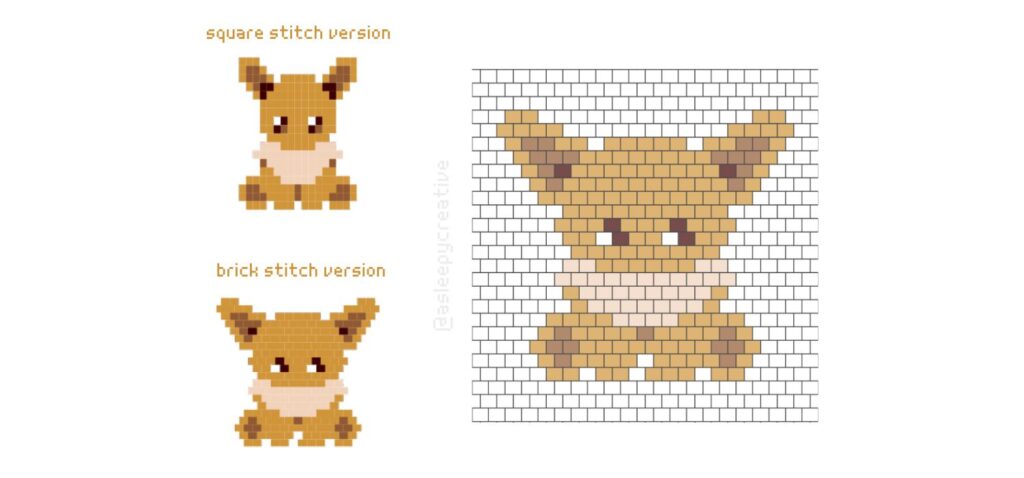
Eevee is clearly not a shape you’d imagine in brick stitch, due to the offset of the grid. Since Eevee is an animal, we imagine much rounder lines than brick stitch is able to give us. It’s hard to give proper round shape, and you have to work around and find tricks to make it work (and there are a lot!). But once you’re used to it (or if you buy patterns), it actually looks quite nice.
1×1 pixel art will always look better for this kind of piece in my opinion, but as time goes by, I fall more and more for brick stitch/peyote shapes and patterns. I find them full of personality.
Materials for Brick Stitch
Thread
Brick stitch creates beadwork with good solid quality, but this strength comes from the thread bridges doing most of the structural work. You need thread that can handle the stress of supporting beads from connection points rather than passing through bead holes.
Thread Considerations for Brick Stitch
- Slightly thicker thread than peyote and square stitch since you’re not passing through tiny holes repeatedly
- Must maintain consistent tension to keep brick pattern even
- Choose thread color carefully since thread bridges can be more visible
- Thicker thread = stiffer end work!
Top Thread Recommendations
- Fireline 6lb-8lb (0.20-0.25mm): Excellent for most brick stitch projects, strong enough for the thread bridge connections
- Nymo Size D (0.30mm): Traditional choice, good for larger beads and structural pieces
- KO Nylon Thread (330dtex): Very smooth for multiple passes under thread bridges
I tried all three of them and the choice you’ll end up with will purely depend on your preferences and the stiffness you want your project to have. They’re all good!
Needles
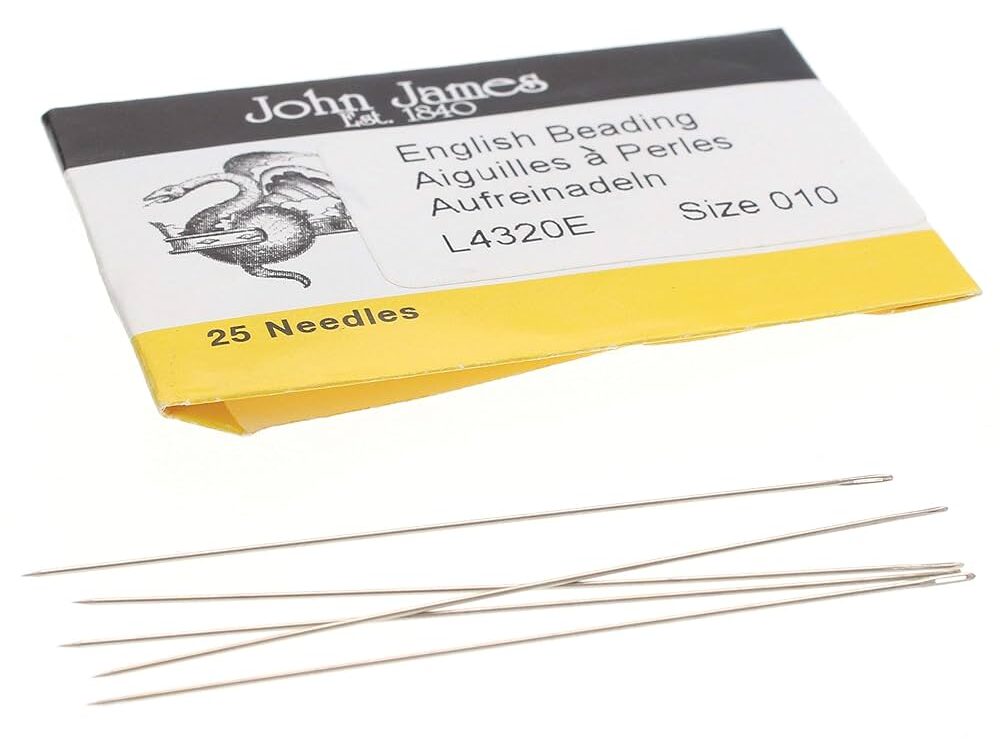
Size 10 to 12 needles work well for brick stitch, and your choice depends on your bead size and thread combination:
- Size 12 needles: Thinner, for small beads, good for multiple passes
- Size 11 needles: Best all-around choice for size 11/0 beads
- Size 10 needles: Thickest option, 11/0 beads and larger

- MADE IN ENGLAND: The name of John James Needles is recognized by needle crafters around the globe and is renowned for qu…
- QUALITY: Made of steel, the #10 needle measures 55mm in length and 0.46mm in diameter. They come in a pack of 25.
- THREADING: The stiff needle is very fine, long and straight, with long eyes made for keeping thread in place while worki…
In my case, I use Miyuki Delica beads with 0.2 to 0.3 thread and I use either a needle size 10 or 11.
Beads
The choice of bead for brick stitck reflects exactly the same as for square stitch. Since round seed beads are, by definition, round, they give a softer look to your piece. If they’re uniform in size, it’s perfectly okay to go with round seed beads and will still look really good. But uniformity is definitely a key point when you choose your beads for brick stitch.
Cylindrical beads work best for brick stitch because of their shape and uniformity in size. And as I said, the consistent sizing is crucial for maintaining the brick pattern’s regularity.
Advantages of Cylindrical Beads
- Nearly square profile
- Sharp and clean edges, giving crisp lines
- Consistent size
- Large holes compared to seed beads, which allows multiple passes

- [UNIFORMITY] Miyuki Delica Glass Seed Beads Size 11/0. Miyuki Delica beads are known for their perfect tube shape and ex…
- [SIZE] Size: 11/0 – these TINY seed beads measure 1.6mm with a 0.8mm Inner Hole Diameter. Size 11/0 is the most popular …
- [QUANTIY] 3 TUBES each containing 7 Grams of Miyuki Delica glass Seed beads. Each tube measures 2 x 9/16 Inces and conta…
Good quality cylindrical beads are totally worth it – you’ll see the difference in how neat and professional your finished pieces look, especially with square stitch where everything’s so visible.
You can grab Chinese cylindrical beads from sites like AliExpress too. I’ve used them and they’re decent enough. The sizing is pretty consistent and there are tons of colors to choose from. Just heads up though:
- They break way easier than the good stuff like Miyuki or Toho
- Color matching is hit or miss – order the “same” color twice and you might get two totally different shades
- The coating scratches off pretty easily
They’re great if you’re just starting out or don’t want to drop a bunch of money right away to see if you’re actually into beading!
Cylindrical vs Round Seed Beads
- Miyuki Delicas/TOHO Treasures: Create crisp, architectural lines perfect for structured designs
- Round seed beads: Softer, more organic look but less precise alignment
- Size considerations: 11/0 Delicas are the sweet spot for most brick stitch projects
Brick Stitch Applications and Project Ideas
As I wrote previously, there are tons of projects you can start with brick stitch. Also, a lot of what you can do with brick stitch can be done with peyote stitch! Both stitches are extremely similar in look, even though different in construction.
Projects Ideas
- Geometric drop earrings
- Heart, diamond shapes
- Origamis
- Letters, papers, notes
- Square/rectangular bottles of all sorts (potions…)
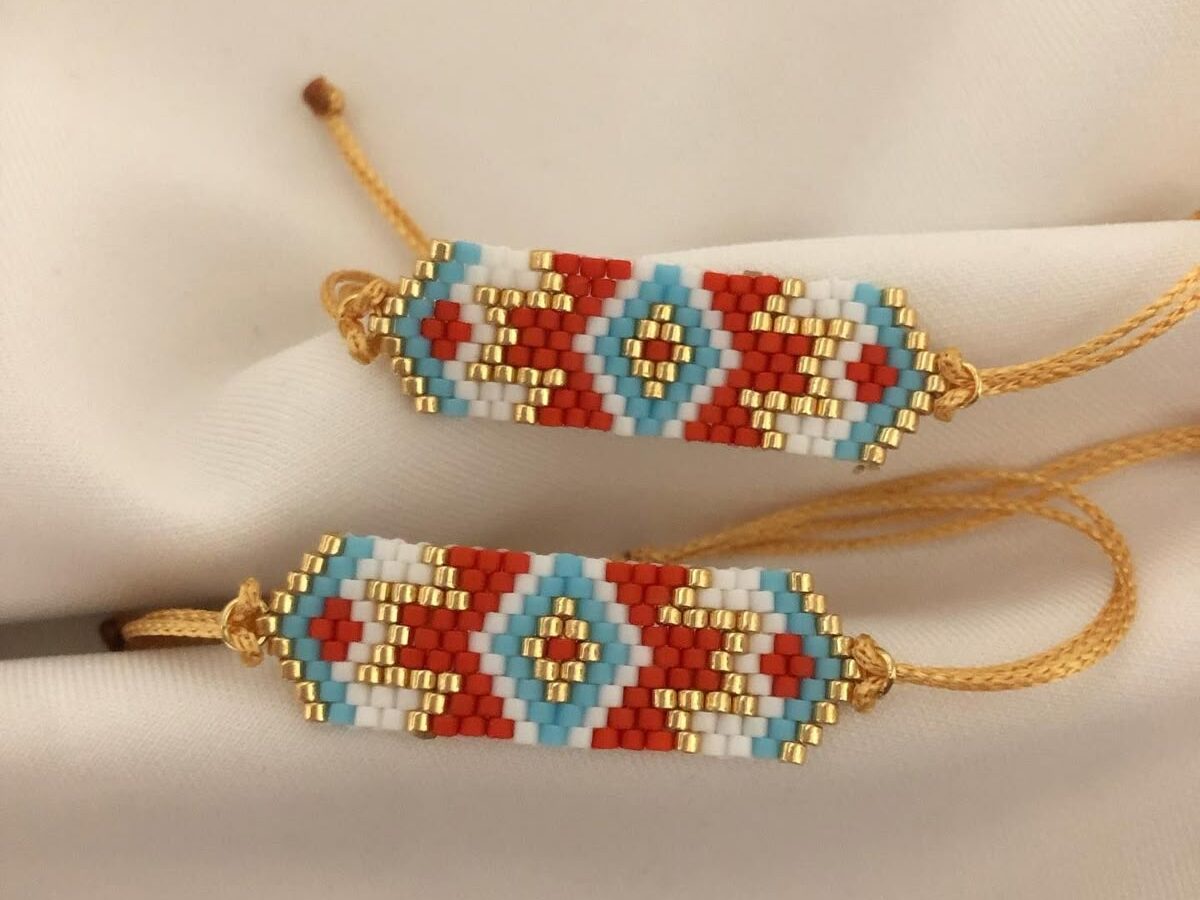
- Bracelets (I LOVE brick stitch bracelets, they’re SO cute – if you want to see what I’m talking about, check out Pinterest!)
- Cute animals (when you’re a bit more experimented with pattern designing or if you buy patterns)
- and as much as your imagination allows, actually ♥
You can find many paid patterns on Etsy if you want to start your first project. Soon, I’ll also add patterns for free on the blog as well, so you can wait for that if you want. 🙂
Wrap-Up
Brick stitch has definitely earned its place in my heart – it’s actually much faster than square stitch, too. So I’m happy about it lol. Where square stitch gives me those perfect pixel art translations, brick stitch delivers structure and dimension that’s honestly pretty satisfying. My square stitch never lays perfectly flat and my thread is always a tad visible. But this is not a problem I encountered with brick stitch.
The learning curve felt steeper than square stitch at first – mainly because of getting used to working with thread bridges instead of going through beads. But once I got the hang of the foundation and the rhythm of hooking under those thread bridges, it became surprisingly meditative and fast.
I’m already planning out some brick stitch earring patterns to share on the blog soon. I’m so excited about it already aaah.
Next up on my beading journey? I’m finally ready to tackle peyote stitch. From everything I’ve learned about brick stitch, peyote seems like it’ll be the perfect complement. And I’ve read that peyote stitch is extremely versatile, so I’m excited about it. The fact that they’re basically siblings (just turned sideways from each other) makes me think the transition should be pretty smooth. (maybe i’m wrong to think this way lol)
I’ll see you soon I hope! ♥