
Hello hello!
I’m back again with another article about my current obsession: beading! So, remember those beaded spheres I’ve been making? I created an article not so long ago to let you guys know how to make one (and to keep a tutorial for myself as well for future reference, lol)
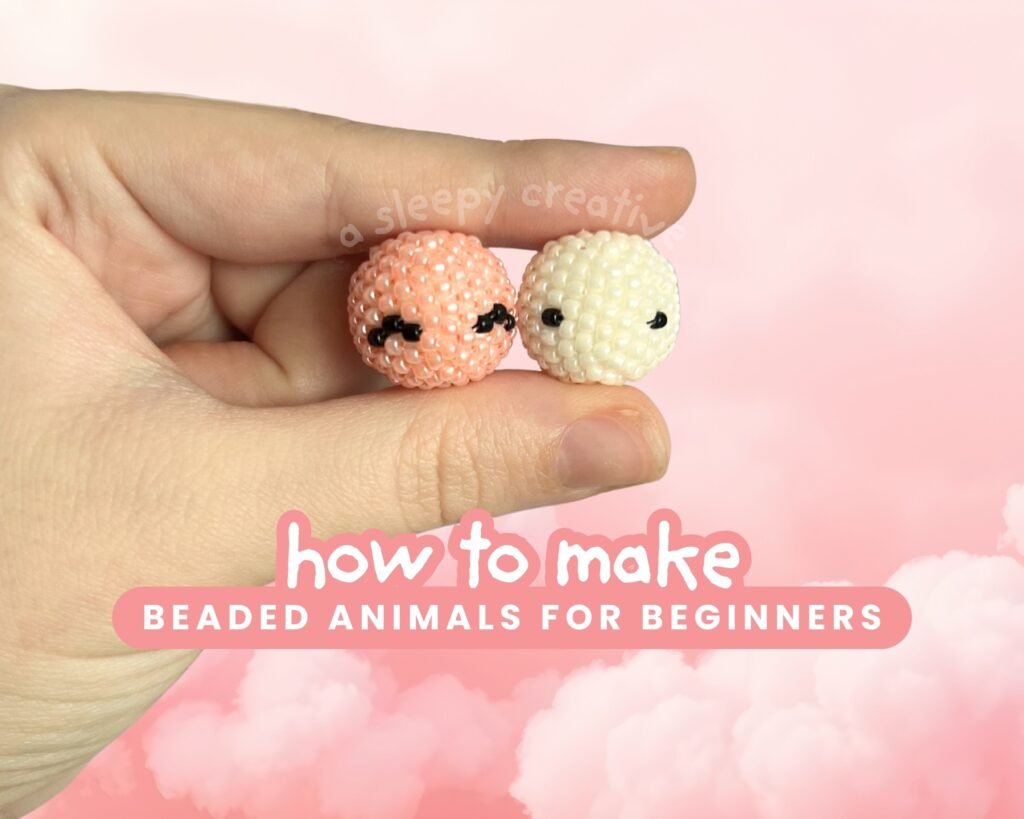
Anyway, I wasn’t just making them for fun. I was actually working up to my first beaded animal! I’ve been willing to try it out for a while, after seeing many beaded animals all over my Pinterest feed.
But they mostly use RAW stitch, which I haven’t learned yet – so I had to improvise!
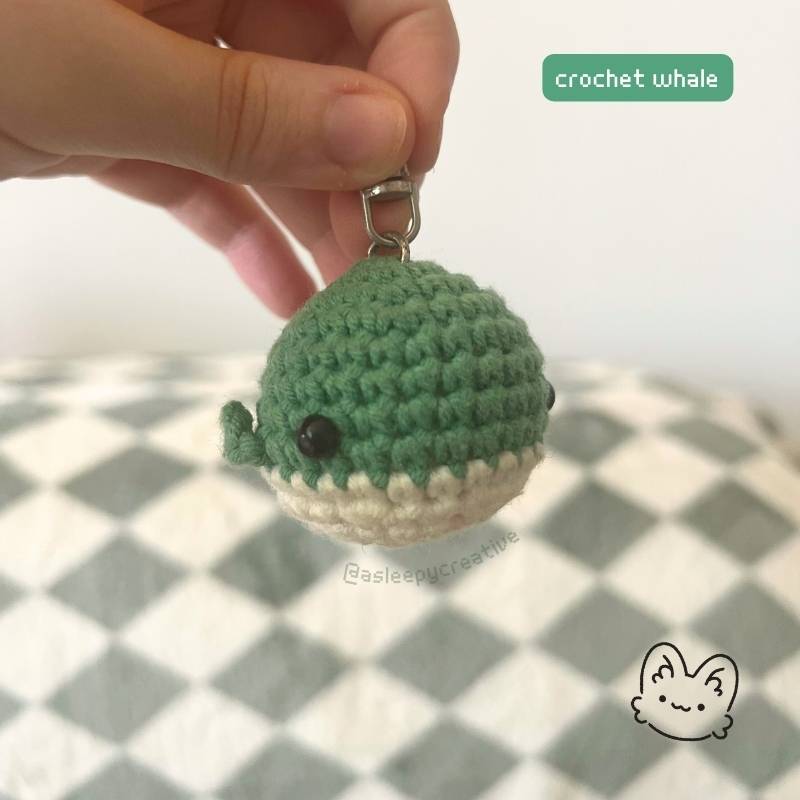
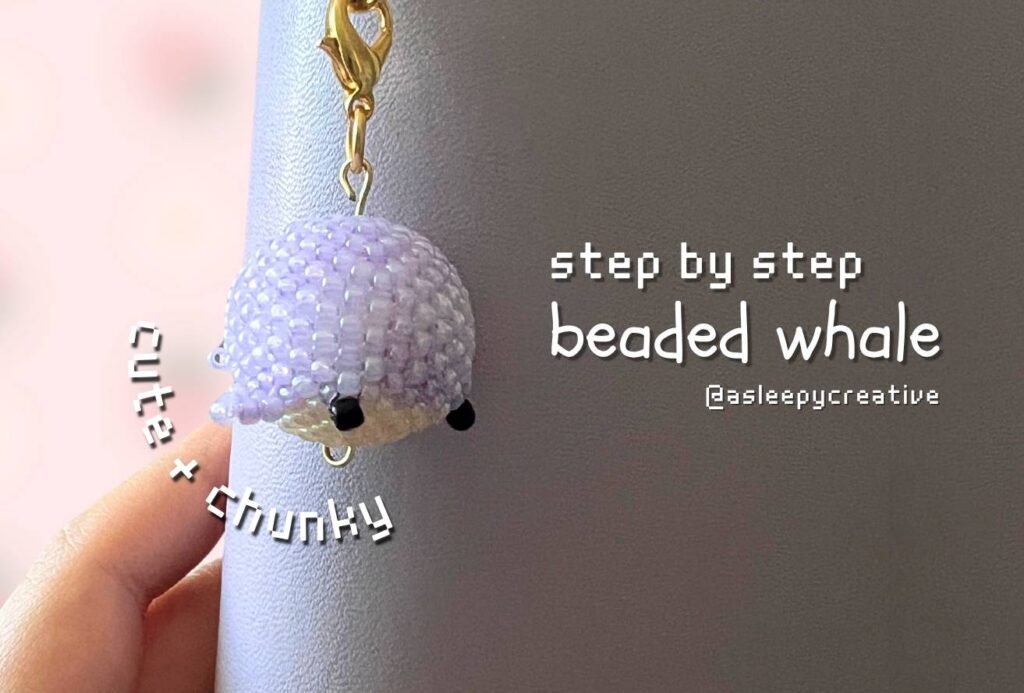
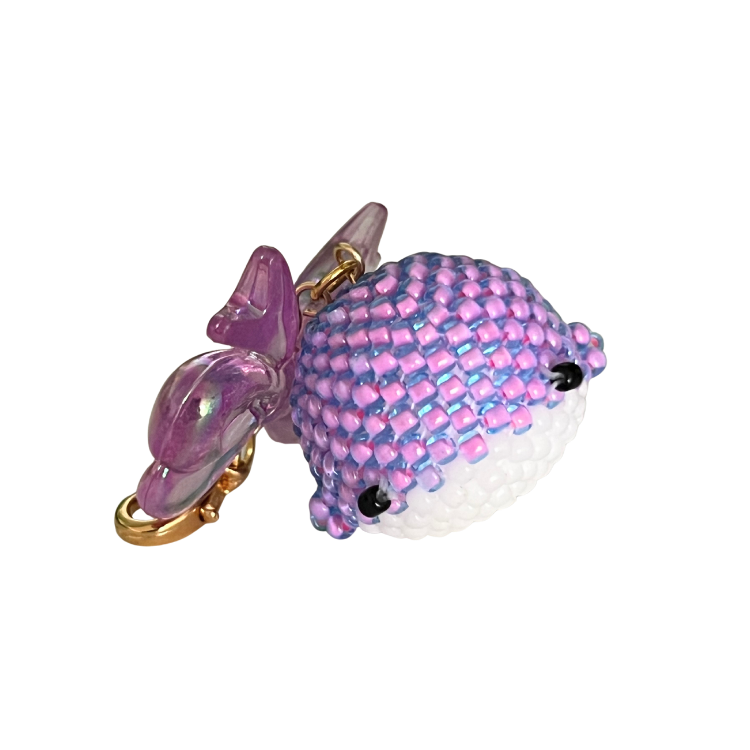
I’ve had this crochet whale for the longest time, and after learning how to craft a beaded sphere, I wanted to create the same chunky little whale. Round shape just like the beaded sphere, plus adding a couple of details, doesn’t seem too difficult, right? And it’s not! it just requires patience and attention to detail, I’d say.
To be honest if you can make a beaded ball following my previous tutorial, you can totally make this whale. It’s just a slightly different ball – less perfectly round, more whale-shaped with a flatter bottom; plus some cute little fins, a tail, and eyes.
This was my very first beaded animal, so if you’re also starting out, we’re in this together! Yes, there were some struggles (tension is still not easy to control, and attaching those fins without them looking wonky took some trial and error), but the end result? SO worth it.
This is a difficulty level 2 project – meaning you should be comfortable with basic circular peyote stitch first. If you haven’t made a beaded ball yet, I’d recommend checking out my beaded ball tutorial before diving into this one. But if you’re ready? Let’s make a whale!
Materials
- 16mm to 20mm bead
If you don’t have a bead of that size, you can make it yourself (like I did)! You can use clay, aluminimum, plastic wrap, or anything similar that will hold the shape. - Beading thread – max 0.2mm thickness
Whale’s body: 55 inches of thread (140cm)
Fins: 2x 11 inches thread (around 30cm)
Tail: 15 inches thread (around 40cm)
In my case, I used KO beading thread (330dtex) but you can use any as long as it is not too thick! I’ve also found this Aliexpress alternative. Note: Nowadays (in 2026) I only use Fireline Crystal 6 or 8lb for all my projects. - 11/0 beads
For this project, I used toho 11/0 round seed beads (Amazon) / (Aliexpress). You can use any beads that are around 2mm.
I’m using 2 colors: purple, and off white. You can use the colors of your choice! - x2 3mm black beads (for the eyes)
but you can also choose smaller ones (2mm)! - Beading needle
I personally use a 11/0 beading needle for most of my beading work, but if you don’t have any, I recommend buying a pack with sizes 10, 11 and 12. 🙂
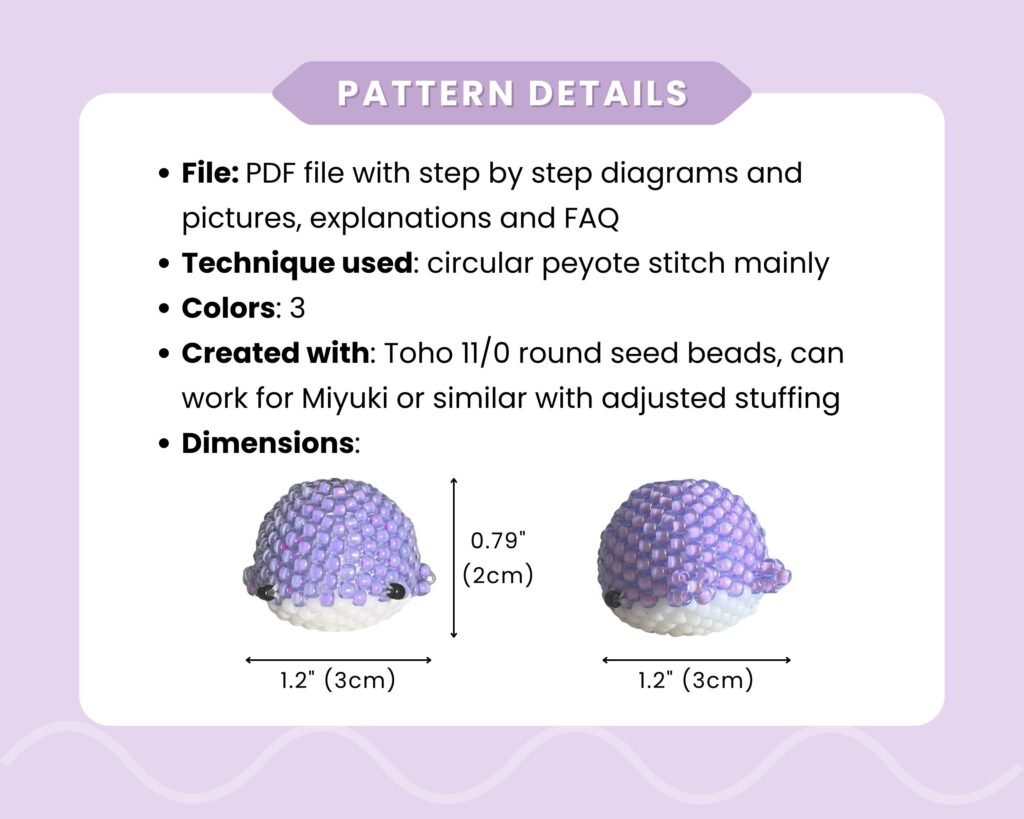
About the Pattern
Make sure you take note of these points before starting to work on your whale! It’s important for the understanding, as well as the success of the project.
Through the whole work:
- Maker sure you know about the basics of peyote stitch! If you don’t know anything about it, the pattern might be harder to follow.
- Always end by passing through the first bead added in the round you’re working on.
- If you get confused, trying orienting your work the same way I do on the pictures / diagrams. You’re free to rotate your work as much as needed!
On the pictures:
- Pink border on beads = beads added during the current round
- Pink strokes = skip (decrease)
Premium version:
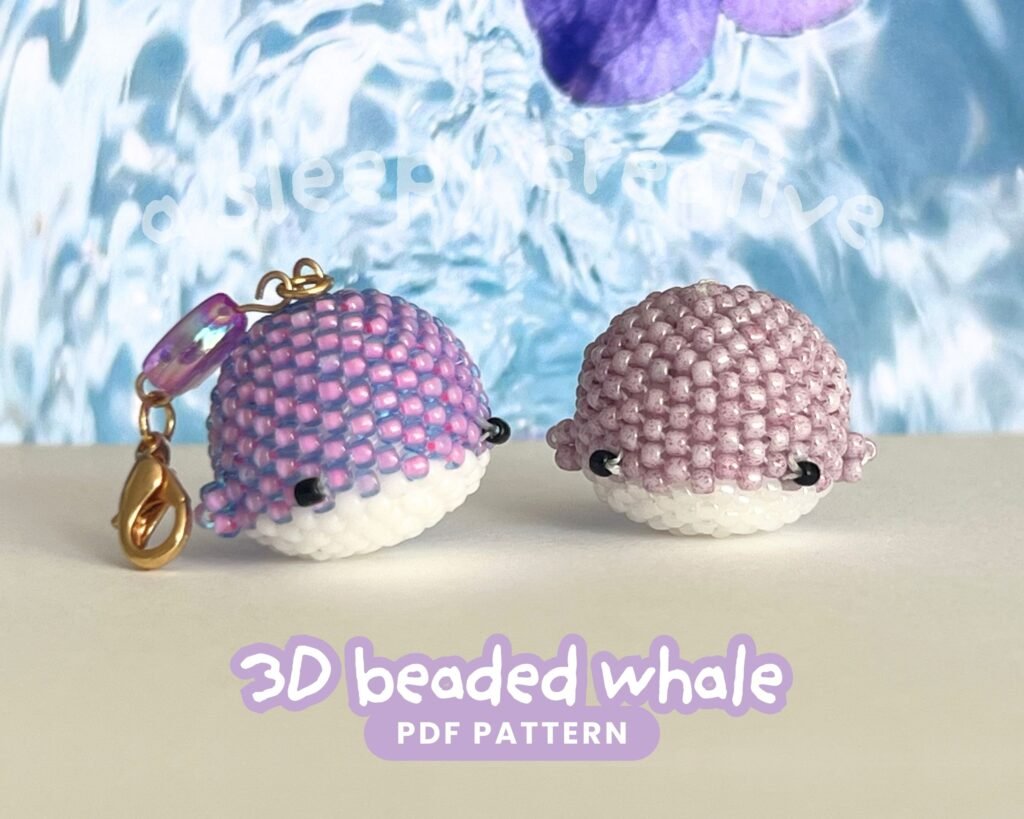
An upgraded version of the whale is now available on my recently opened Etsy shop! ♥
I’ve recently released a premium version on Etsy with structurally improved fins/tail and enhanced attachment methods for a sturdier finished piece, plus full diagrams for each step of the craft!
Beaded Whale Tutorial Step by Step
1. The Body
For the body, you’ll need your longest thread (55 inches), as well as your 11/0 beads (or 2mm) in both colors chosen, and your beading needle.
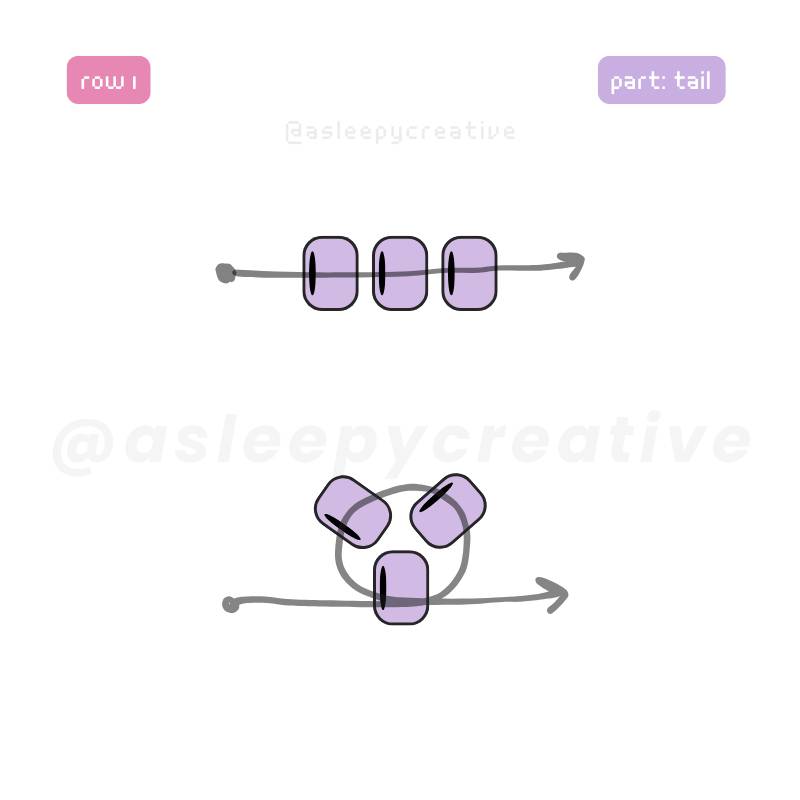
Row 1
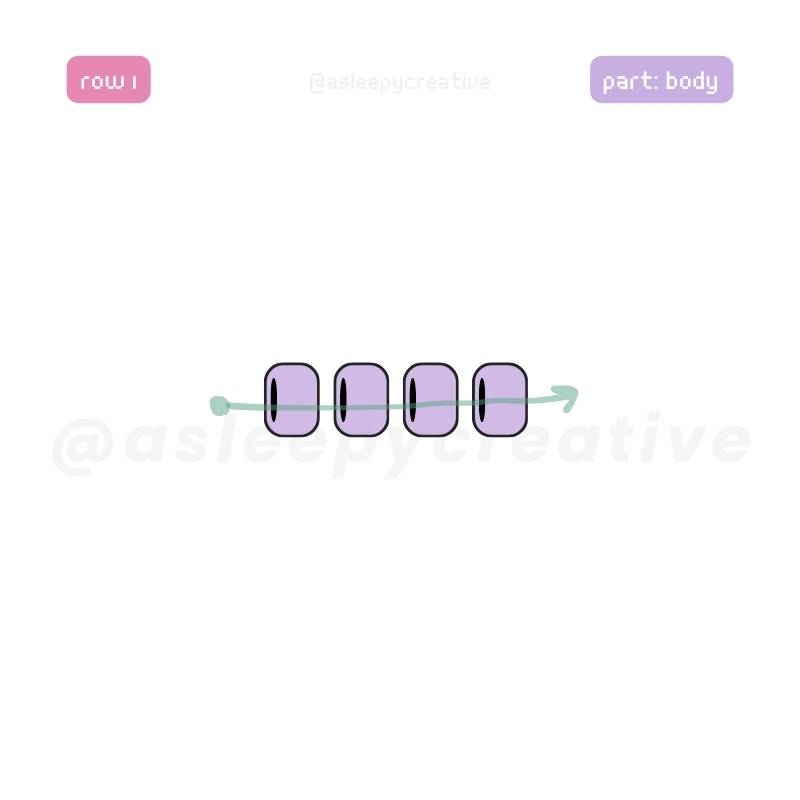
To start buildinging your whale’s foundation, pick up 4 beads and thread them on your needle
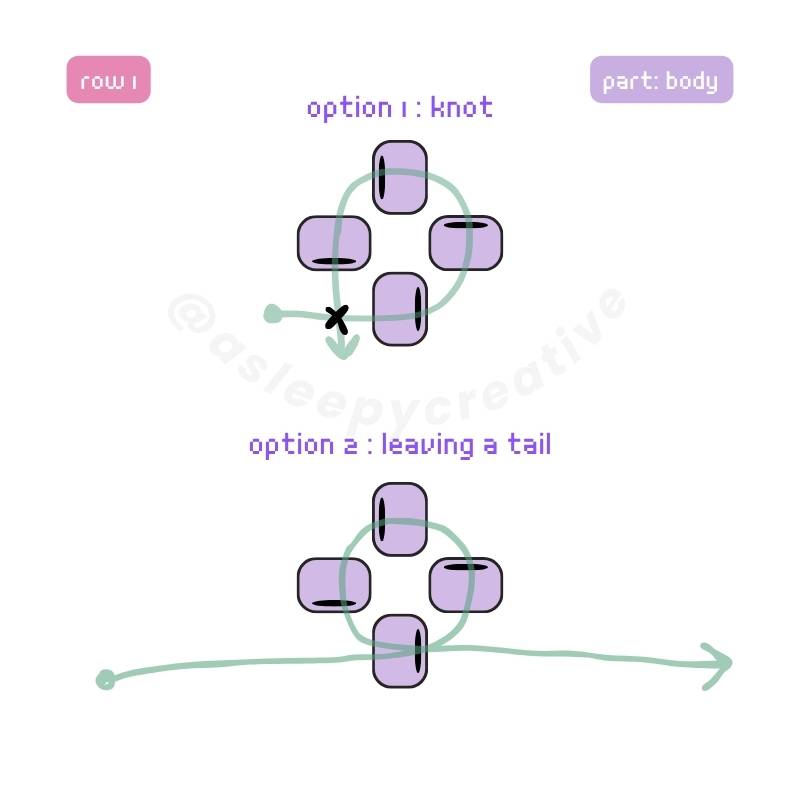
From here, you have two choices: either you tie a knot (a surgeon’s knot is very secure and will go a long way), or you leave a tail (the tail should be long enough to be weaved in the final work at the end).
There are pros and cons for both methods. Leaving a tail means you’ll always have the tail bothering you until the end of the work. Leaving the tail to be weaved at the end will be seamless though, while the knot will always be a bit visible.
I chose the knot, but it’s up to you!
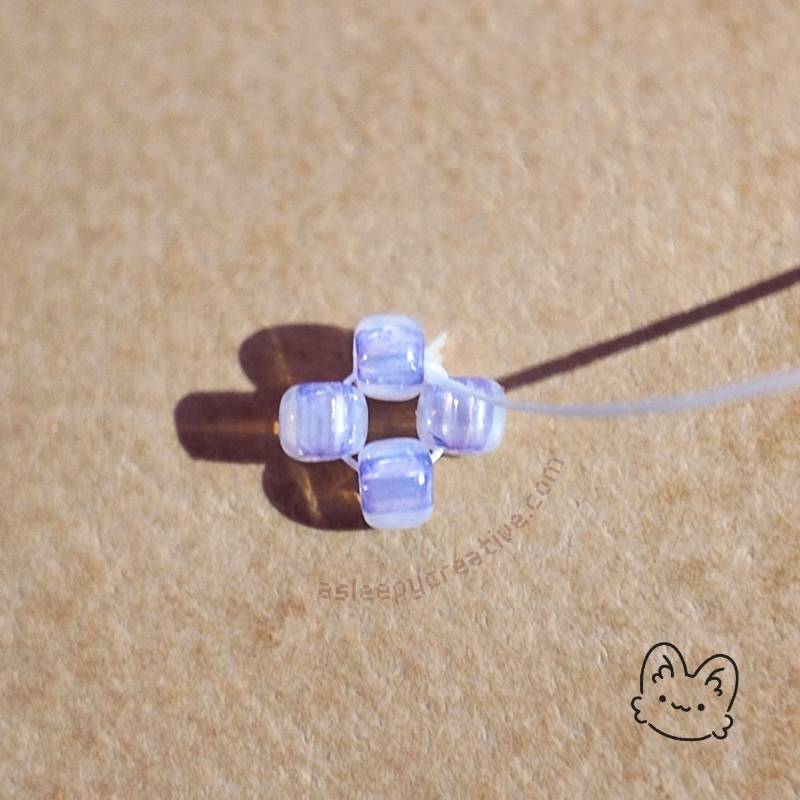
The foundation with the knot, ready to thread more beads!
Row 2
For row 2, we need 4 additional beads. We thread them in between each bead of the previous row (basics of peyote stitch that we will use through out the whole project!)
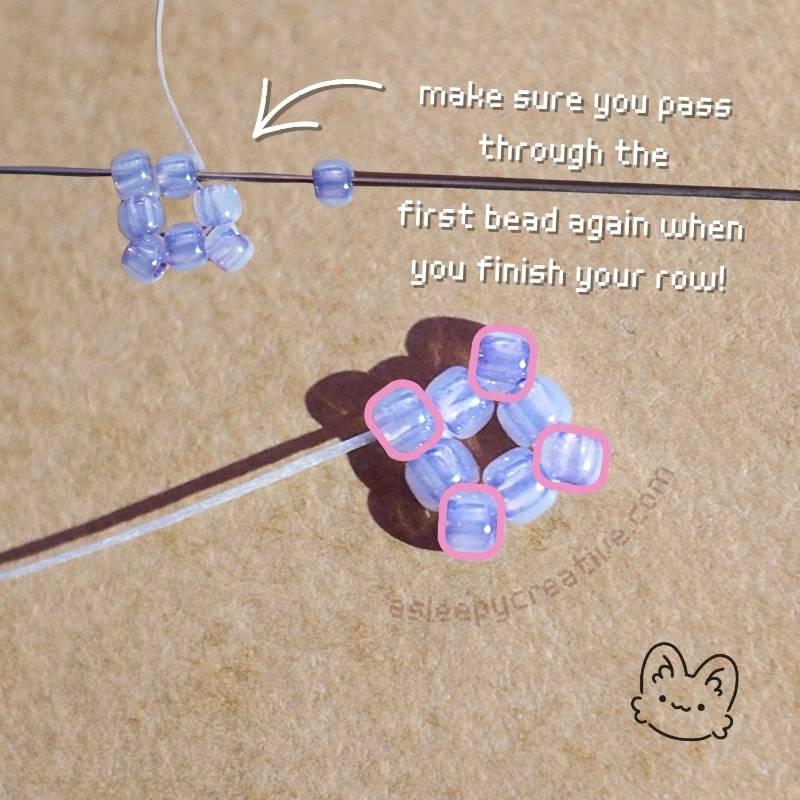
And of course, don’t forget to pass through the first bead added during the row at last. You’ll have to do that during the whole work as precised previously, but I won’t keep repeating it, so make sure it becomes a habit.
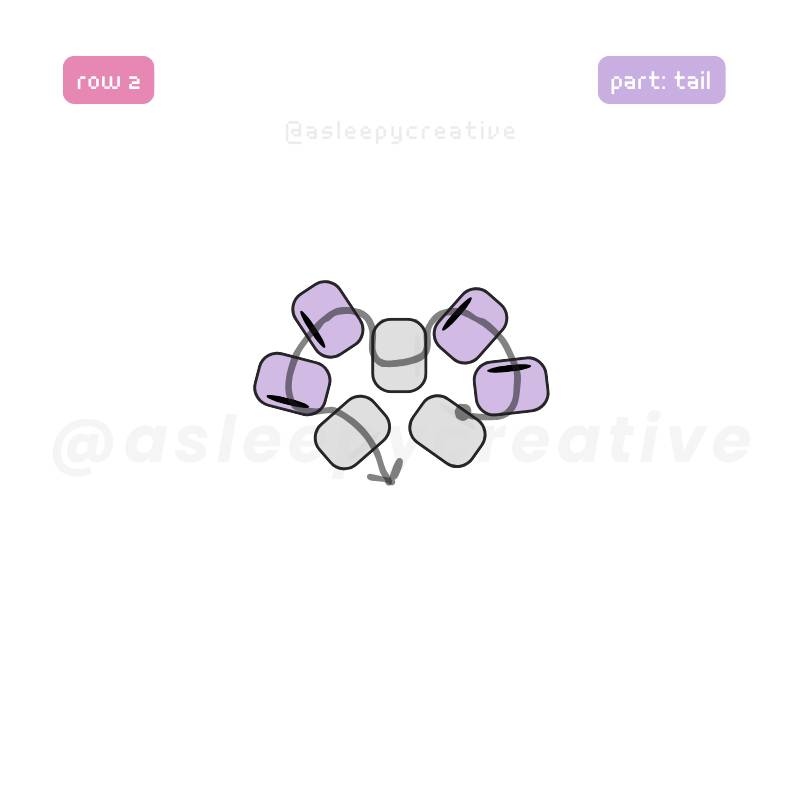
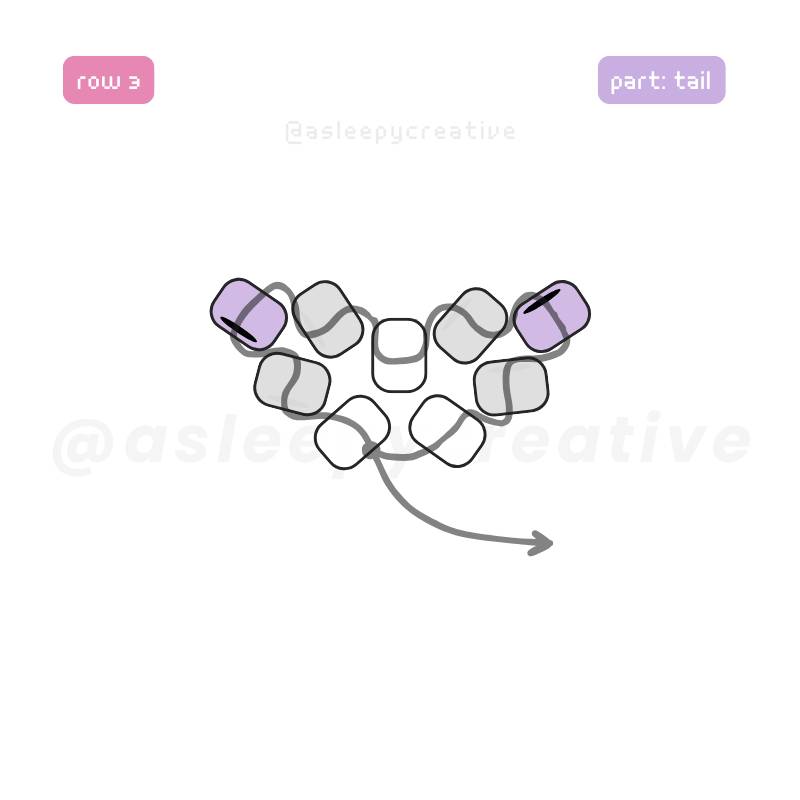
Row 3
Row 3 is our first increase. We go from 4 beads to 8 beads. Instead of threading one bead between each bead of the previous row, add 2. (pattern: 2 – 2 – 2 – 2)
Row 4
Okay, row 4! This is a regular peyote round with no increases or decreases. Simply add one bead between each bead from the previous row, working your way around the entire circumference. You’ll need 8 beads! (pattern: 1 – 1 – 1 – 1 – 1 – 1 – 1 – 1)
Row 5
Work row 5 using the same pattern as row 4, with 8 beads. Pick up one bead, pass through the bead of the previous row, pick up one, pass through, pick up one, pass through… you get the rhythm! (pattern: 1 – 1 – 1 – 1 – 1 – 1 – 1 – 1)
Row 6
Time to make this sphere grow! This round has increases, but not for every spot! The pattern goes 1 – 2 – 1 – 2 – 1 – 2 – 1 – 2 – 1 – 2 – 1 – 2. Identify where the previous increase is, and increase on top of it. Keep going around until you’ve worked all positions. You’ll end up with 12 beads total.
Row 7
Row 7: all single bead across this row! Just work normal peyote stitch, adding a single bead between each bead from the previous round, counting a total of 12 beads
Row 8
Another round just like the last one (row 7) with 12 beads to add. You’ve got this rhythm down now! Work through all positions using the same pattern.
Row 9
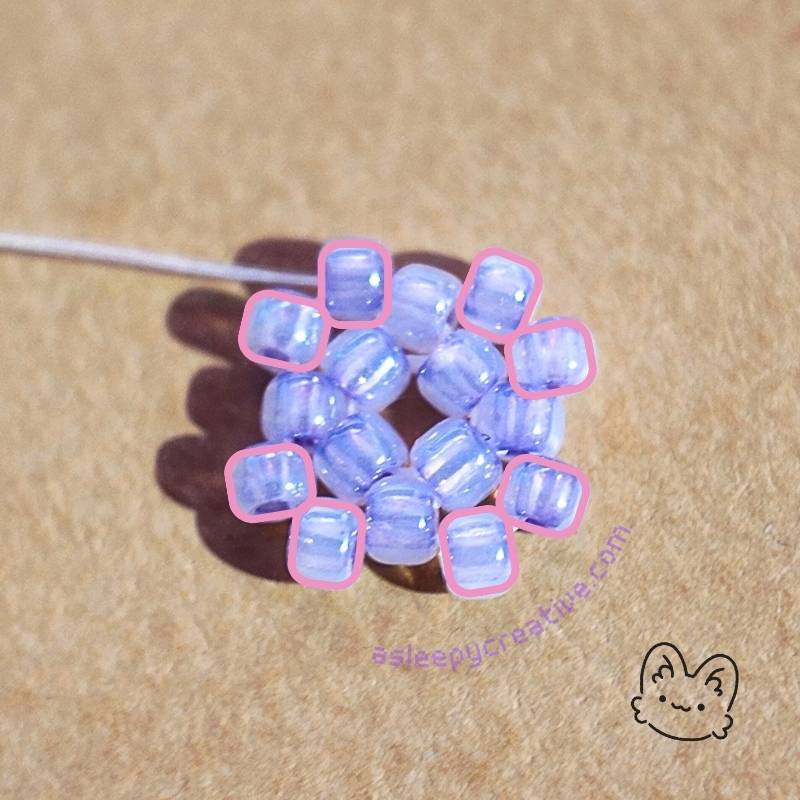
Row 9, the last increase for our little whale! You’ll need to alternate adding 2 beads and 1 bead in each position, as previously. Add 2 beads, then 1 bead, then 1 bead, then 2 again, and repeat this pattern until you have 16 beads. (pattern: 2 – 1 – 1 – 2 – 1 – 1 – 2 – 1 – 1 – 2 – 1 – 1 – 2 – 1 – 1 – 2 – 1 – 1 – )

Row 10
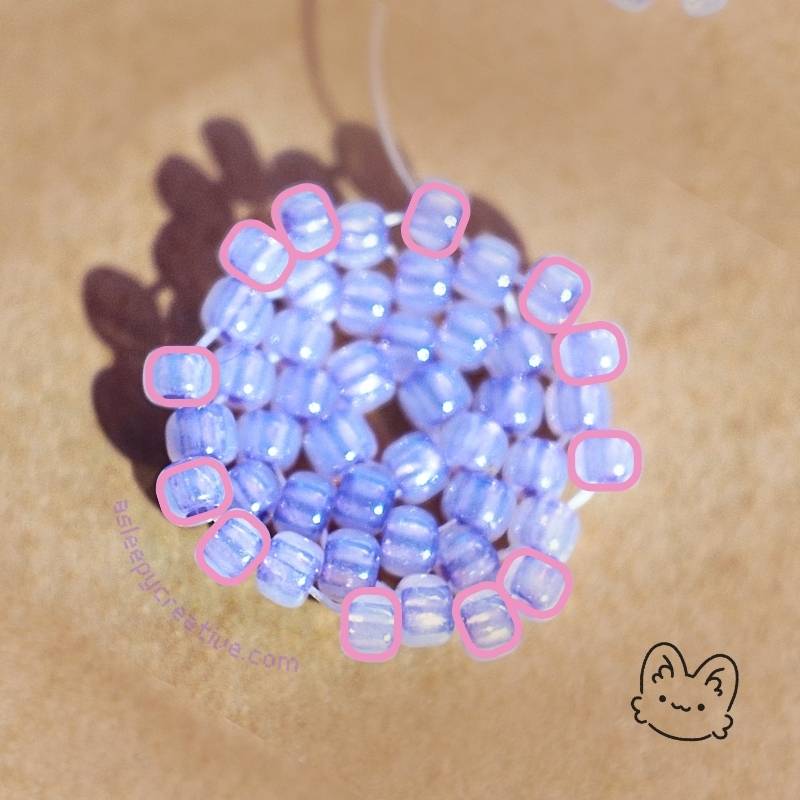
Once again and after all increases, we work our regular peyote stitch by adding one bead in between each bead of the previous row for a total of 16 beads! ♥
You’ll have to work this way without any change to the pattern for the next 8 row (total 9 rows of 16 beads), or more depending on the size of your core bead. Make sure you keep count of your rows!
Row 19
Now that we’re done threading through all our 16 beads rows, we end up at row 19, and it’s time for our first decrease! If you’re at row 19, decrease where you prefer. If you’re at row 20 or another even number, decrease on top of the previous increases (stacked). You’ll end up with 12 beads and a successful decrease!
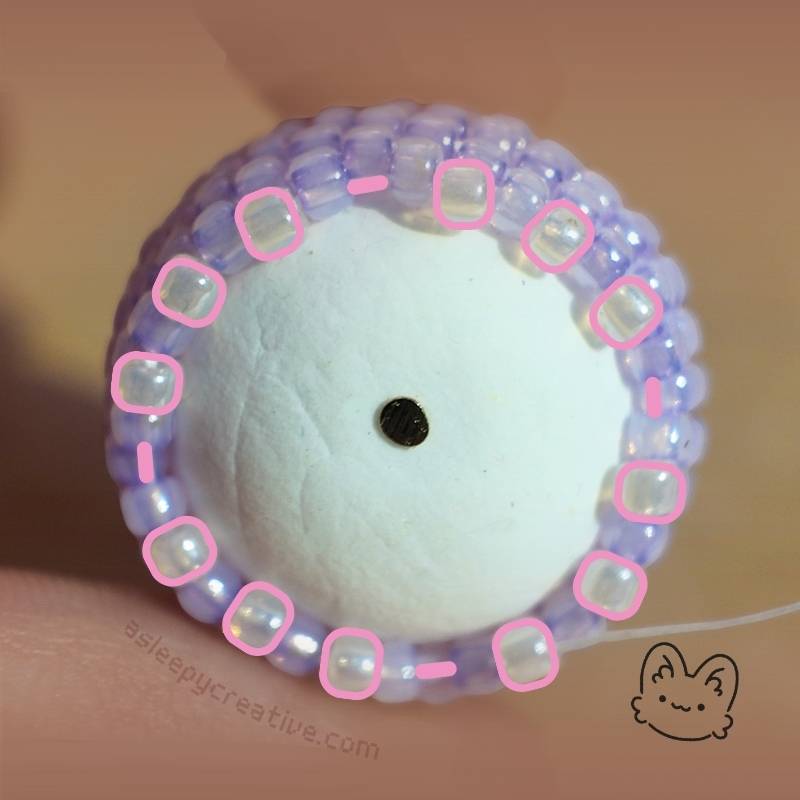
- Again and as always, don’t forget to end by passing through the first bead you added during the row!
- This decrease can not be stacked on top of the previous increases because of the odd number of rows. Just decrease where you see fit!
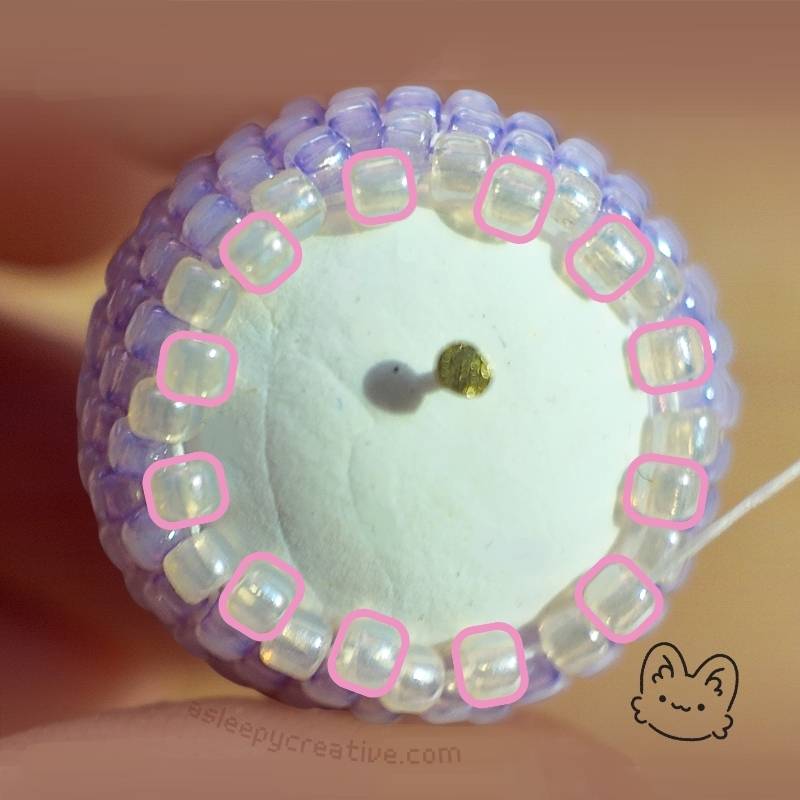
Row 20 & 21
Roww 20 & 21 are regular rows of +1 bead between each bead of the previous round, working all the way round.
Row 22
And it’s time for the second decrease! You’ll end up with 8 beads and 4 skipped positions!
Row 23
Another straightforward peyote round. One bead in each position, all the way around, for eight beads total.
Row 24
Last decrease: we’re almost done with the body of our little beaded whale! We end up with 4 beads and 4 skipped positions. I don’t stack the decreases here either.
In my final version of the whale on Etsy, all increases and decreases are stacked in a way that makes it easy to make, but for this first iteration of my whale amigurumi, I was purely beginning my ventures in the world of decreases, so it’s a little awkward sometimes. In the end though, it does give a cute little whale, so it’s okay.
Row 25
And last row to finish the body, add 1 bead in between the 4 beads added in the previous row. You’ll end up with 4 beads, and a little space in the middle!
Final Body Shape
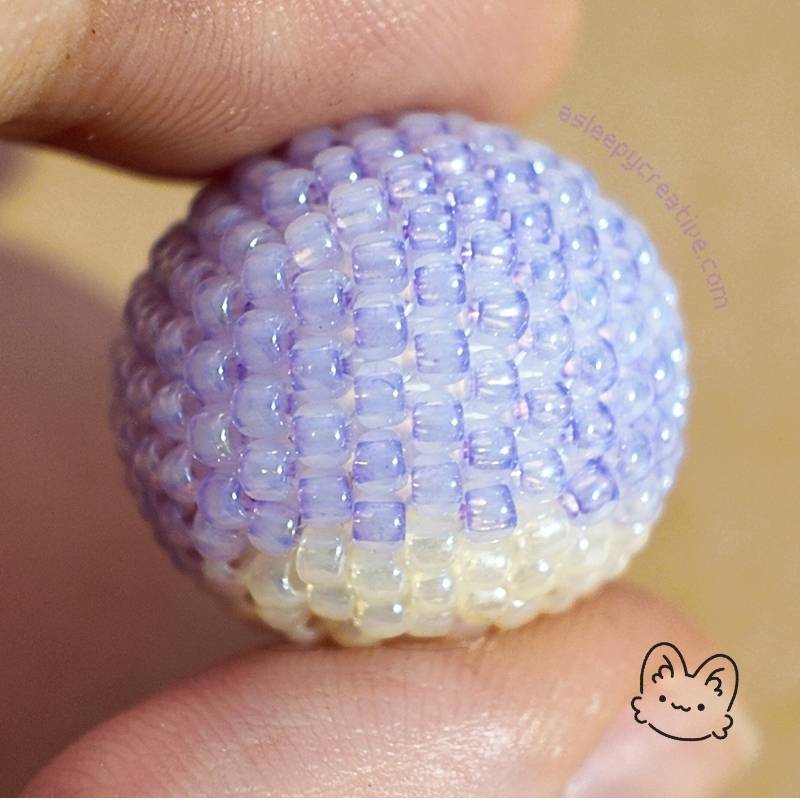
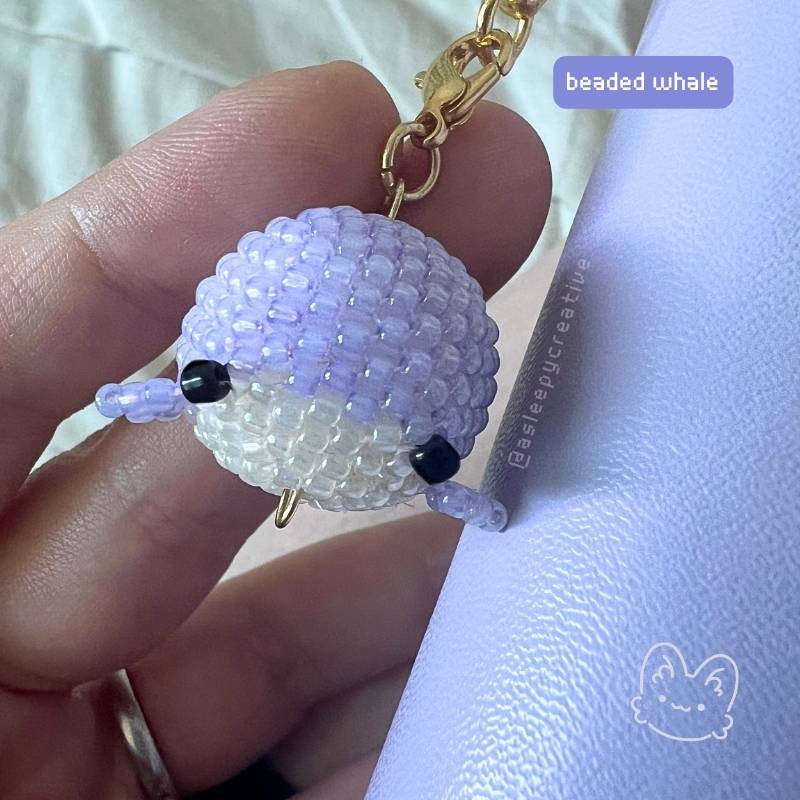
The final shape of the body is spherical, but not completely. It’s slightly flatter at the bottom, which, in my opinion, gives it a good base to make a cute chunky little whale! ♥
2. The Eyes
Now it’s time to add the eyes to your little whale, with the 2 black beads you prepared previously.

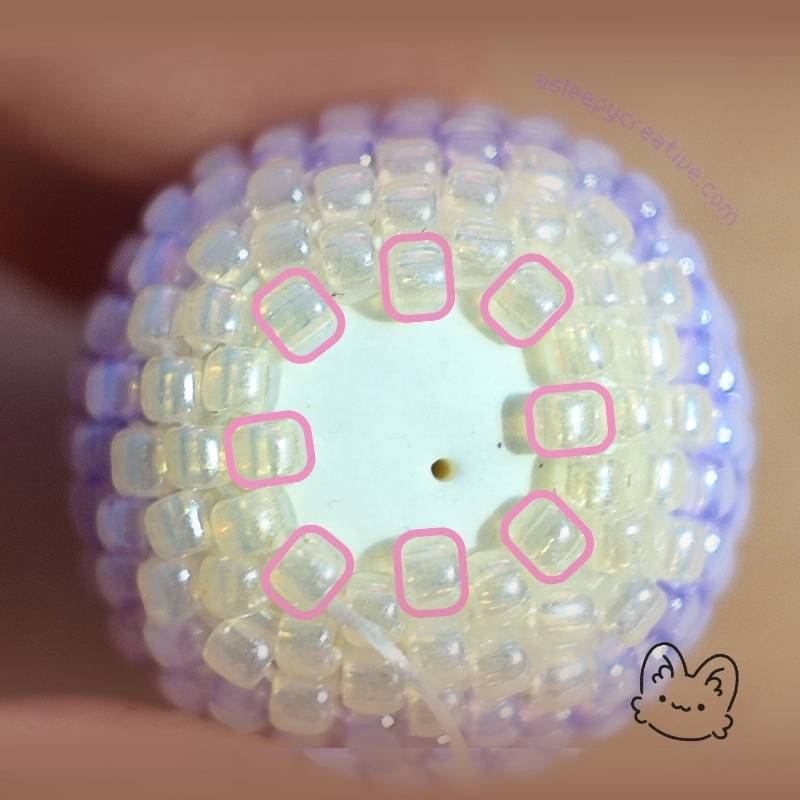
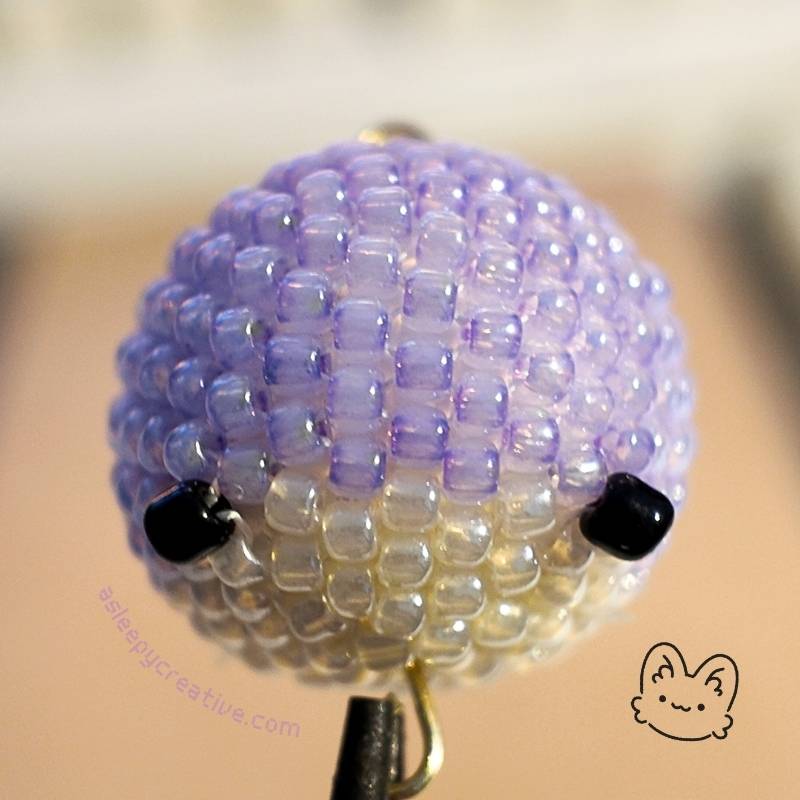
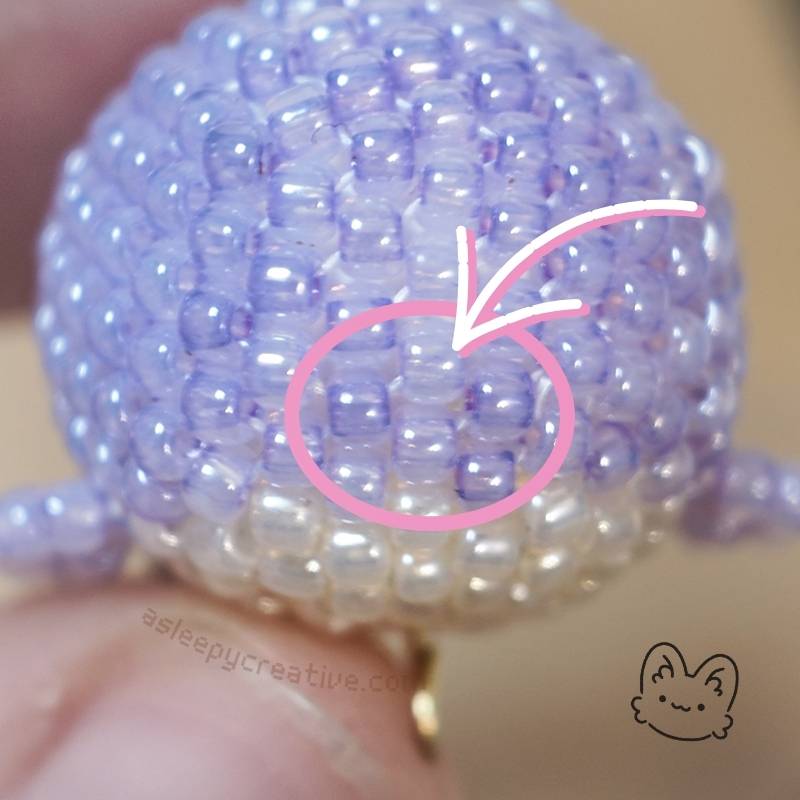
At the junction of both colors of your whale, identify these holes. They are visible when you look very carefully or from a very close distance. This is where I choose to sew my eyes.
This is the second spot. I’ll sew one eye on each spot.
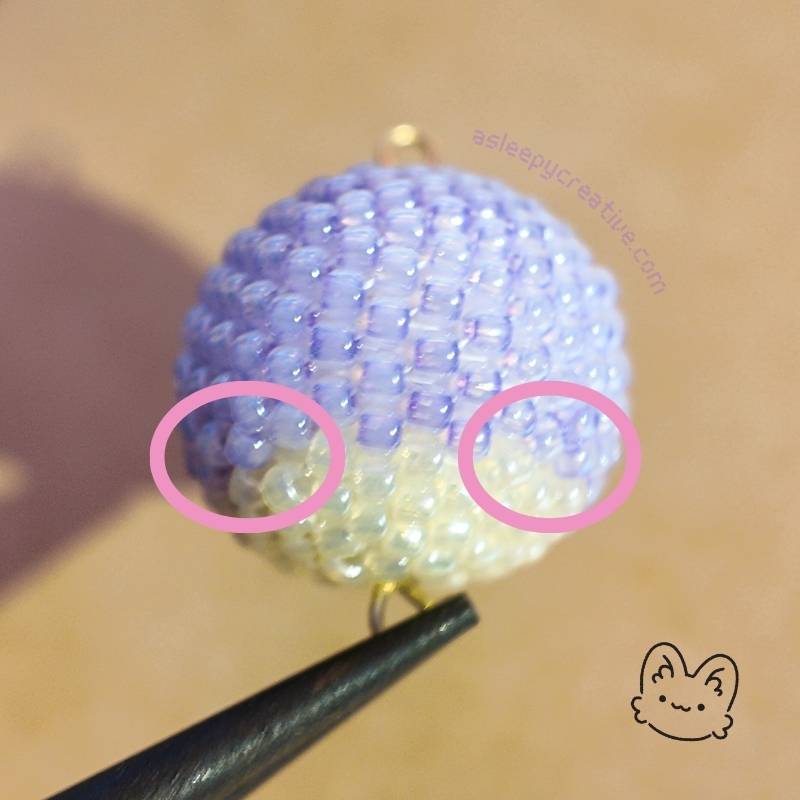
This is how it looks from the front. You can choose to sew your eyes wherever you want actually, and it depends on the look you want to give to your whale. The angle of the beads and their position will change the overall look and vibe of your whale. I decided to go for a sleepy look, with the eyes angled down (after all, i’m a sleepy creative)
The attachment goes as follows:
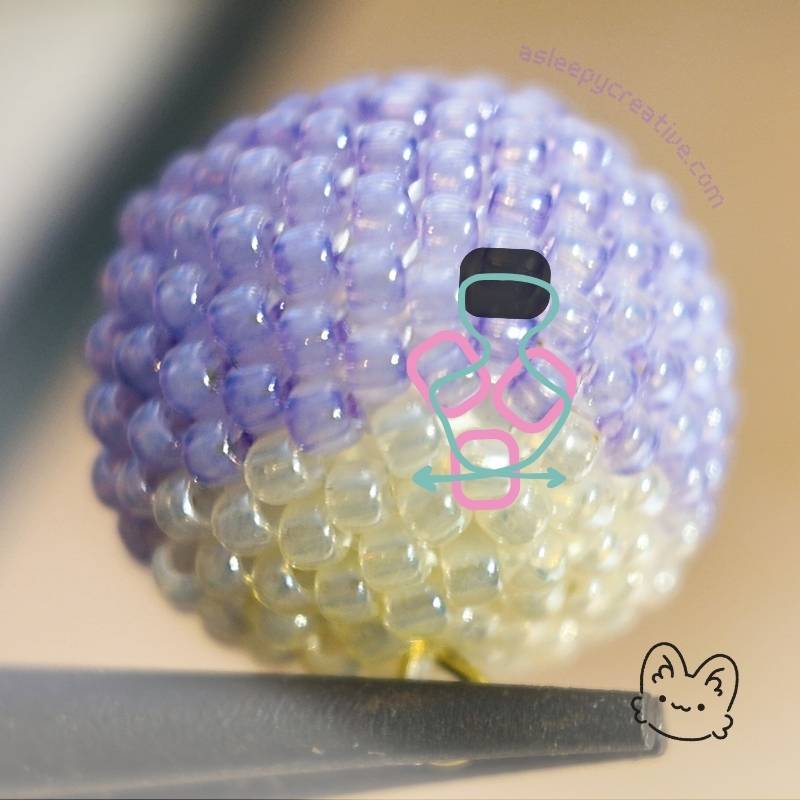
Identify the beads surrounding the area, and thread your way through the beads as annoted on the picture.
To secure the eye in place, you can pass through it again from there. The more times you pass through the eye, the more secure it’ll feel, but your thread will be more visible.
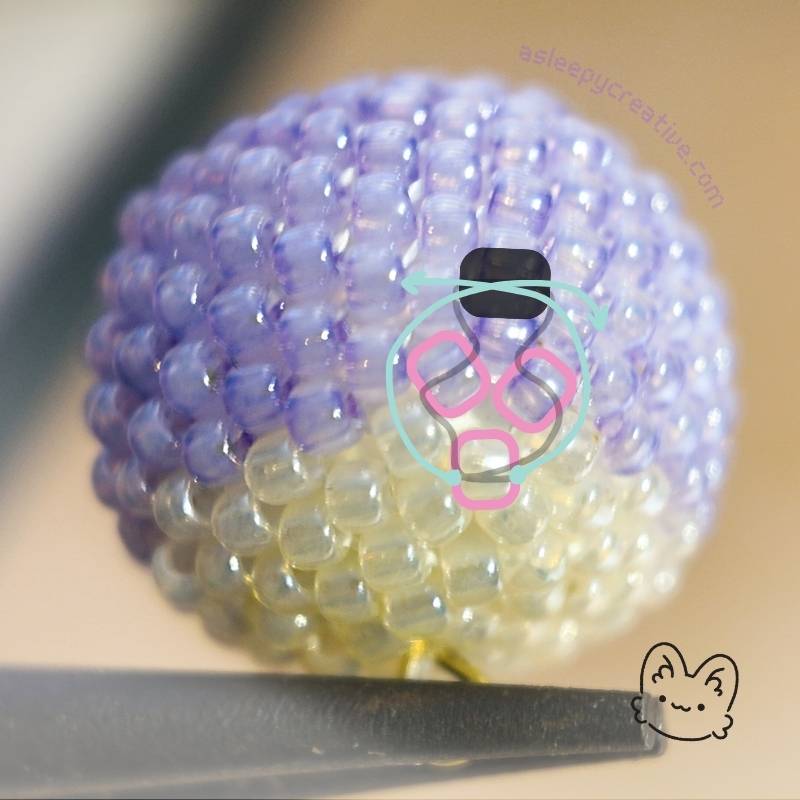
The way you choose the angle of the eye depend on which bead you go through. I wanted downturned eyes, so I passed through the bottom bead. But you can have different results by weaving through the top bead, or by positioning the eyes somewhere else:
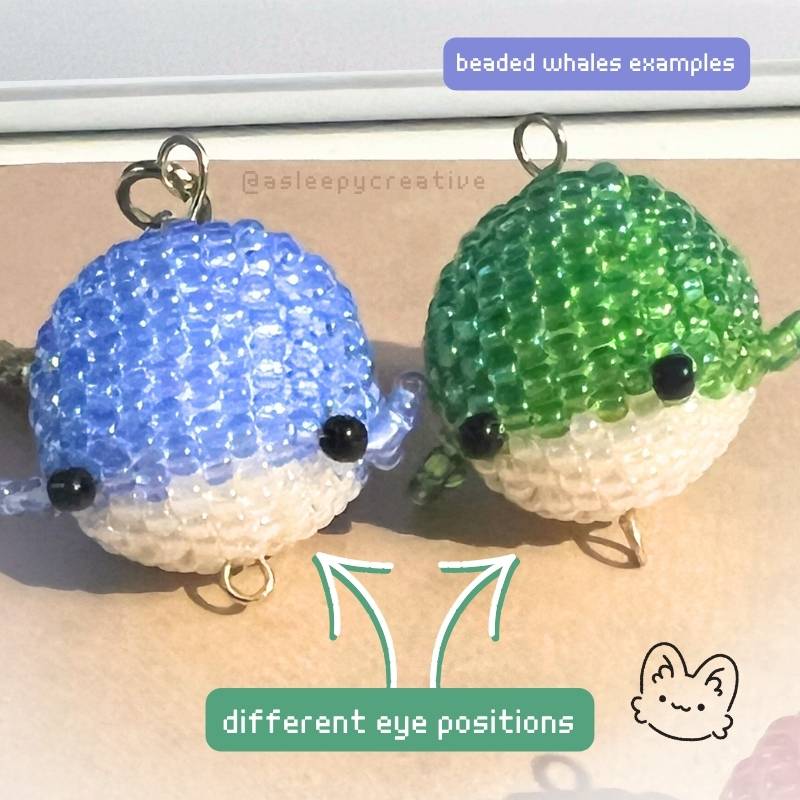
You can see how different eye positions affect the whole vibe of the whale! Originally, I thought following a perfect sphere pattern would make it impossible for me to have a cute shape for the whale, but I realized with my final version of the whale (the one available on Etsy) that you don’t specifically need to change much to achieve a really nice shape for a whale, or any other animal for that matter.
Anyway, here’s the result once the eyes are secured. I ended up coloring the string inside the black beads with a black marker so it becomes barely visible.
Now time to create the remaining parts of the whale!
3. The Fins
For the fins, you’ll need a total of 6 beads of the first color and 2 times 11 inches thread (30cm). You can make both fins at the same time or one after the other, it’s your choice. Let’s start!
Row 1
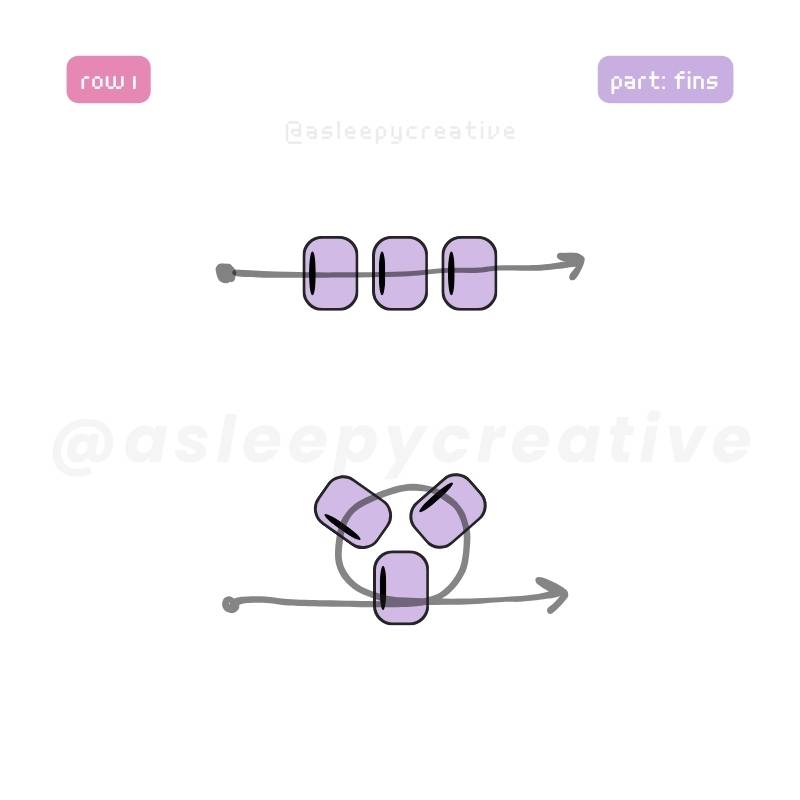
Put 3 beads on your thread, then pass your thread once again through the first bead added to form a little triangle.
Row 2
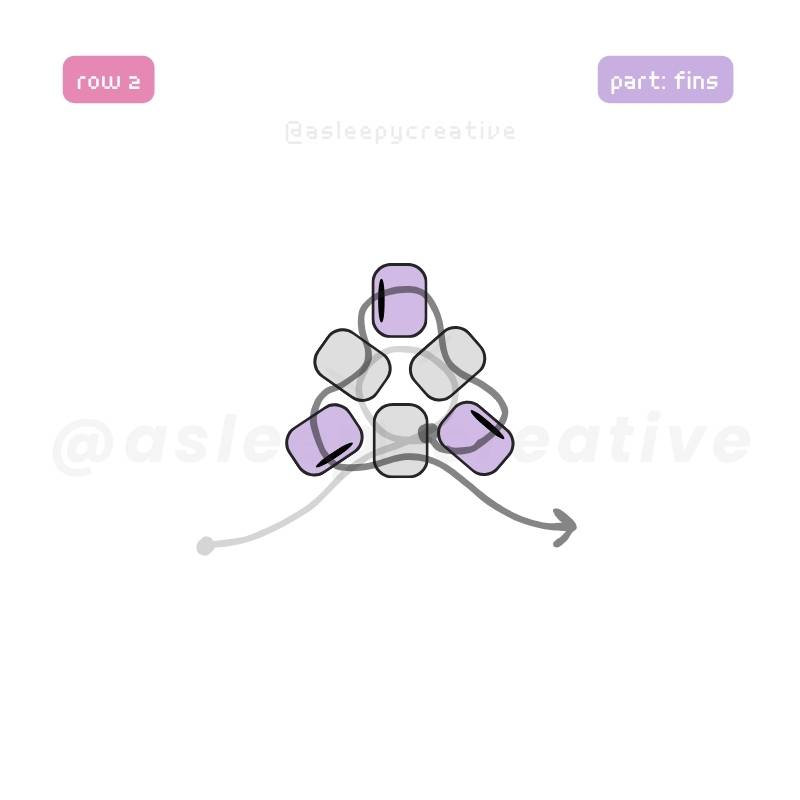
From there, make one round of peyote stitch by adding one bead in between each bead of the 1st row. This will create a larger triangle: that’s your fin! Make sure to slide the triangle around the center of the thread, as we will weave it to secure it on to the body.
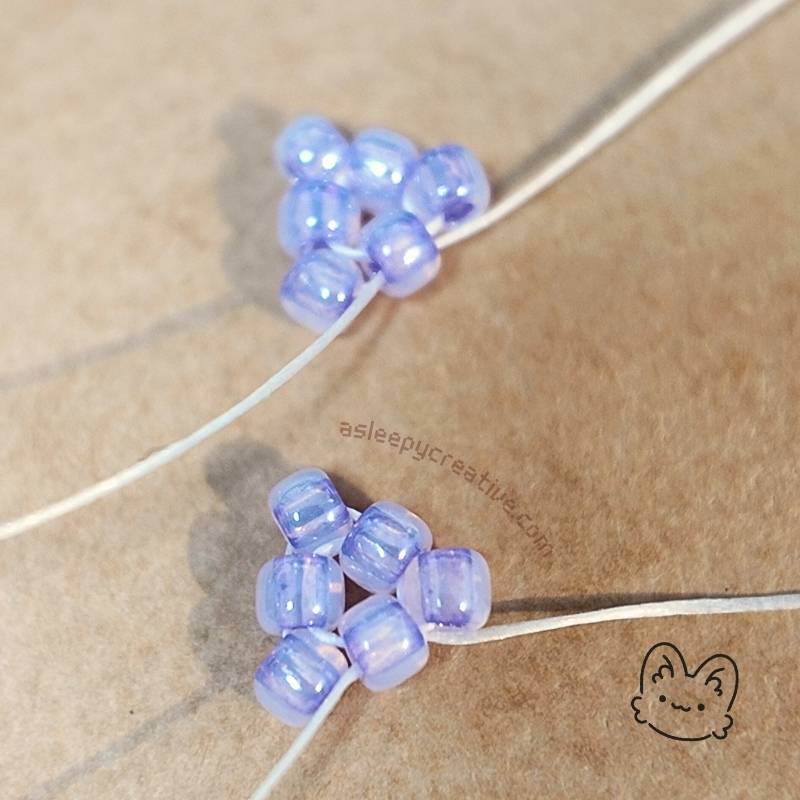
Both fins are ready to be secured!
Attaching Fins to Body
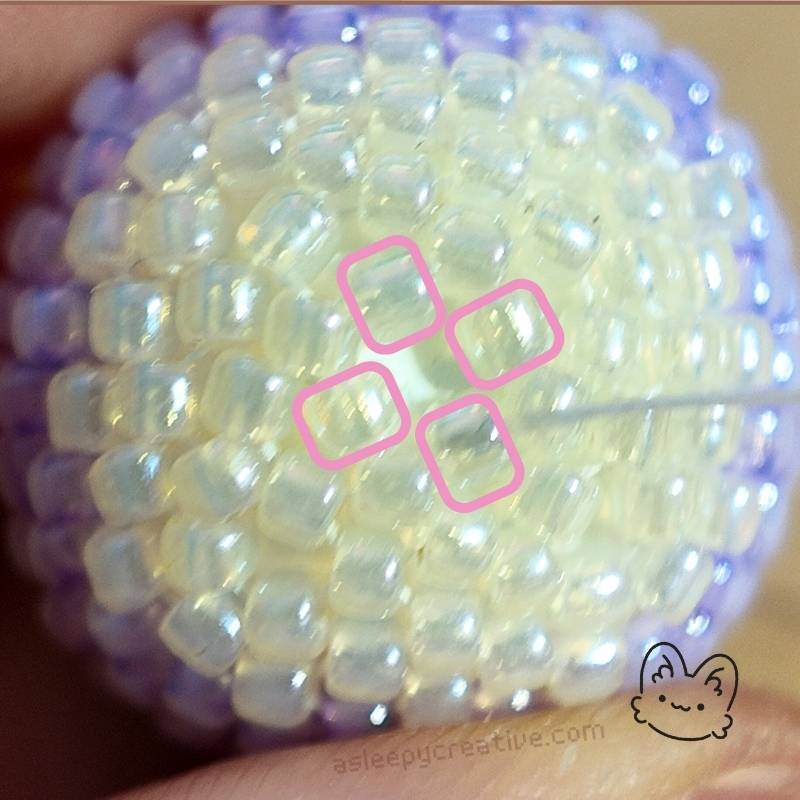
Here is the position I’ve chosen to secure the fins. On the left of the eye, you can identify 3 beads forming a little triangle. Then, we have the diamond shape that we will sew the fin onto.
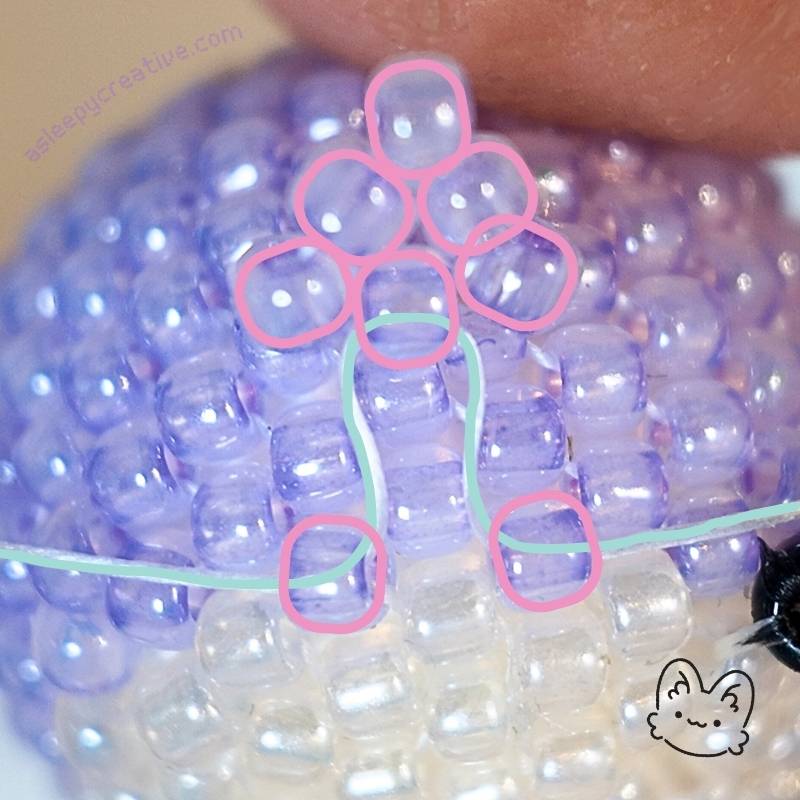
Take your fin, and weave it through both beads as shown on the picture. You need to pass both end of the thread separately, and will work in symmetry to make sure the fin doesn’t end up too wonky.
Once you’ve done that, it should look like this from the top.
Secure it by weaving both ends of the thread in the surrounding beads, in different directions. You can do it multiple times if you want to have a more secure attachment. Make sure you pull tight after doing that!
Do this again for the other fin, and you’re done for the fins! ♥
Note: the fins (and tail) will never be completely immobile, as they are not structurally made to be with this method. They will move and wiggle a bit, that’s perfectly normal. If you want a super sturdy whale to use as a keychain, for example, check out the official pattern instead, which can withstand time and wear easily.
4. The Tail
For the tail, you’ll need a total of 6 beads of the first color and 15 inches thread (40cm).
Row 1
Just like what you’ve done to make the fins, pass 3 beads on your thread, then pass your needle and thread once again through the first bead added to form a little triangle. Make sure the triangle is positioned in the middle of your thread.
Row 2
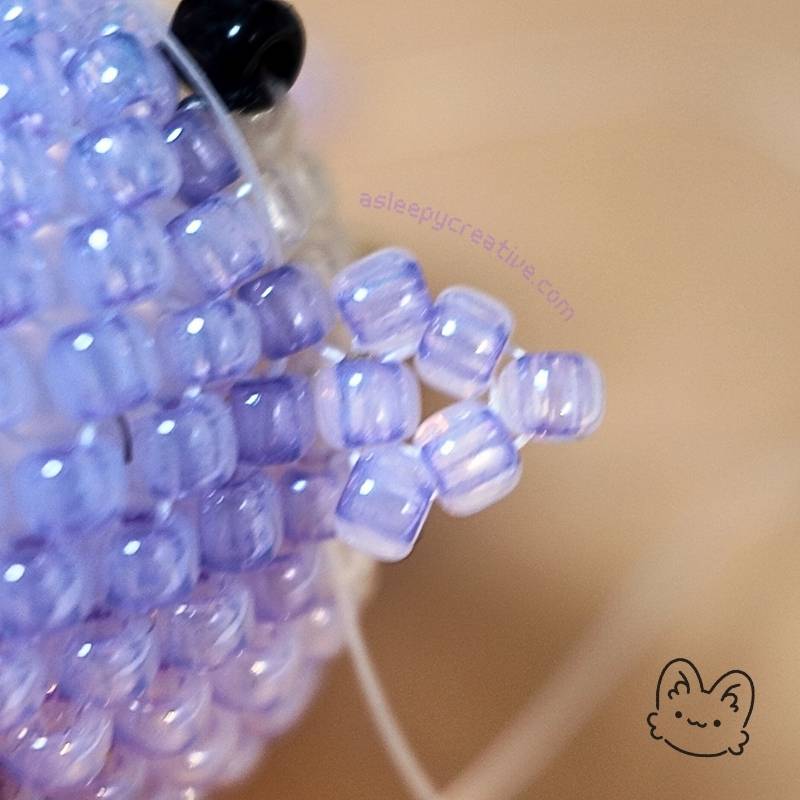
Rotate your the triangle shape you’ve created to have 2 beads at the bottom. Then, make an increase on both sides of the triangle by following the diagram.
Row 3
For the third and last row, add one bead on each side of the tail symmetrically, following the diagram.
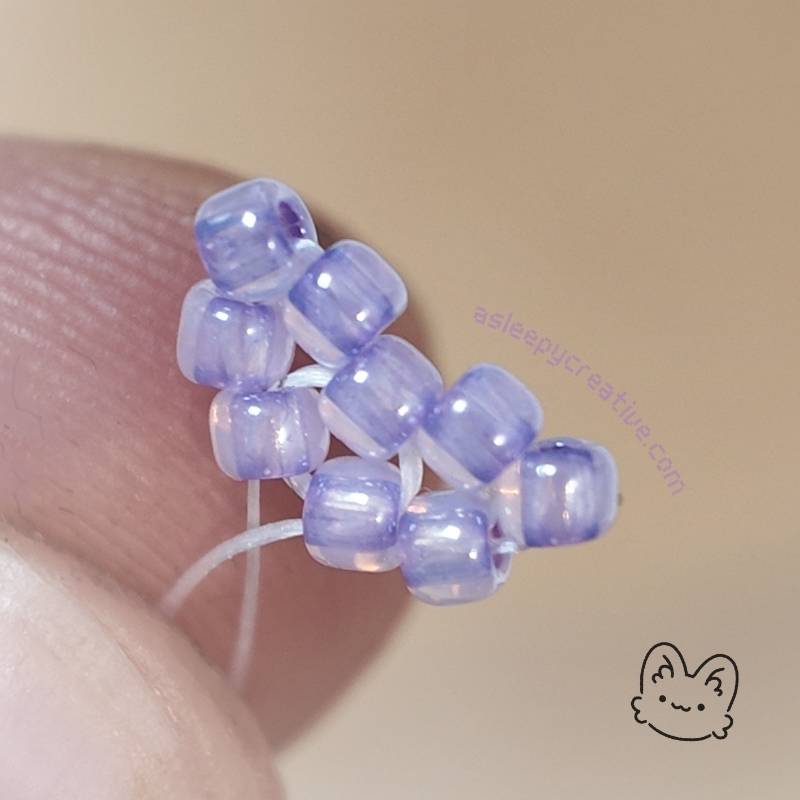
Final Look
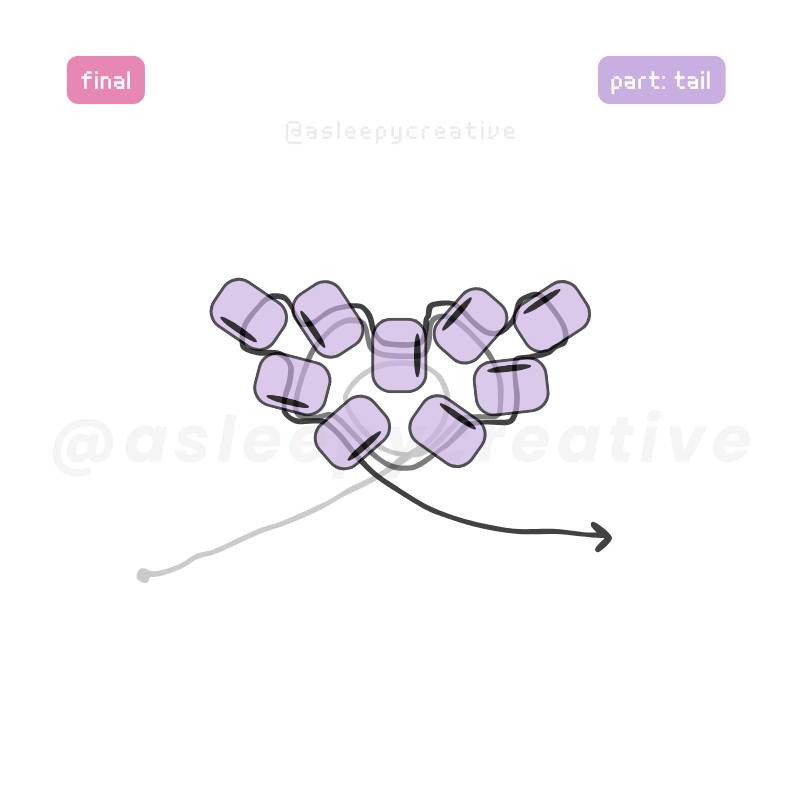
And that’s what the tail should look like! Make sure both ends of the thread are of similar length, because we’ll use them to secure the tail onto the body, just like we’ve done it for the fins.
Attaching Tail to Body
It’s now time to attach the tail you’ve just made to the body and finish our whale!
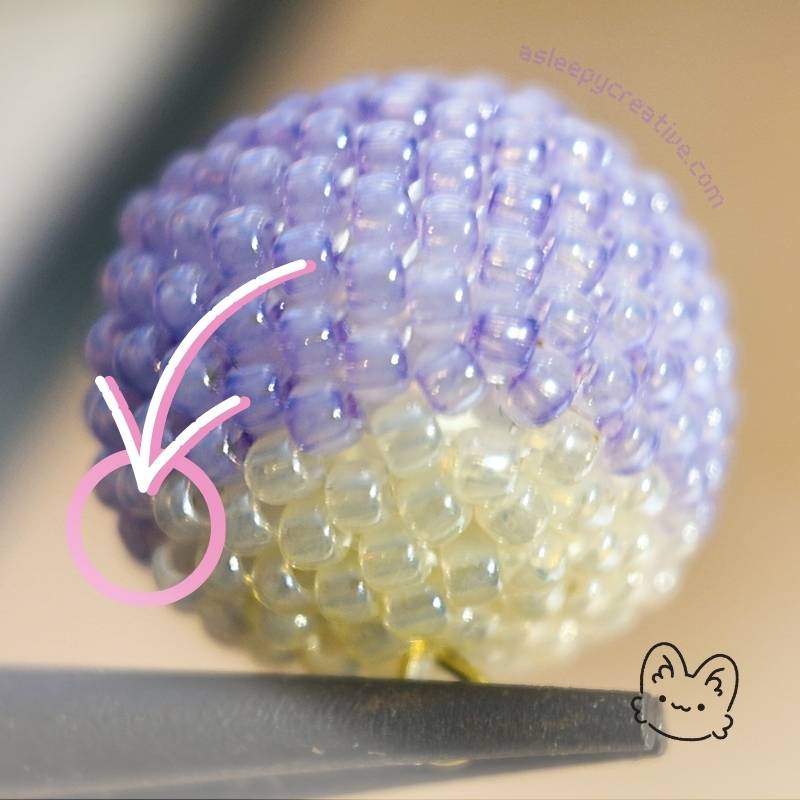
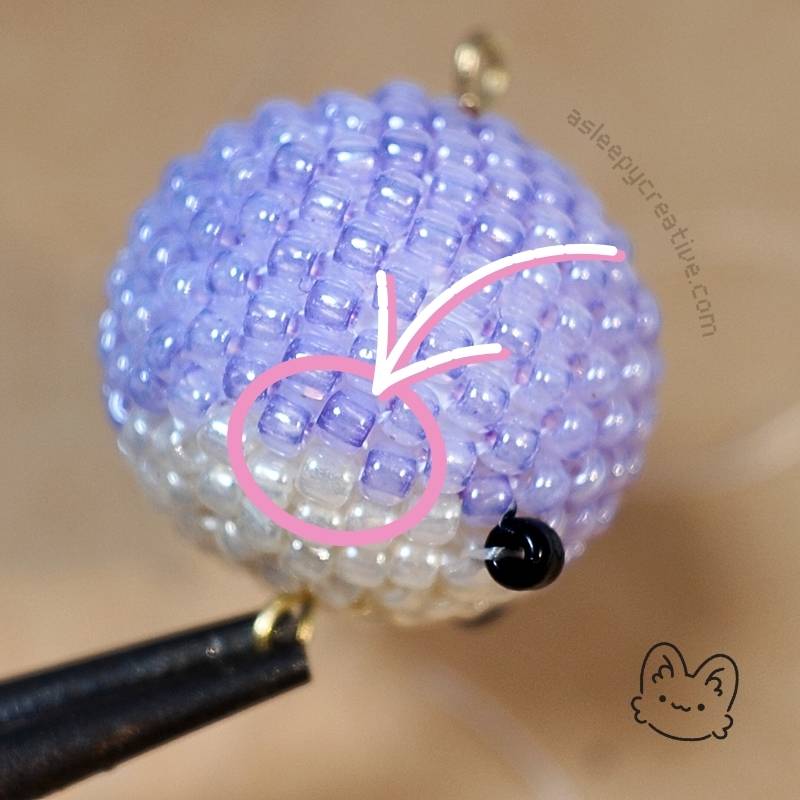
We start by identifying gthe spot we’ll secure the tail onto, at the back of the whale’s body. As previously, I marked the diamond shape created with the 4 beads circled in the pink circle.
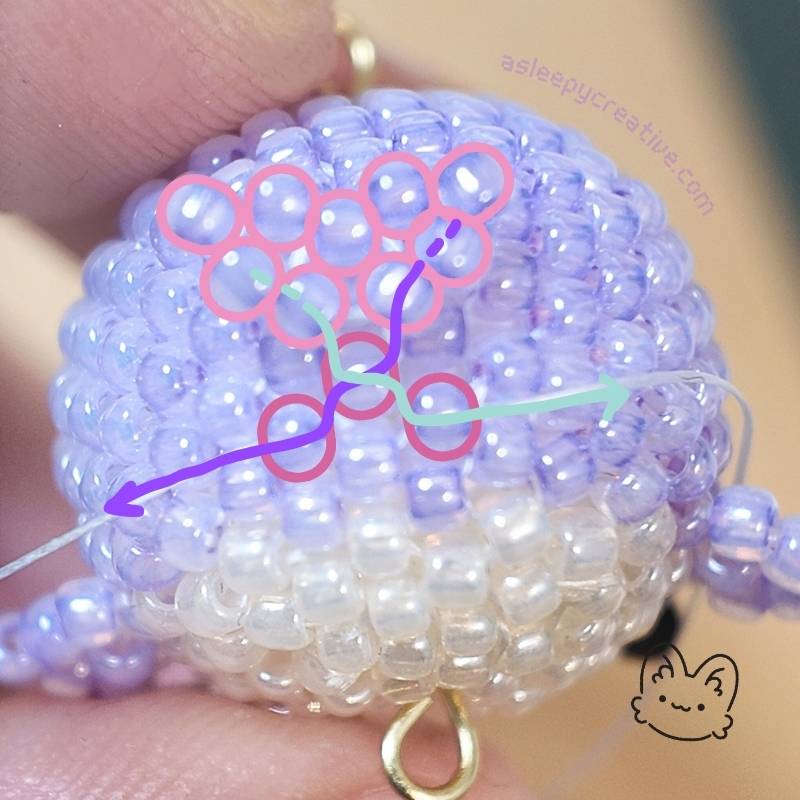
You’ll have to pass both ends of the thread symmetrically in the beads as shown on the picture. I’ve circled the tail’s beads in light pink, and the beads in which you have to pass the threads in dark pink.
Then, loop through surrounding beads to secure your work, like you did with the fins. I weave mine through at least 10 beads before cutting the thread, just to make sure. Also, I prefer cutting the thread in the white part, so it’s even less visible. ♥
Beaded Whale: Final Look
Wrap Up
And there we have it – our very first beaded whale!
I’m not gonna lie, this project challenged me more than I expected. Getting the tension right throughout the whole body, making sure those fins were sturdy enough to not flop around, dealing with a few gaps here and there.. it all required more focus than a simple sphere. But that’s exactly what makes finishing it so satisfying. You didn’t just make a ball. You made a WHALE. a super cute whale.
This purple whale is like my fourth one, and all of them are slightly different. Plus, whales need friends!
♥ If you loved making this and want an even sturdier version for gifts or sales, check out my premium pattern on Etsy! it features reinforced fins/tail and complete diagrams for each step of the way. Happy crafting!
I havent tried it yet but it looks SOOOOO cute!
Thank you for all that you do 🌸✨️