After diving deep into brick stitch and absolutely loving how structured and dimensional it was, I was told peyote stitch had to be next on my beading adventure. I already knew what peyote looked like and could tell how similar it looked when compared to brick stitch. I kept reading about people saying they were siblings and that you could switch a brick pattern to peyote super easily.
Turns out everyone was right. Peyote stitch creates that same gorgeous offset pattern as brick stitch, but the construction is totally different. Where brick stitch hooks onto thread bridges, peyote weaves through the actual beads. It’s fascinating how two techniques can look so similar yet be built completely differently. It makes me wonder how many new techniques we could think of.
And can I just say.. peyote stitch has this reputation for being incredibly versatile, and now I totally get why. It feels like I’m gonna be creating a lot of cute things with peyote (especially the circular peyote technique tbh)
And just so you know, some of the links in this post are affiliate links, which means I might earn a small commission if you decide to purchase something (at no extra cost for you). Thanks for supporting my work!
What is Peyote Stitch?
Peyote stitch is a bead weaving technique where beads are arranged in offset rows, just like brick stitch, but instead of connecting to thread bridges, you sew directly through the beads from previous rows. The result is that same beautiful brick-like pattern, but with a completely different feel and construction method.
The technique creates a flexible that is perfect for pieces that need to drape or curve naturally. Peyote is slightly less stiff compared to brick stitch. It’s ideal for bracelets, curved elements or organic shapes.
There are two main types of peyote stitch:
- Even-count peyote: where each row has the same even number of beads
- Odd-count peyote: where alternate rows have different bead counts, making the turns a bit trickier
In beading, “making the turn” refers to transitioning from one row to the next in peyote stitch, brick stitch, or other row-based techniques. After completing a row, you need to “turn” to position yourself for the next row.
What it involves:
♥ Positioning your needle and thread to start the next row
♥ Often requires a specific thread path or “step up” to get into the correct position
♥ The turn determines how your rows will align and whether your edges will be straight or stepped
How to Peyote Stitch: Step-by-Step Tutorial
Even-Count Peyote Stitch
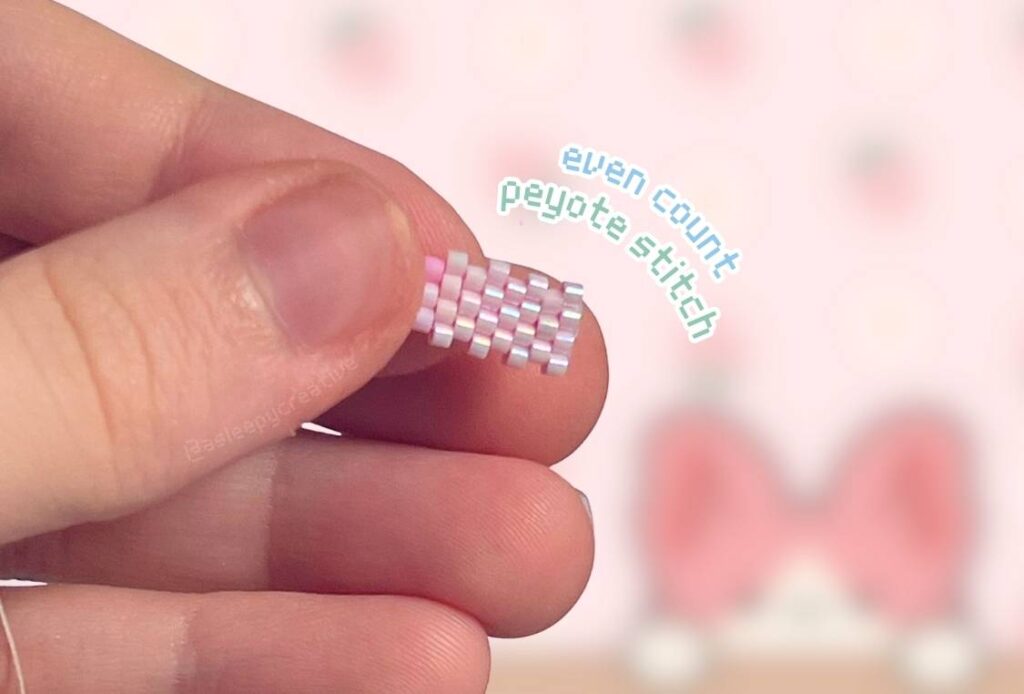
Even-count peyote is definitely the easier place to start. Each row has the same even number of beads, which makes the turns at the end of rows super straightforward.
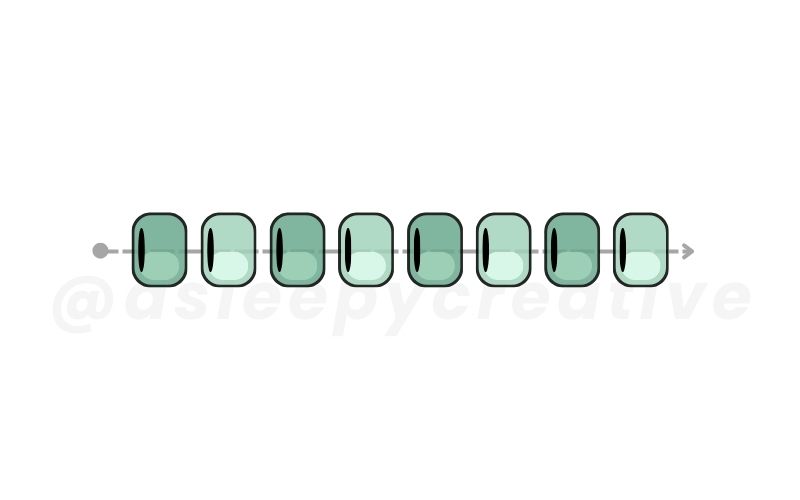
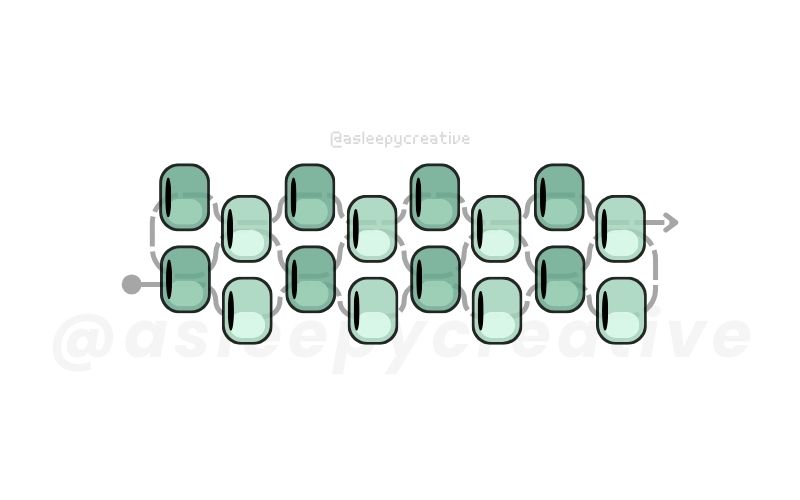
On my picture up here, you can see that each row has 4 beads, making it an even count peyote stitch. And since we start with both first rows at the same time, we’ll need 8 beads to start with!
***
Step 1. Create Your Foundation
Thread your needle with a comfortable working length and add a stopper bead about 6 inches from the tail (totally optional, but it keeps everything from sliding off). String an even number of beads (here, 8 so 4 beads per row as I said previously) – these will become your first two rows once you start the third row.
Step 2: Row Three
Pick up one bead, skip the last bead you strung (light green on the infographic), and sew back through the next bead in the opposite direction (darker green). Position this new bead so it sits right next to the one you skipped, with their holes lined up parallel to each other.
For each stitch after that, pick up a bead, skip a bead from your foundation, and sew through the next one. Keep going until you exit through the very first bead you strung. The beads you add in this row will stick up from the foundation beads – these are your “up-beads.”
Step 4: Following Rows
For every row after this, just pick up a bead and sew through the next up-bead from the previous row. That’s it! The pattern becomes super rhythmic once you get into the flow.
Note: First Rows
Okay, before we continue with odd count peyote stitch, just a quick word! If you’ve never tried peyote stitch before, it might be difficult at first. The first couple rows can be a bit fiddly until you get the hang of it. Here are some tricks that saved me:
- The Pinch Method: After stringing your foundation beads, pinch them between your thumb and finger while you work row 3. This keeps everything stable while you’re getting the rhythm down.
- Wire Guide: Thread a thin wire or pin through every other bead in your foundation strand. This shows you exactly which beads to sew through for the next row – super helpful for visual learners!
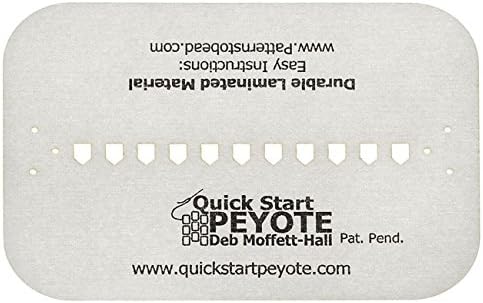
- Quick Start Cards: You can buy quick start cards, they’re honestly not bad! Worth looking into if you’re struggling with the setup. It exists in multiple sizes for different beads. I’m pretty sure you could make one yourself too!
Odd-Count Peyote Stitch
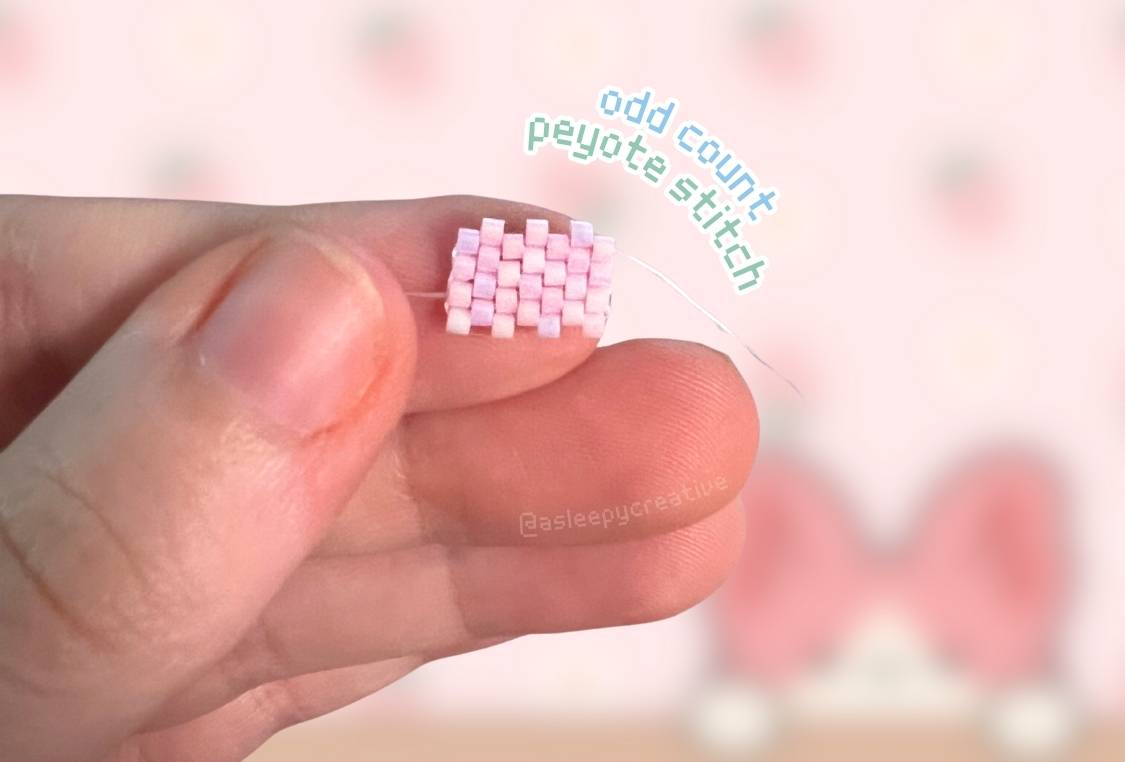
Odd-count peyote has an odd number of beads in every other row, and the turns are where things get… interesting (read: slightly more complicated). But don’t worry, once you learn the technique, it’s not that bad. Let’s discover it!
***
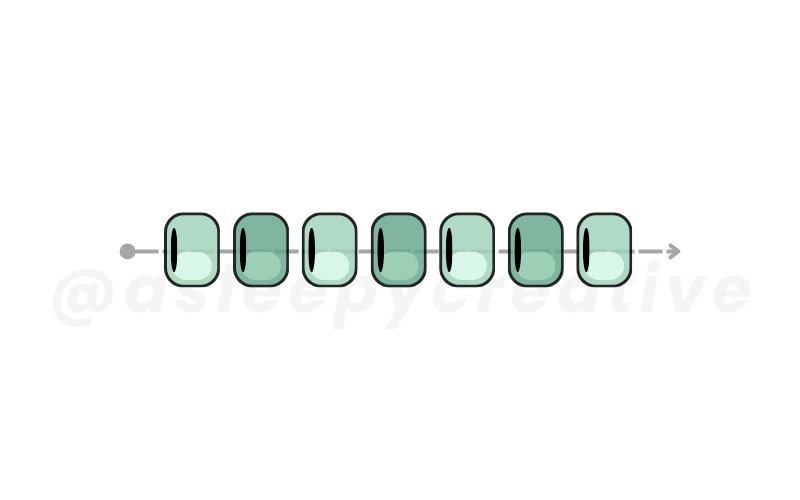
Step 1: Foundation
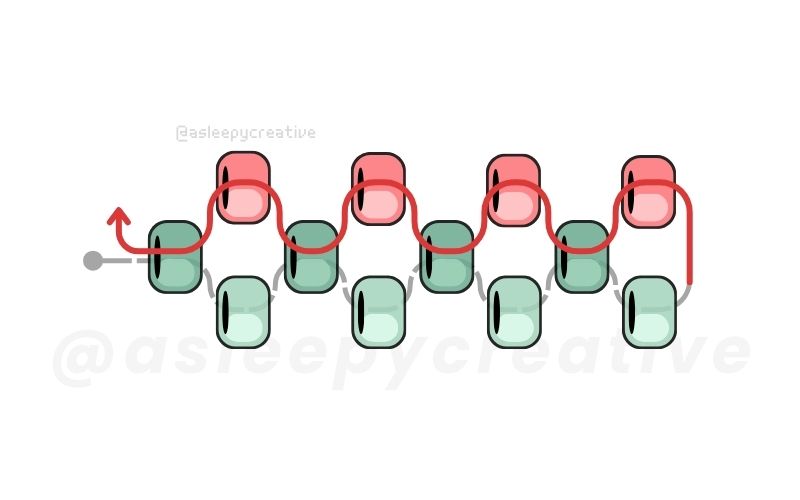
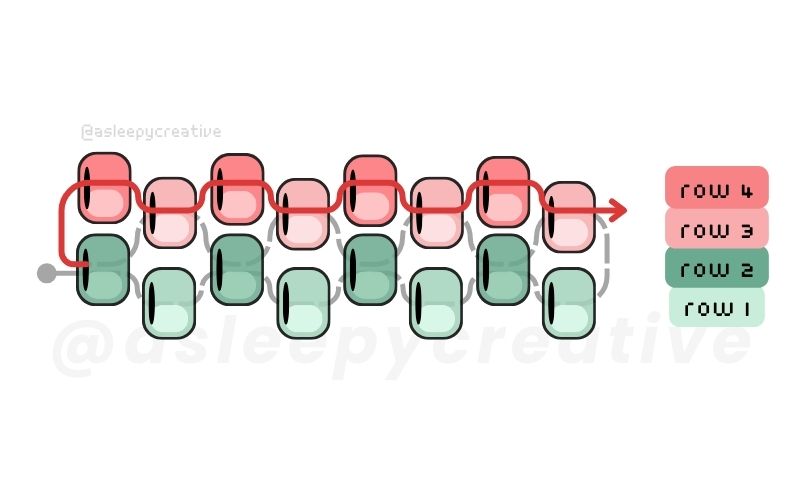
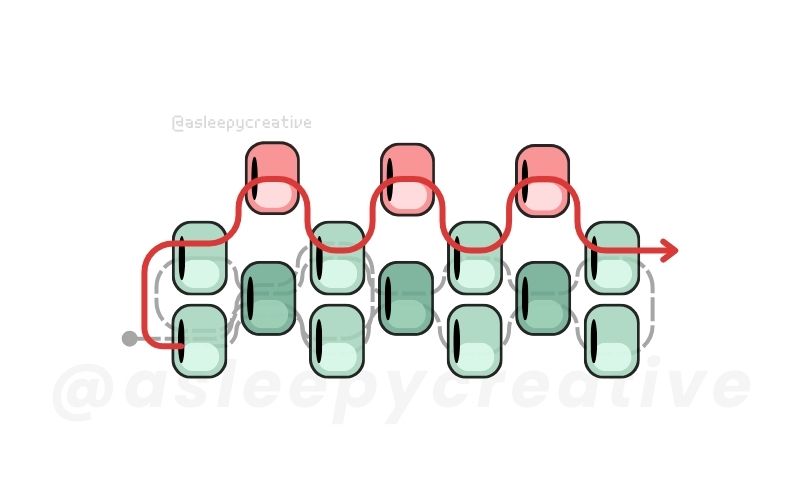
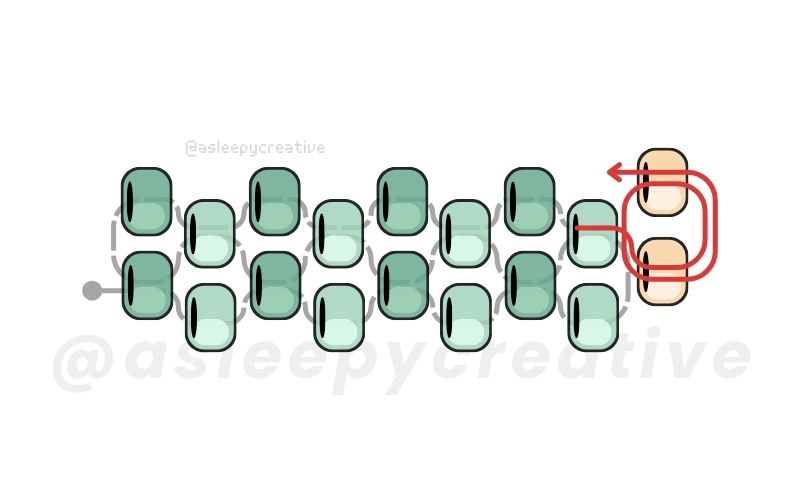
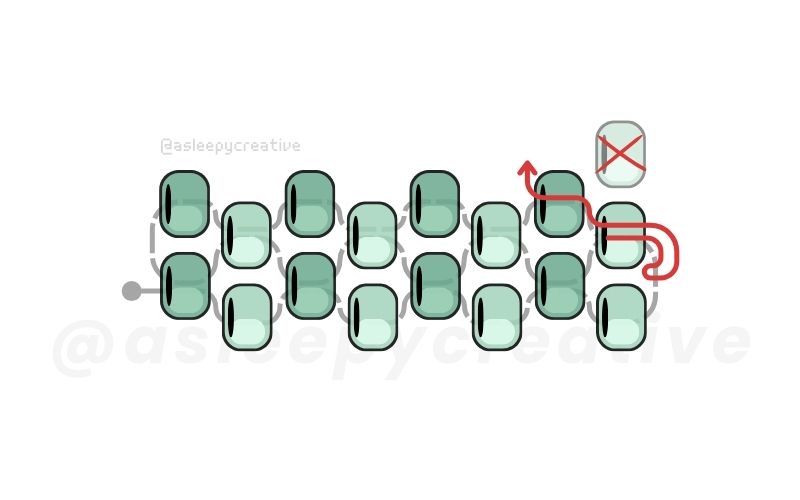
String an odd number of beads. In the infographic, I added 7! (note: the red beads are the beads added last)
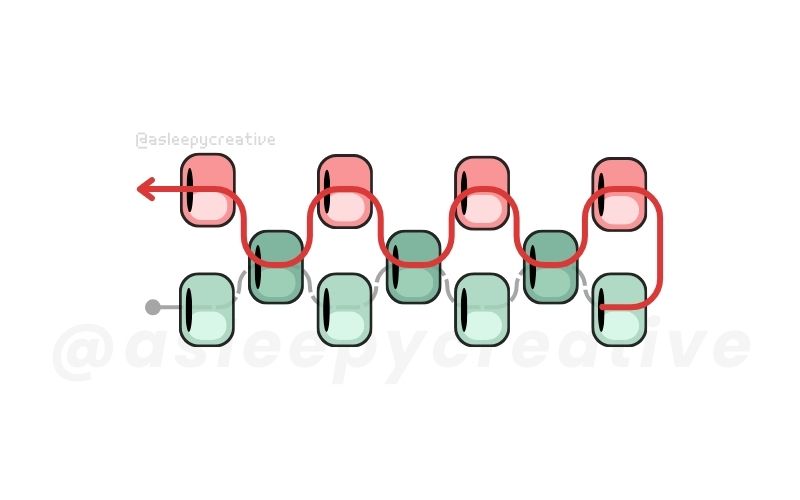
Step 2. Third Row
Work row 3 just like even-count peyote, but stop before adding the last bead.
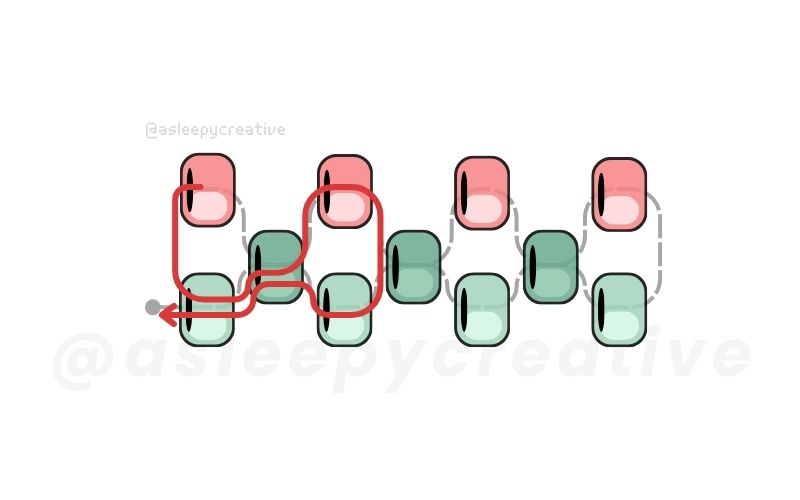
Step 3. Making the turn
Basically, you’ll just have to follow the red curved line on the infographic for this one – it’s a little tricky to explain efficiently, and I believe the image speaks volume!
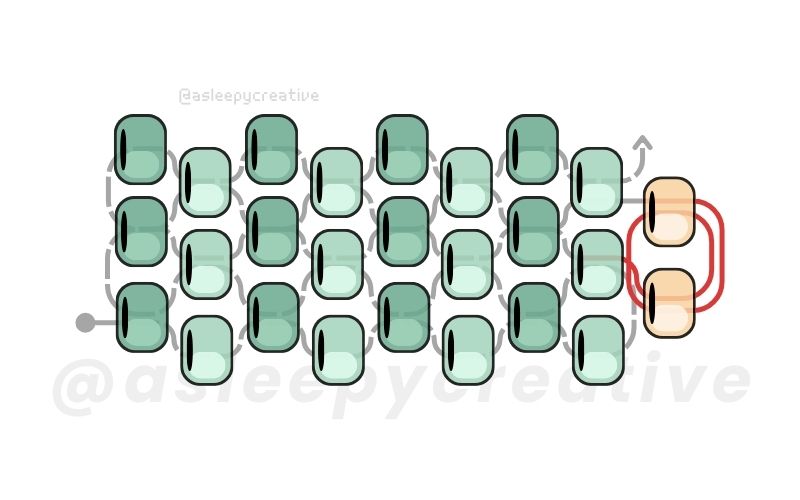
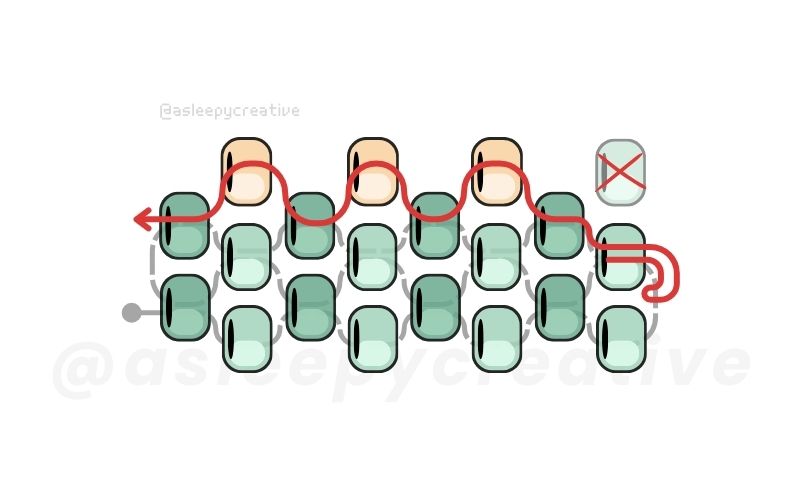
Step 4. Continue Building
Work your next row normally (like even-count)
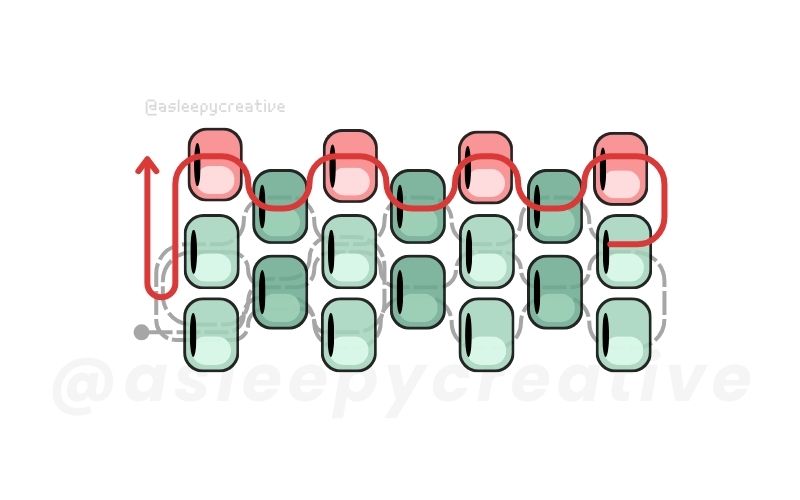
Step 5. Simpler Turn
Continue working until the end of the next row. This time, you’ll use a simpler turn: after the last bead, sew under the thread bridge below it, then go back through that last bead to start the next row.
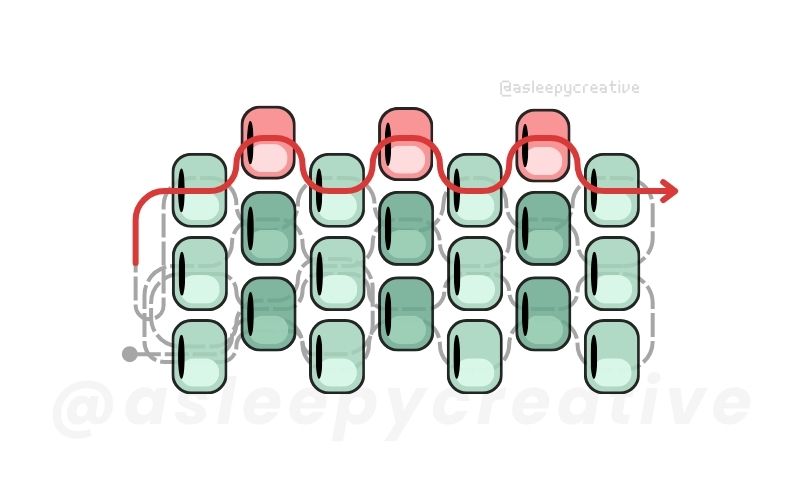
Step 6. Finishing
Just continue with your row. You can repeat the step 5 and 6 for each new rows!
Two-Drop Peyote
Two-drop peyote is basically regular peyote but treating pairs of beads as single units. It creates this really cool chunky texture that I’m obsessed with!
For even-count two-drop, start with a bead count that’s divisible by four. For odd-count, use an even number that’s NOT divisible by four. Then work exactly like regular peyote, but pick up two beads, skip two beads, go through two beads – you get the pattern.
The turns work the same as regular peyote (easy for even-count, special technique for odd-count). And yes, you can totally do three-drop, four-drop, or even mix different drop counts in the same piece for really interesting textures!
Advanced Techniques
Now let’s discover some advance techniques for peyote stitch! They include increases, decreases, as well as circular peyote and tubular peyote. I will add tubular peyote and circular peyote once I get the hang of it, and for now, we’ll discover increases and decreases!
A quick note before starting. Please remember that I’m not covering ALL the ways of doing things, and the way I’m explaining might not be the one you’re used to. It’s the ones I learned, and the ones I like! 🙂
If I learn other ways down the line, I will update the article.
Increases in Peyote
An increase in peyote stitch involves adding extra beads to make your beadwork wider or create outward curves. It’s is super useful for creating triangular shapes or gradual width changes! Unlike some other beading techniques, peyote increases must be done by adding two beads at once (at least) to maintain the characteristic offset pattern of the stitch. (but! there are tricks to add only one bead too.)
Anyway – there are two types of increases: at the edges, or mid-row.
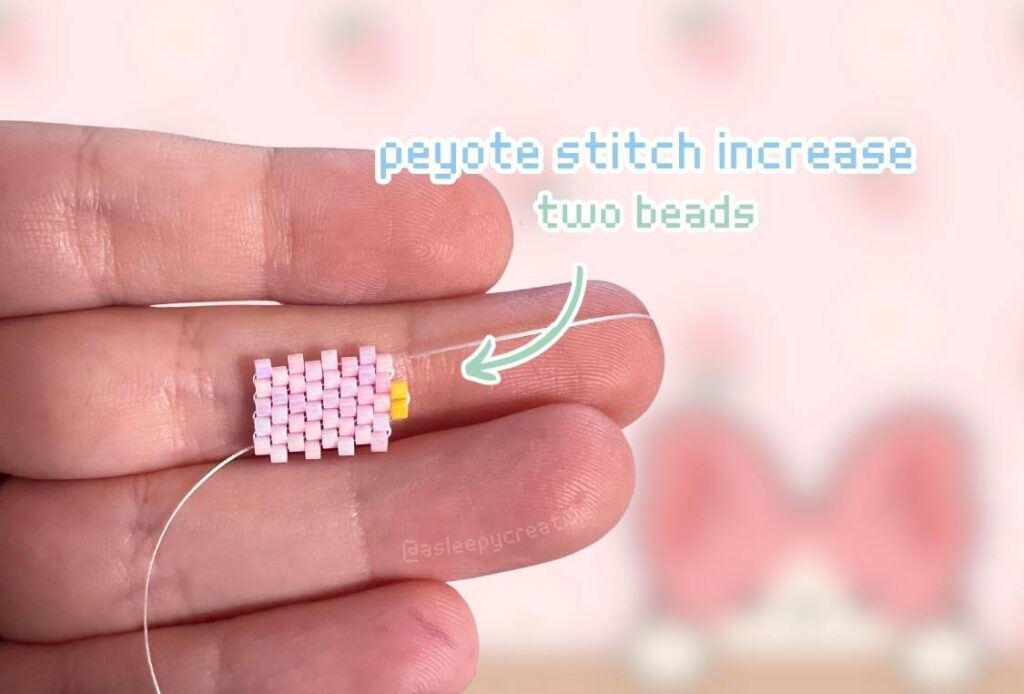
Increases at the Edge of a Row
Two Beads (one column)
***
Step 1. We start from a classic peyote stitch on a few rows. Here, you can see even count peyote stitch, but the method works as well for odd count.
Step 2. Once you’re done with a few rows, it’s time to do your increase. When you reach the position where you want to increase, pick up two beads instead of one and pass through them both twice (see infographic).
Step 3. Once you’re done, continue to the next stitch position in your row. After doing that, you may find that the two increase beads or nearby beads feel loose or sit unevenly. To tighten and align them, pass your needle back through these beads with gentle tension to lock them into place.
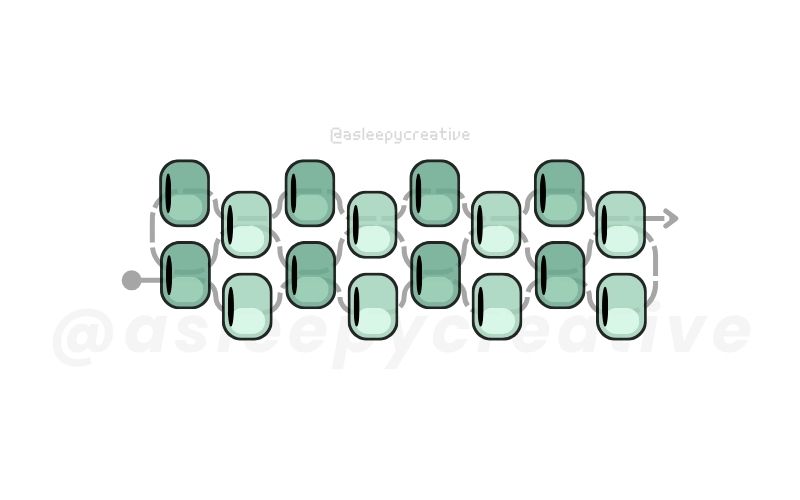
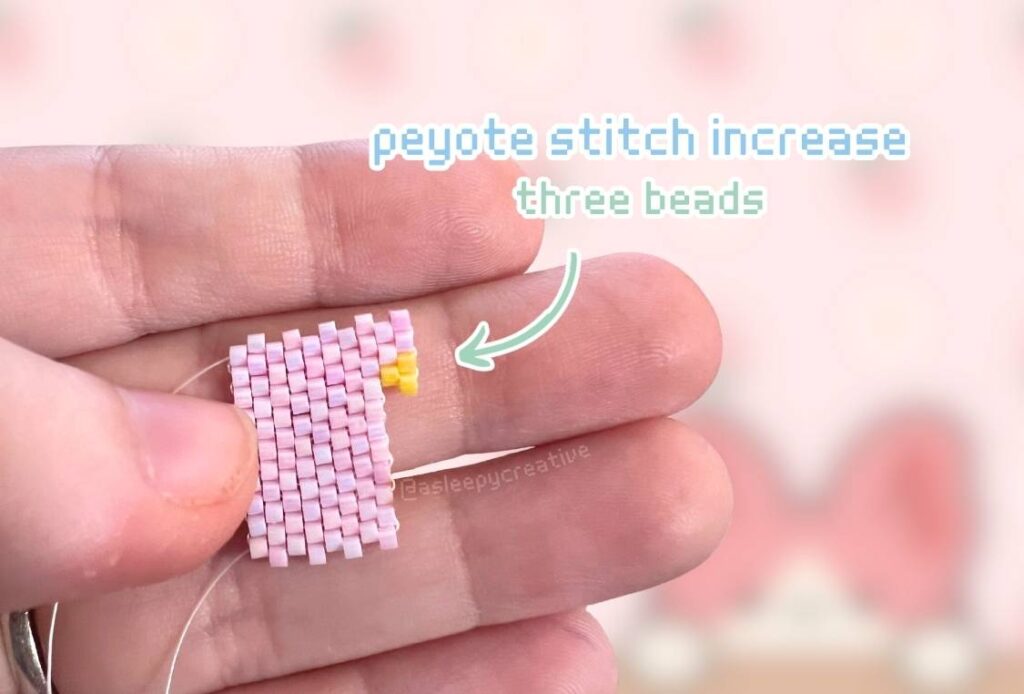
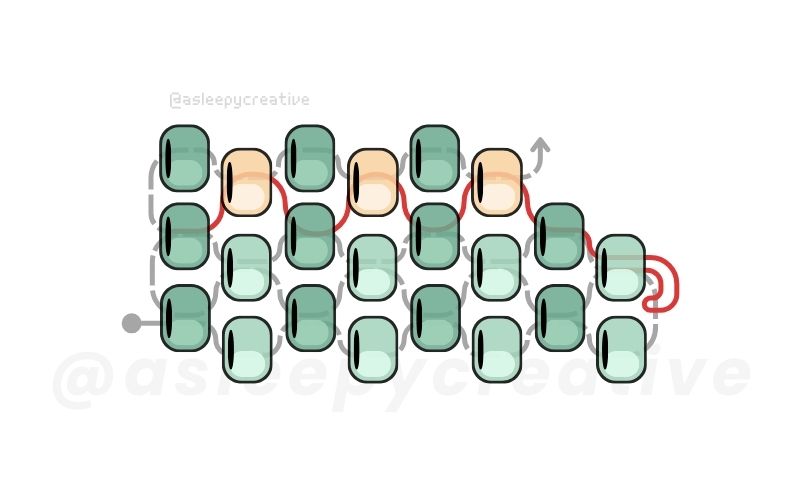
Three Beads (two columns)
Step 1. Once again, we start from a classic peyote stitch on a few rows. We’re also working with even count peyote stitch this time, but the method works as well for odd count.
Step 2. Once you’re at the position for you’re increase, pick up three beads (yellow on the infographic). Pass your needle through all three beads, then pass it back in the first bead you added for this increase. The three beads will sit together in what would normally be one stitch position.

Step 3. Continue working your row as normal by moving to the next stitch position and adding your next bead. Complete the rest of your row, and don’t worry if the increase beads look a bit loose or uneven at this point as this is normal and will settle as you continue.
From here, you have several choices on how to continue your work: you can continue until the increase you’ve just created, or stop before, etc. It’s up to you (or your pattern)!
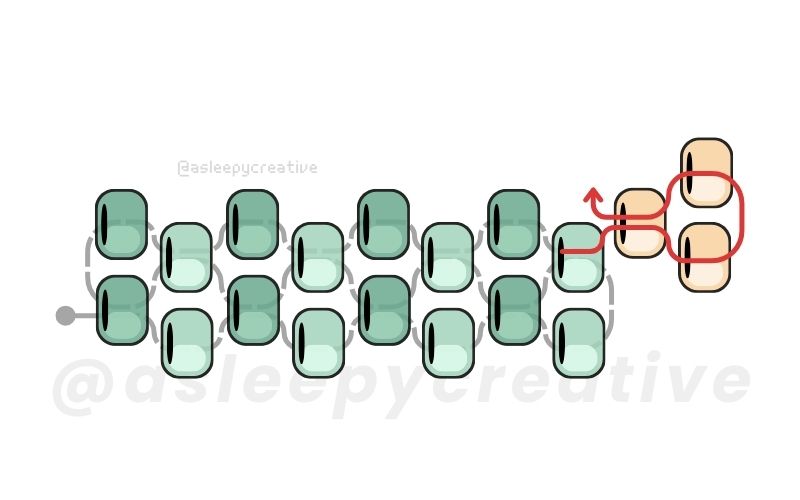
One Bead (special)
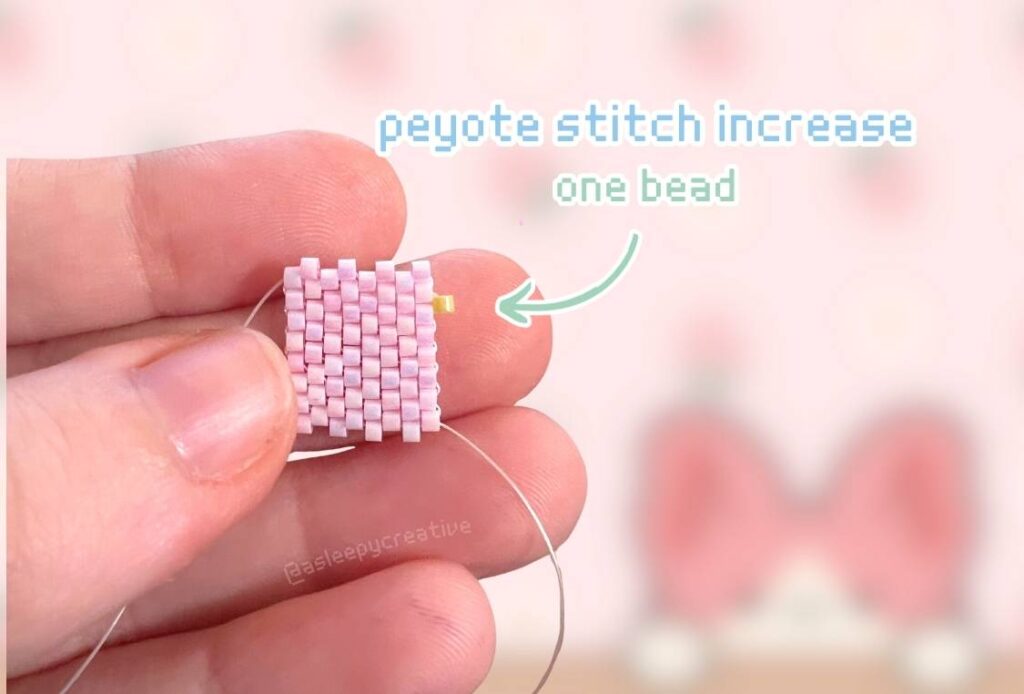
And finally, the one bead increase! This increase is not a traditional one, in the sense that it doesn’t really respect the structural shape of peyote stitch. But I do believe that it looks good enough and is nice to know.
Step 1. Once again, we start from a classic peyote stitch.
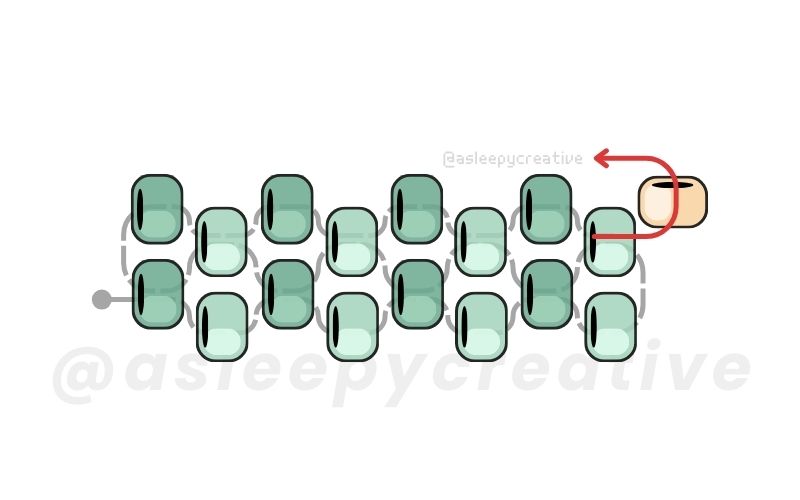
Step 2. Work your way until the end of the row where you want your one-bead increase to sit. Once there, add one bead.
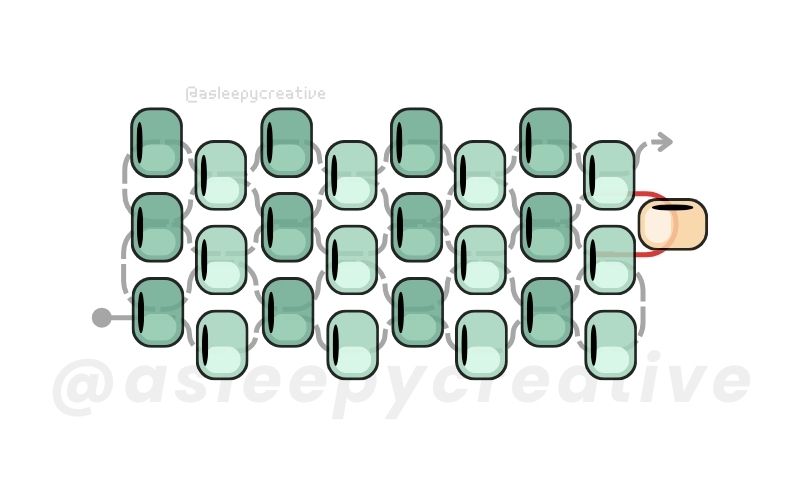
Step 2. Then, continue your peyote stitch as you normally would. You’ll need to adjust the bead with your nail or needle so it sits correctly. It should be at a 90° angle compared to the others (brick stitch position). Once you’re done, the bead will feel a little wobbly. You can reinforce it if you wish by threading through it again.
Decreases in Peyote
A decrease in peyote stitch involves reducing the number of beads to make your beadwork narrower or create inward curves. Decreases are easier to do compared to increases (in my opinion)~
Just like for increases, there are two ways to decrease: at the edge of a row, or mid-row.
Decreases at the Edge of a Row
Step 1. We start with a few rows of peyote stitch, as usual
Step 2. When you reach the row where you want to decrease, skip the bead you would usually thread there. Pass your thread through the bridge connecting the row 1 and 3, then go back through the last bead you added, and the one just before.
Step 3. Then, continue with a regular peyote stitch for the rest of the row
Step 4. And you can continue your work as normal from there! 🙂
Tips and Troubleshooting
Planning Your Work
Planning your work is key – especially if your pattern doesn’t do it for you. For peyote, I prefer starting from the widest part of the work, around the center. I think making decreases is generally easier than making increases, so if I can choose to make decreases on my work, I definitely plan in this way. Maybe you can identify what you prefer and plan according to your tastes!
Getting the Right Tension
For the first few rows, peyote stitch might seem tricky, wobbly, and sometimes even discouraging. Your work will most likely look curved and weird, but as you keep working on it, it evens out.
If it doesn’t improve after several rows, I suggest trying to loosen the tension a bit. Pulling too tight will make your work curve and that’s not what you want – plus you risk breaking your beads as well.
Thread Management
Keep in mind that you want your thread to be as invisible as possible. By that, I mean that it shouldn’t pass in front of a bead, bridge visibly from a bead on one row to another bead on a different row, etc. You want to find the thread path that will make your beads look like they all hold together effortlessly! That’s also why a thin thread is always preferred over a thicker one.
Materials for Peyote Stitch
Thread
Peyote stitch is surprisingly forgiving when it comes to thread choice, and that’s one of its biggest advantages. Since you’re threading through beads rather than stressing thread bridges like in brick stitch, you have way more flexibility in what you can use. The choice will essentially depend on your preference and usage (for example, you’ll want a keychain to be stronger than a bookmark)
Thread Considerations for Peyote Stitch
- More thread options than brick or square stitch since there’s less structural stress
- Fewer passes through beads compared to square stitch means less wear on your thread, thicker thread is possible too
- Thread is mostly hidden inside beads, so color matching isn’t as critical
- Thinner thread = less bulk in bead holes, giving you a cleaner finish
Top Thread Recommendations
- Fireline 4lb – 6lb (0.15 – 0.2mm): Perfect for most peyote projects, gives you strength without the bulk. The lower weight works great since peyote doesn’t put much stress on your thread.
- Nymo Size B, C or D (0.2, 0.25, 0.3mm): Classic choice that’s been around forever. Size B for delicate work, Size C for everyday projects.
- KO Nylon Thread (220dtex): Super smooth and consistent, great for when you want your stitches to settle perfectly.
I’ve worked with all of these and honestly, peyote is so thread-friendly that you can get away with using whatever feels comfortable in your hands. The main thing is picking a thickness that doesn’t overfill your bead holes (which is the main concern in all the beading techniques I’ve covered so far)
Needles
Peyote is pretty easygoing with needles too. Honestly, I always work with size 11 needles lol. I already lost many though… can’t find them on my floor…(…) Size 10 to 12 needles work perfectly, and your choice really comes down to your bead size and personal preference:
- Size 12 needles: Thinner, for small beads, good for multiple passes
- Size 11 needles: Best all-around choice for size 11/0 beads
- Size 10 needles: Thickest option, 11/0 beads and larger

- MADE IN ENGLAND: The name of John James Needles is recognized by needle crafters around the globe and is renowned for qu…
- QUALITY: Made of steel, the #10 needle measures 55mm in length and 0.46mm in diameter. They come in a pack of 25.
- THREADING: The stiff needle is very fine, long and straight, with long eyes made for keeping thread in place while worki…
Since peyote doesn’t require as many passes through each bead as square stitch, you don’t need to worry as much about your needle wearing out the bead holes. I personally stick with size 11 needles for most of my peyote work with Delica beads and 0.2mm thread as I said previously~
Beads
Honestly the choice of bead is up to your preference, but I think the choice for brick stitch and peyote stitch is quite similar. So let’s talk about it!
Round seed beads work beautifully with peyote stitch. Since the beads sit in the valleys of the previous row, the rounded shape actually helps everything settle into place. You don’t need perfect uniformity like you do with square stitch – peyote will forgive minor size differences and still look great.
Cylindrical beads are (obviously) super nice for peyote as well, especially when you want crisp, clean lines. These are definitely my favorite. But you don’t absolutely need them. It depends on your budget (they’re more expensive), your preferences, etc.
Advantages of Cylindrical Beads for Peyote
- Nearly square profile
- Sharp edges give crisp definition to your work
- Uniform sizing makes it look extra cool (imo)
- Larger holes than round beads allow for comfortable threading
Cylindrical vs Round Seed Beads
Miyuki Delicas / TOHO Treasures / TOHO Aiko: Create sharp, architectural looks perfect for geometric designs
Round seed beads: Softer, more flowing appearance that works beautifully with peyote’s natural drape
Size considerations: 11/0 (2mm or less depending on the brand) beads are the most commonly used

- [UNIFORMITY] Miyuki Delica Glass Seed Beads Size 11/0. Miyuki Delica beads are known for their perfect tube shape and ex…
- [SIZE] Size: 11/0 – these TINY seed beads measure 1.6mm with a 0.8mm Inner Hole Diameter. Size 11/0 is the most popular …
- [QUANTIY] 3 TUBES each containing 7 Grams of Miyuki Delica glass Seed beads. Each tube measures 2 x 9/16 Inces and conta…
You can definitely pick up affordable cylindrical beads from online suppliers like AliExpress. I’ve tried them and they’re perfectly usable for learning and practice projects. Just keep in mind a few things:
- They’re not as durable as premium brands like Miyuki or Toho
- Color consistency can be unpredictable – the same color code might look different between orders
- The finish tends to wear off more easily with handling
- They’re perfect when you’re starting out or working on practice pieces where you don’t want to invest heavily upfront
Quality cylindrical beads really do make a difference in your finished work – everything looks more professional and polished. But for getting started with peyote stitch, budget options will absolutely do the job while you’re learning the technique! To be honest, I use both!
Brick Stitch vs Peyote Stitch
Now that you’ve gotten the hang of both techniques (or well, i hope so?), let’s dive into when you’d want to choose one over the other. Sure, they look pretty much the same when you’re done, but each one has its own quirks that make it perfect for different situations.
Your Thread
Remember how we talked about peyote being easier on your thread? Well, here’s where that becomes super clear. In peyote, your needle goes right through the beads themselves. But with brick stitch, you’re catching those little thread loops between beads from the previous row. This actually pulls everything tighter as you work, which gives you a really secure fabric. The downside? All that pulling and catching puts way more stress on your thread, and over time, those thread connections aren’t quite as solid as when thread goes directly through beads.
Speed and Getting Started
Once you get into a rhythm, peyote is definitely the fastest one to work with. You can really fly through rows once you’ve got your groove on. Plus, if you mess up, it’s much easier to undo peyote stitches. But – and this is a big but – peyote can be trickier to start, and keeping your tension even takes some practice. Brick stitch is more forgiving when you’re getting started, and your tension stays more consistent naturally.
To Make What?
Honestly, I feel like both are really versatile. Brick stitch really shines when you’re making shaped pieces. Think leaf earrings, little diamond pendants, or anything with angles and curves. It’s also fantastic for small, symmetrical designs because you don’t have to deal with those fiddly odd-count turns that peyote sometimes throws at you.
Peyote, on the other hand, is your go-to for flat panels like bracelets, bookmarks, or when you want to make tubular pieces like beaded ropes.
Mix and Match
But you don’t actually have to pick a side! Lots of beaders will start a project in one stitch and finish it in another, or even combine both in the same piece. You could use peyote to make a nice straight edge on a brick stitch project, or add some brick stitch accents to break up a peyote pattern.
Wrap-Up
Honestly, I think peyote might be my new favorite technique. (Am I gonna say that each time I learn something new? maybe.) Don’t get me wrong, I still love square stitch for pixel art and brick stitch for structured pieces. But there’s something about peyote that just feels… cool, lol. Maybe it’s the way it flows, or how forgiving it is, or just that satisfying rhythm once you get going.
I’m already sketching out some peyote patterns to share on the blog soon. I love cute things so I have so many ideas already. Just like for the other techniques actually lol ;;;
Up next on my beading journey, as I wrote in the article, I plan on learning circular peyote! I will update the article along my learning journey. I’m sure you can make fantastic things with it, I can’t wait to see~
Thanks for following along on this journey with me! ♥