After working my way through square stitch, brick stitch, and flat peyote stitch, I found myself wanting to push my beading skills a little further. I’ve been interested in circular peyote stitch from the beginning actually. I love the way a simple tube can transform into spheres and three-dimensional forms. It opens up a whole new world of possibilities beyond flat beadwork, which is something I really wanna learn and master.
SO HERE I AM, after making countless spheres with peyote stitch. At first, it was really confusing and I wasn’t focused enough to make one correctly – you do need to count a little. But once you’ve got the technique down, you can create stunning little things. For my part, I love creating little animals, so I’ll be focusing on that from now on. But you could create so many different cute jewelries with that techniques!
So if you’re looking for a beaded ball tutorial for beginners, you’re in the right place. This guide walks through creating a ~16mm beaded bead using a structured pattern. I tried to make it as clear as possible, but it might change as time goes by for clarity reasons.
There are many ways to make beaded balls, and this easy beaded sphere pattern is just the one that gave me the best result personally. You can try all the other techniques as well! (triangle peyote shapes & zipping them up together, two demi-spheres & zipping them up together, more rows than what I’m making, etc.) This free beaded ball pattern uses circular peyote stitch, which I find gives the smoothest, most consistent results.
Materials Needed
- 16mm bead (can be a little less, or a little more)
If you don’t have a bead of that size, you can make it yourself (like I did)! You can use clay, aluminimum, plastic wrap, or anything similar that will hold the shape. - 55 inches of thread (140cm)
In my case, I used KO beading thread (330dtex) but you can use any as long as it is not too thick (0.2mm max) - 11/0 beads
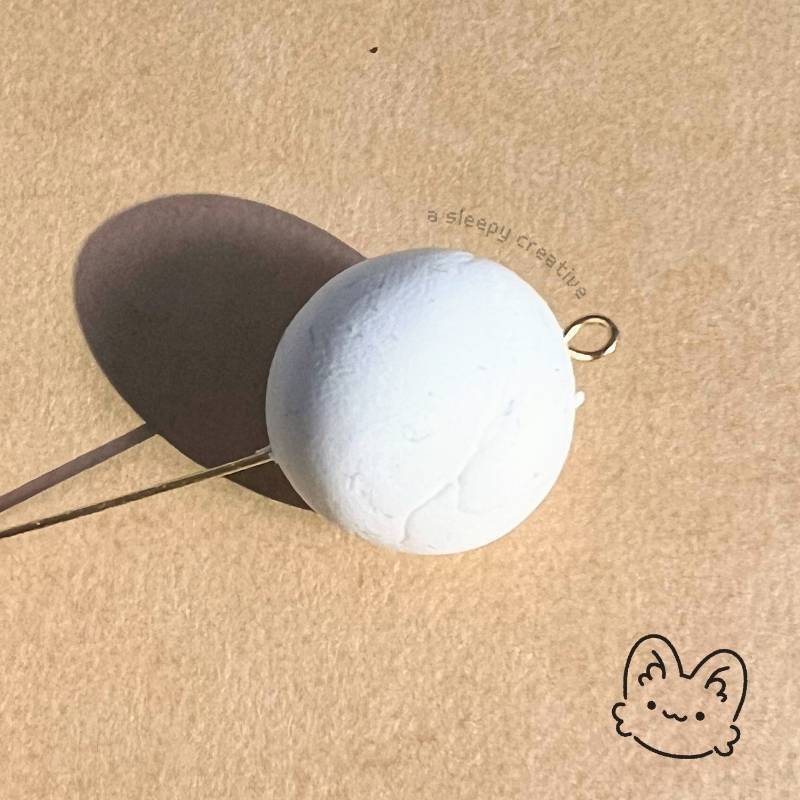
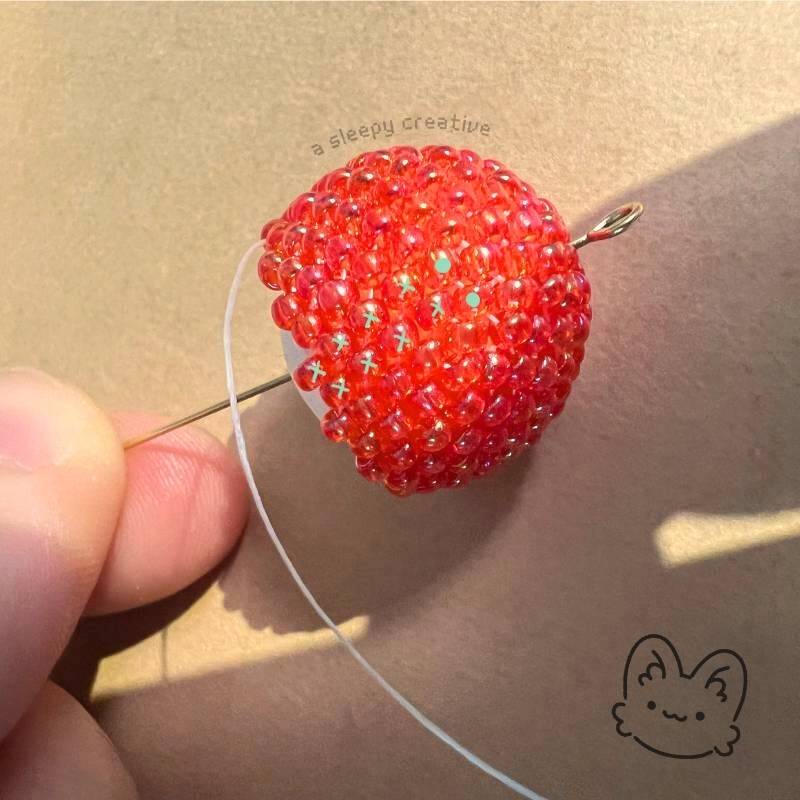
in my case, I used toho 11/0 round seed beads. You can use any beads that are around 2mm. - Optional: an eye pin.
I personally used an eye pin to hold my ball because I want to transform my beaded ball into a keychain in the future, but it’s totally optional. 🙂
About the Pattern
Make sure you take note of these few points before starting to work on your beaded sphere! It’s important for the understanding, as well as the success of the project. 🙂
- Grey beads = Beeads added during the previous round
- Green beads = beads added during the round.
- Circled green beads on photos = beads added during the round
- Always end by passing through the first bead added in the round you’re working on.
Now let’s finally start crafting a 3D beaded sphere from scratch!
How to Make a Beaded Ball Step by Step
Row 1
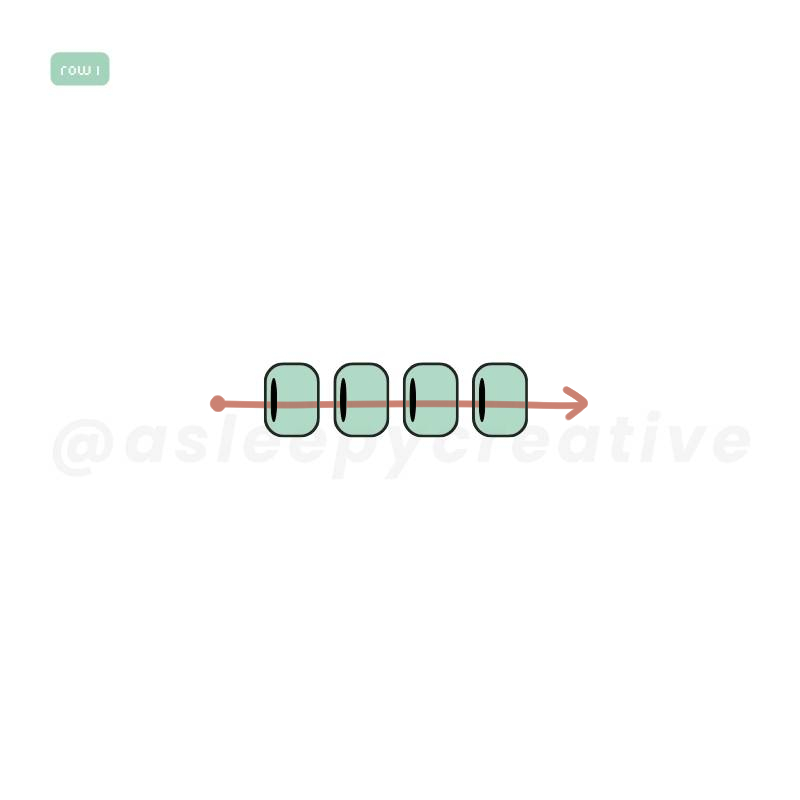
We start simple: pick up 4 beads and thread them.
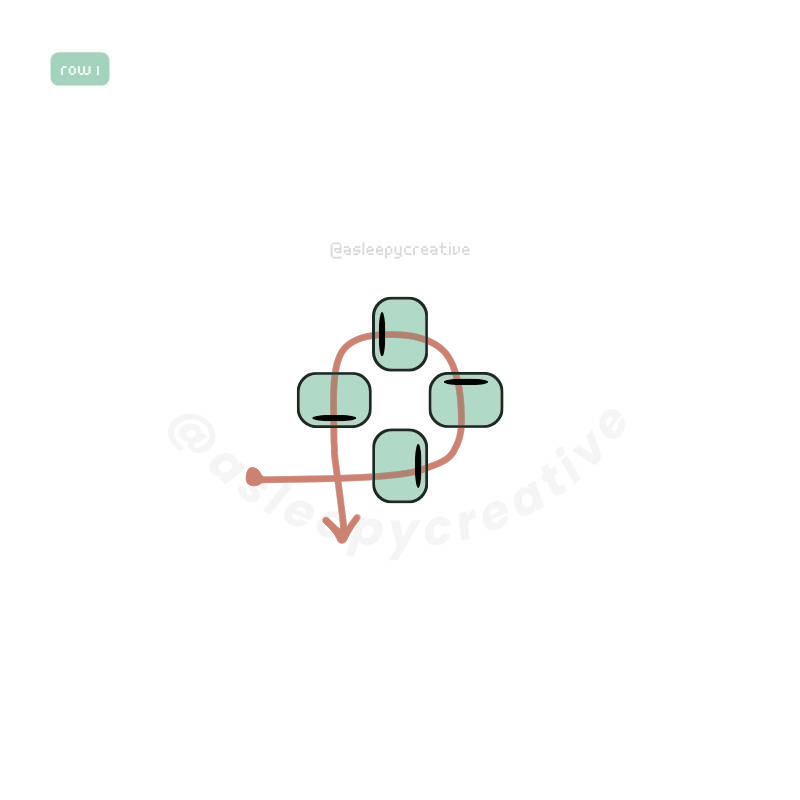
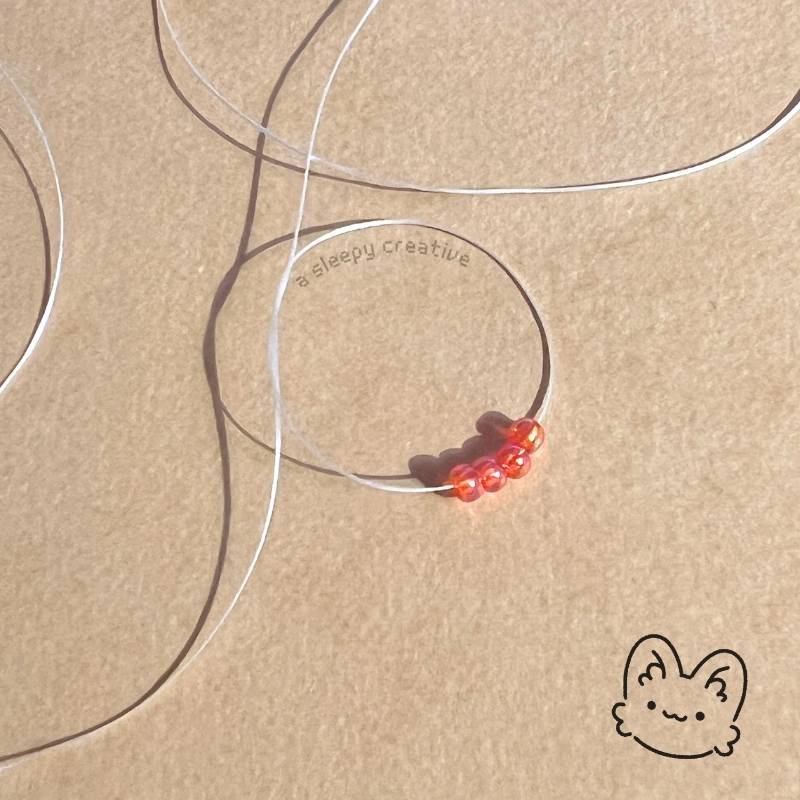
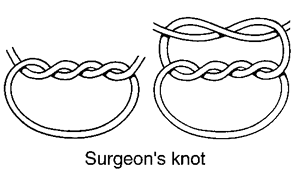
Once threaded, tie them into a circle with a knot. In my case, I’m using a surgeon’s knot – easy and solid.
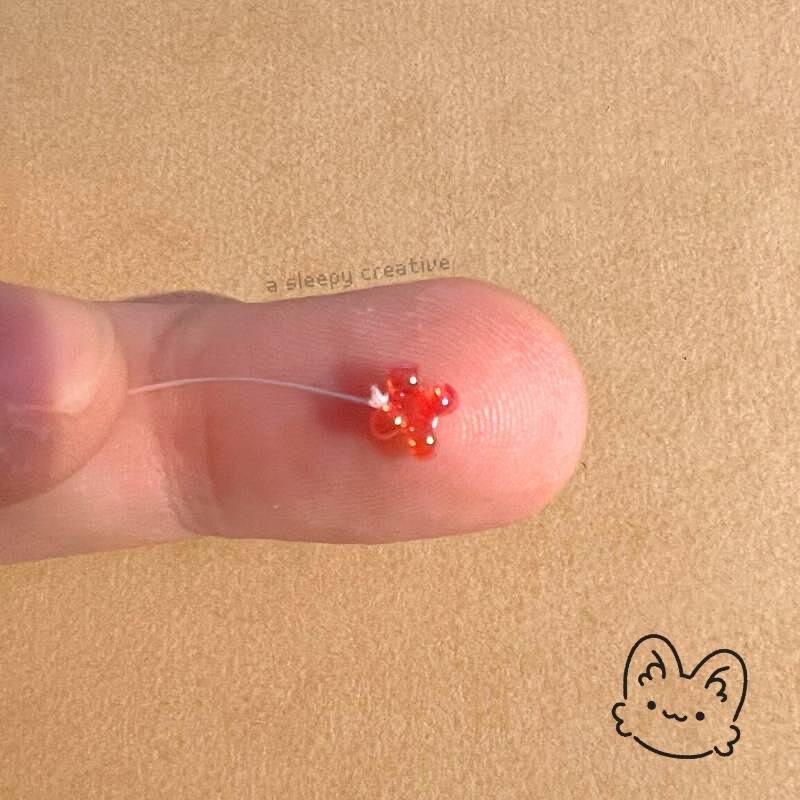
This forms your initial ring. You can hide the knot inside the bead if you want. It will become hardly visible as soon as you start threading more beads in any case.
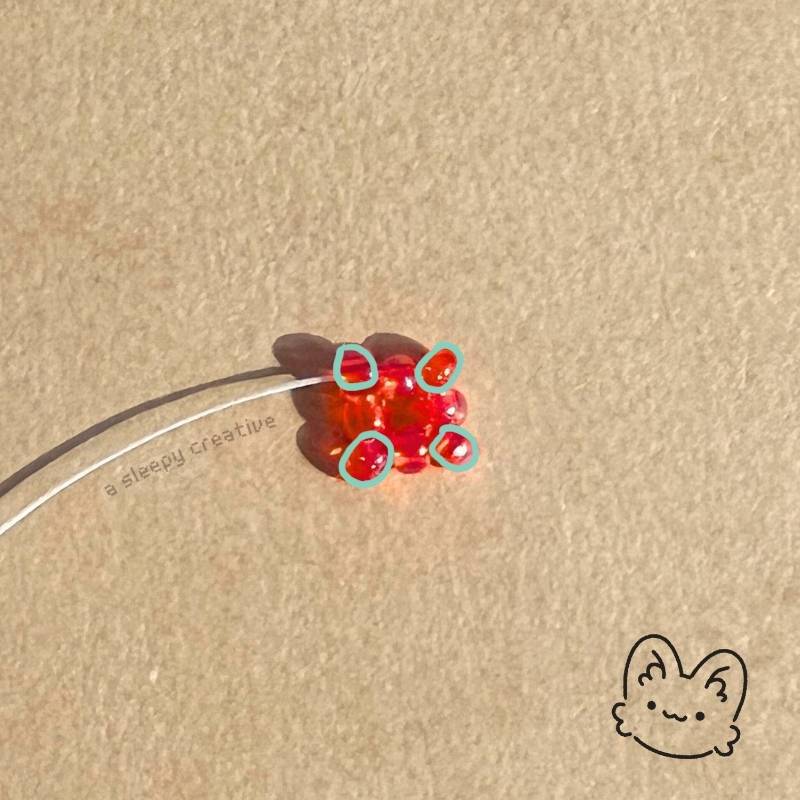
Row 2
For row 2, we’ll need 4 additional beads.
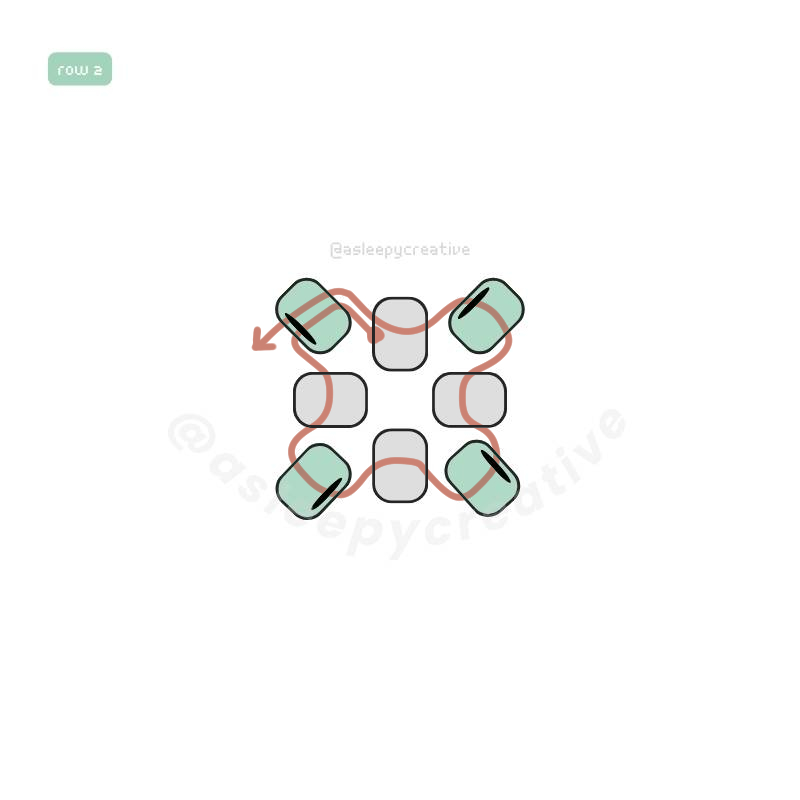
Work the peyote stitch by picking up one bead and passing through the next bead in the circle. Continue around, adding one bead between each of the foundation beads (1-1-1-1). You’ll add 4 beads total. Step up by passing through the first bead you added in this round.
Note: it’s important to always end by passing through the first bead added in the round you’re working on.
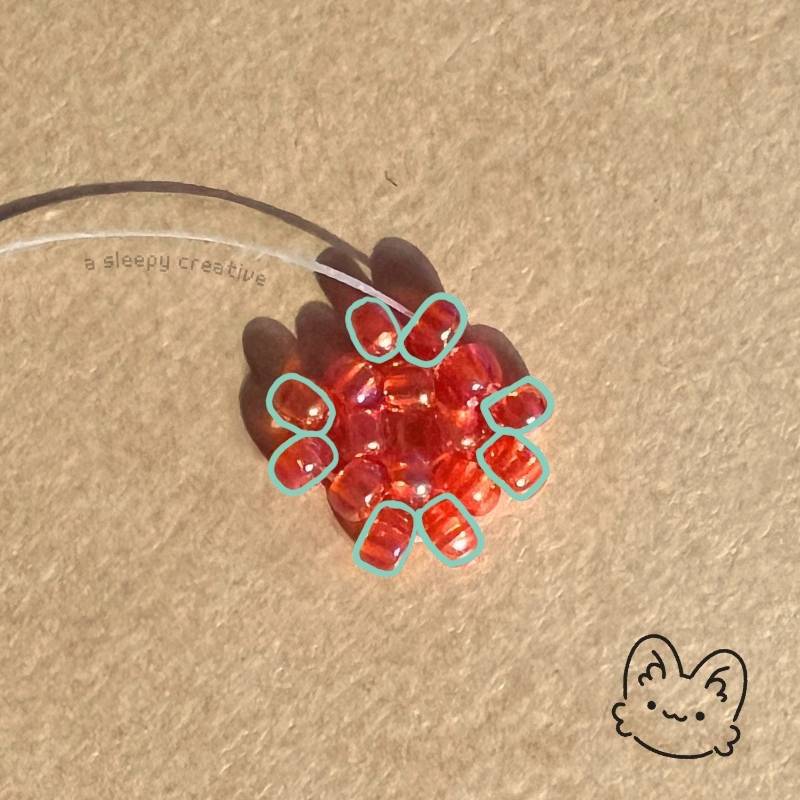
Row 3
Beads needed for row 3: 8
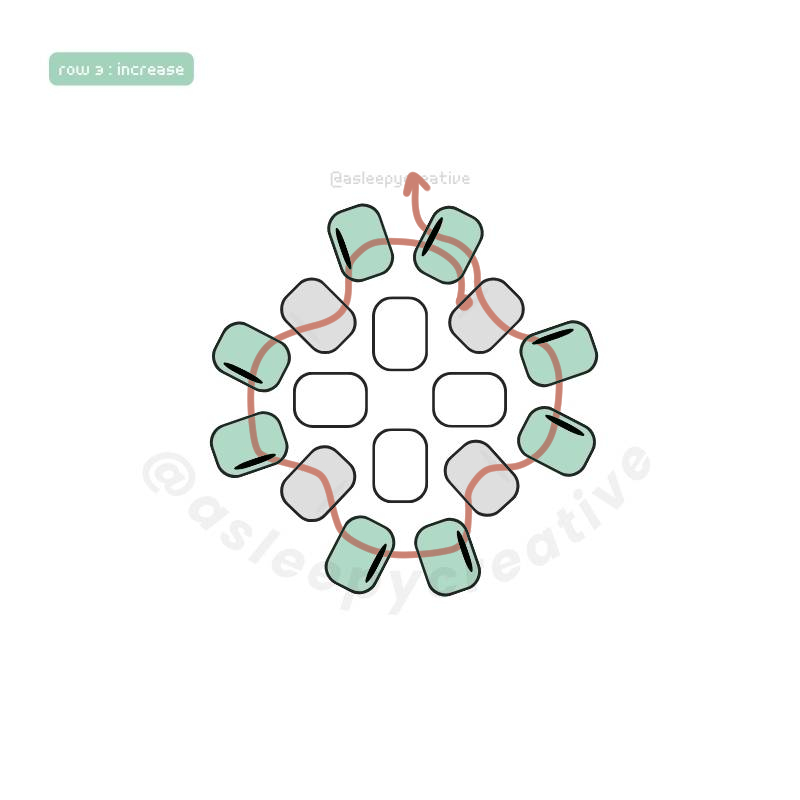
This is our first increase round. In each of the 4 stitch positions, add 2 beads instead of 1. You now have 8 bead positions total. (pattern: 2-2-2-2)
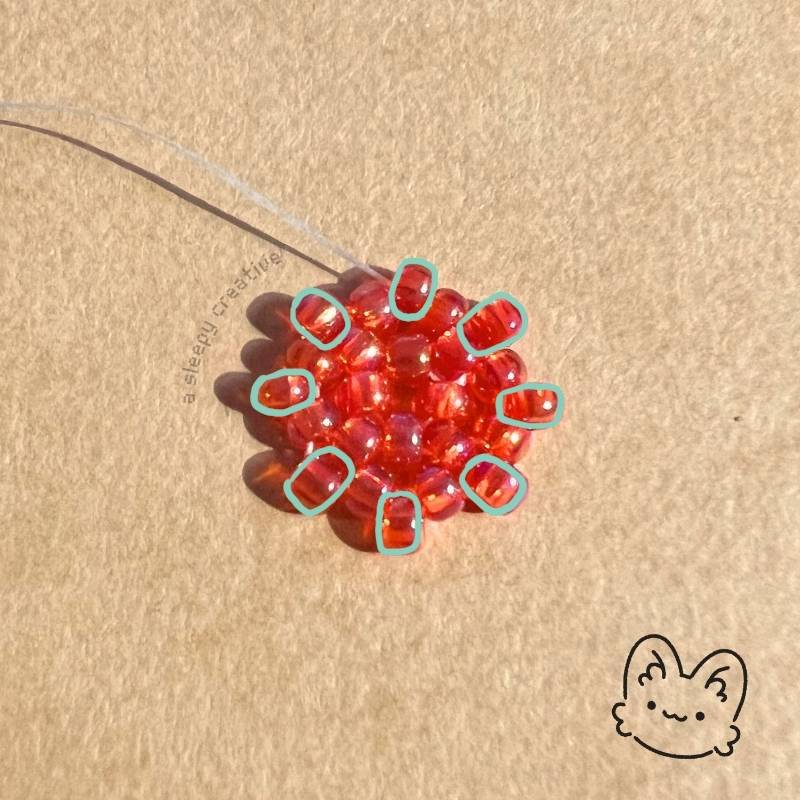
Row 4
Beads needed for row 4: 8
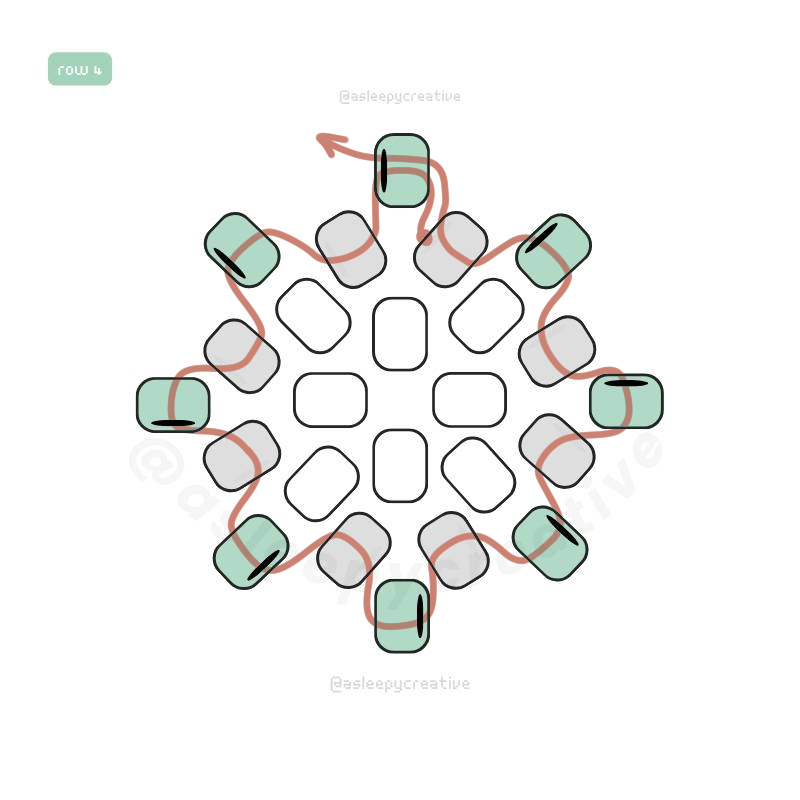
Work regular peyote stitch in all 8 positions, treating each of the previous two-bead increases as separate beads to stitch into. This stabilizes your increases. (pattern: 1-1-1-1-1-1-1-1)
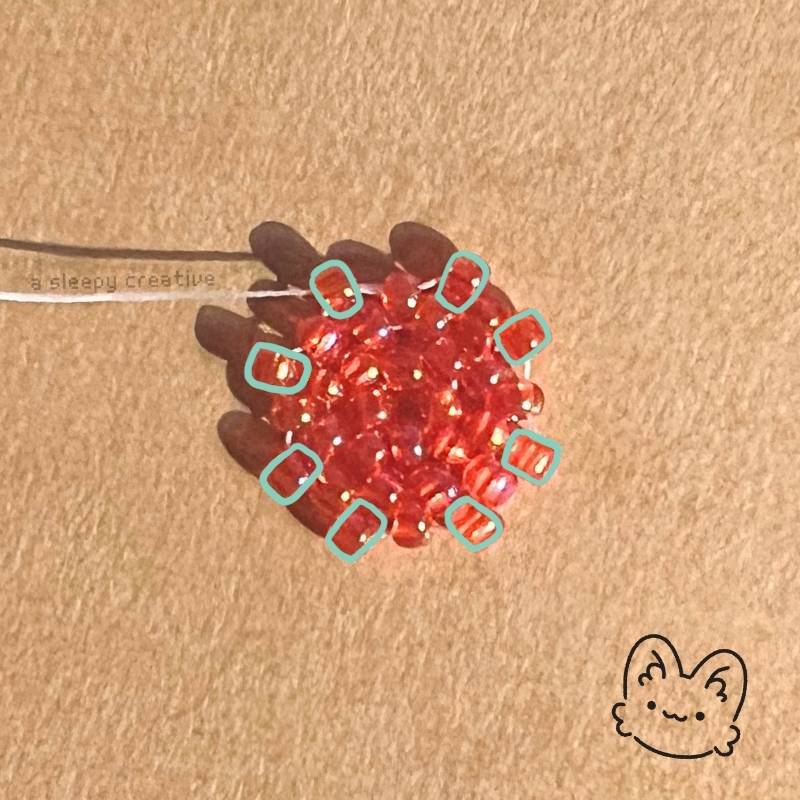
Row 5
Beads needed for row 5: 8
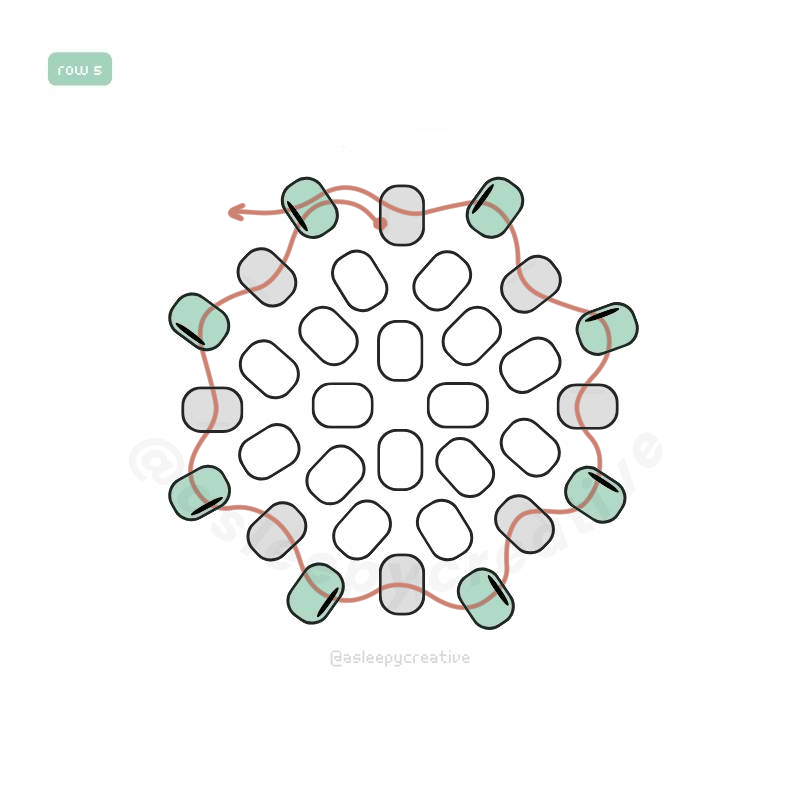
Similar as for row 4, place a bead in between each bead previously threaded, making a total of eight beads threaded for this row as well. (pattern: 1-1-1-1-1-1-1-1)
Row 6
Beads needed for row 6: 12
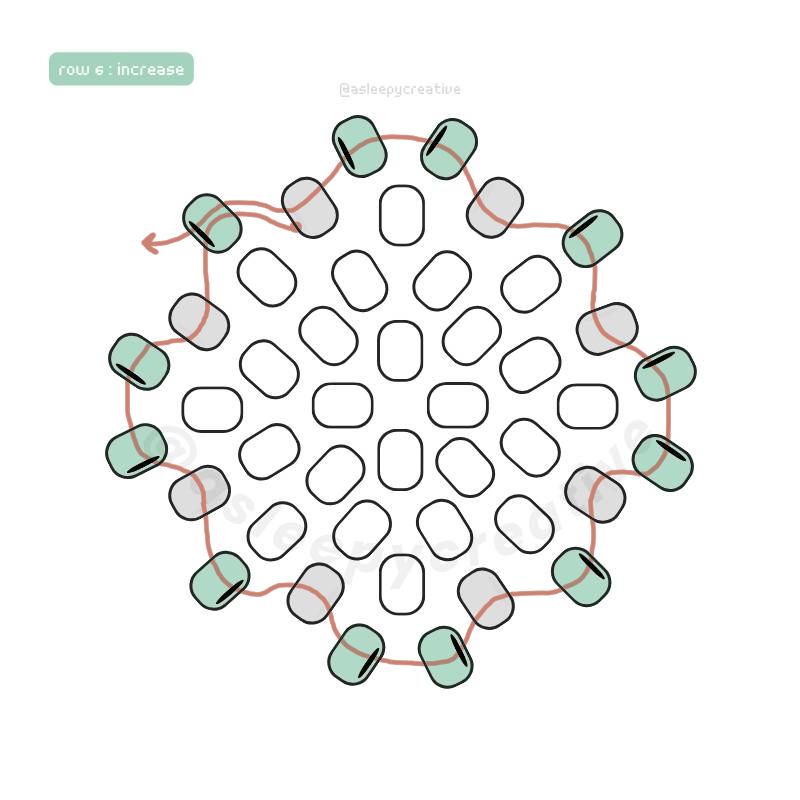
Another increase round, but this time alternating. Add 1 bead, then 2 beads, then 1, then 2, and so on around. You now have 12 bead positions. (pattern: 1-2-1-2-1-2-1-2)
I’m increasing on top of the preivous increase. Some people prefer staggering their increases, but I’ve tried both ways and couldn’t see much difference.
So I decided to stack my increases (as well as my decreases) for clarity. It’s perfect for beginners in my opinion, and I am one as well!
From this row, I’ll also start working on my homemade bead (clay bead that is approximately 16-17mm). It will allow me to make sure the beads are taking the right shape alltogether 🙂
Row 7
Beads needed for row 7: 12
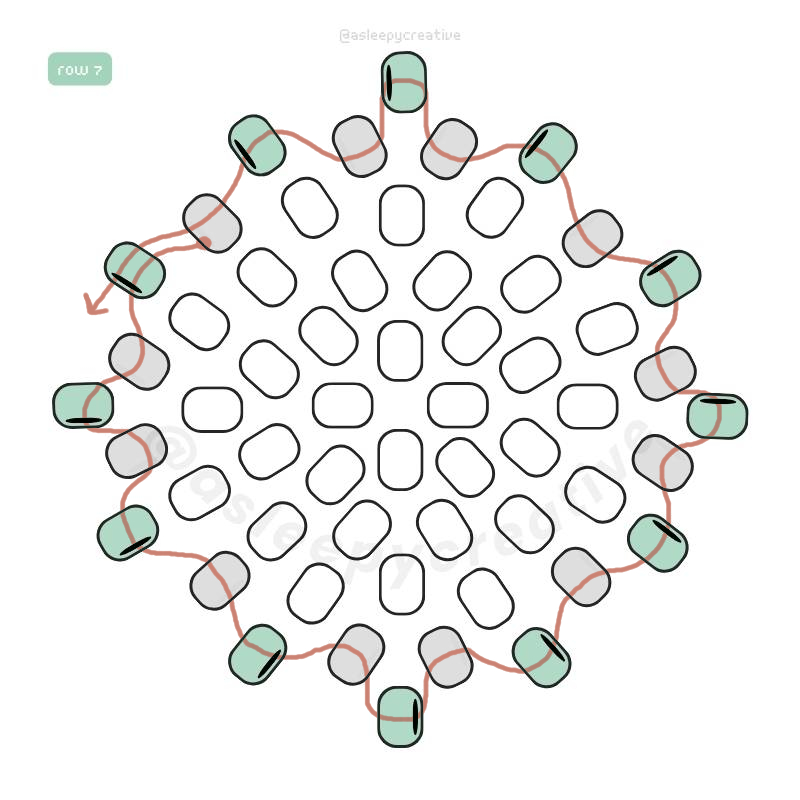
We continue with 12 beads for row 7. Now you might have understood that the same pattern repeats after each increase: we add one bead between each of the previous row’s beads. (pattern: 1-1-1-1-1-1-1-1-1-1-1-1)
Row 8
Beads needed for row 8: 12
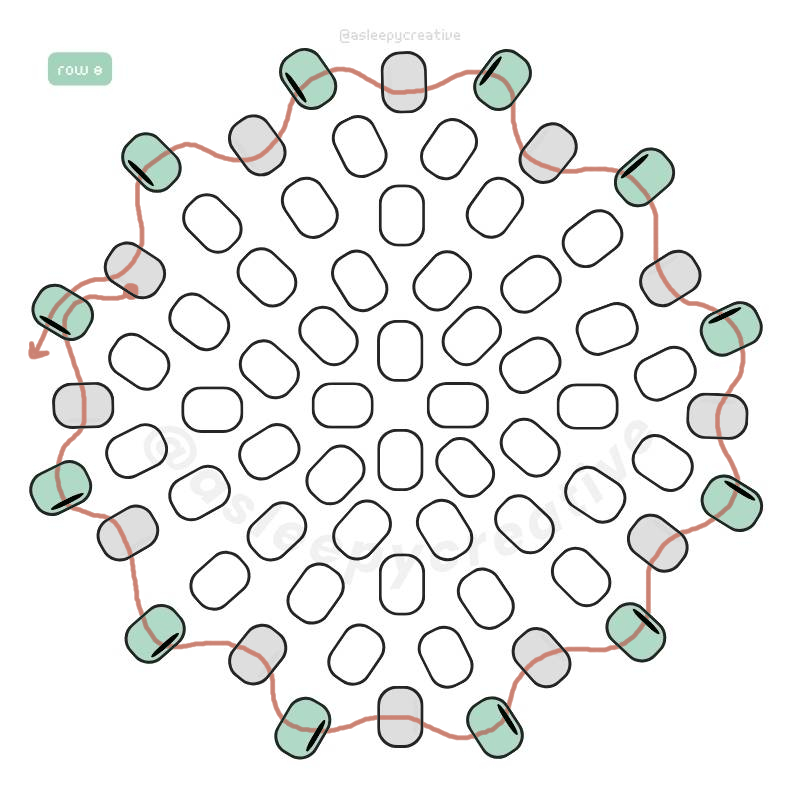
And same for row 8! The last row before our last increase. As for row 7, add one bead between each of the previous row’s beads. (pattern: 1-1-1-1-1-1-1-1-1-1-1-1)
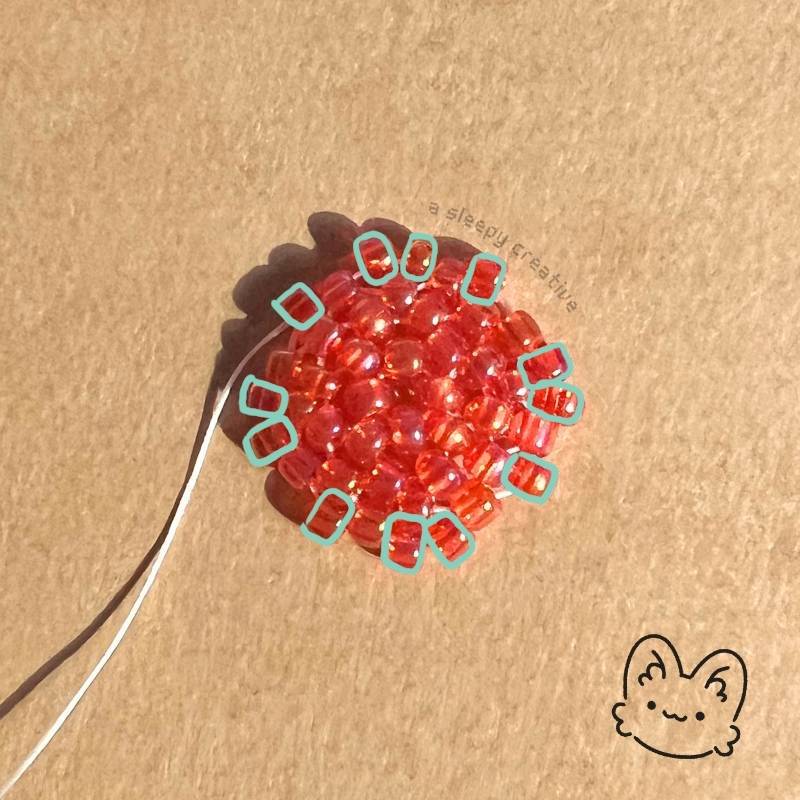
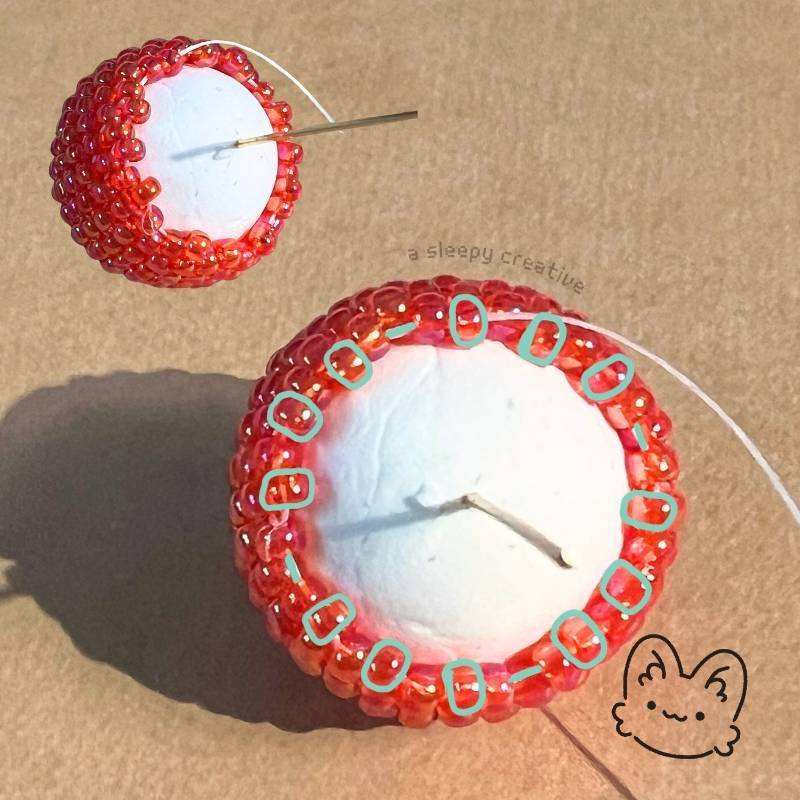
You can see both row 7 (green) and row 8 (yellow) on this picture♥
Row 9
Beads needed for row 9: 16
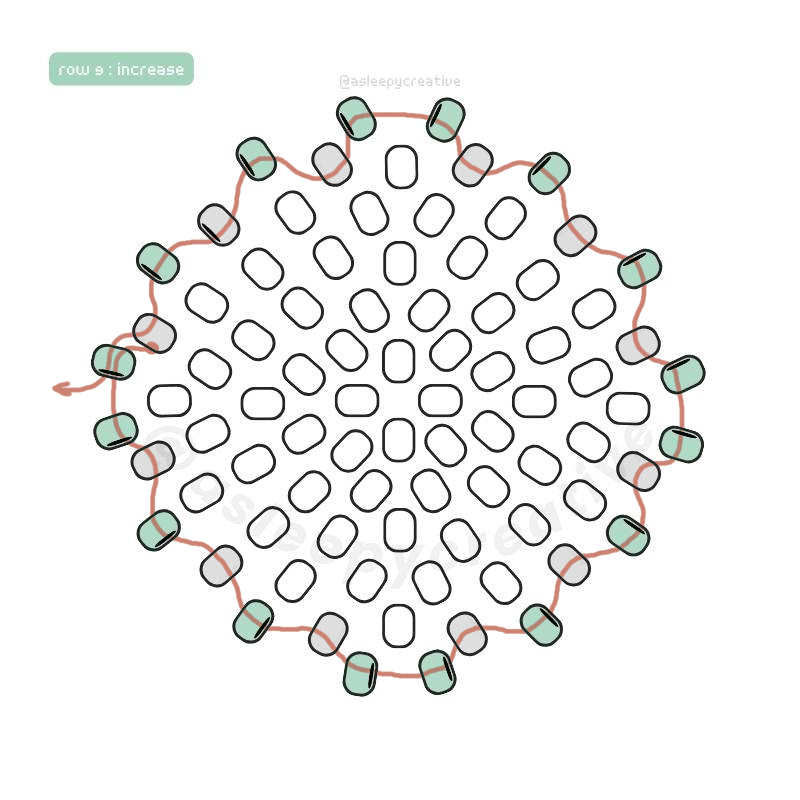
Proceed to make the last increase for our beaded ball. As I said previously, I stack the increase on top of the previous ones because I find it easier to deal with. I have a good understanding of how things work right now and can stagger them easily, but I know I couldn’t do it at first. So I think this way is better for beginners!
Alternate 2 beads and 1 bead as follows: 2 on top of the previous increases, 1 in between. (pattern: 2-1-1-2-1-1-2-1-1-2-1-1)
Row 10
Beads needed for row 10: 16
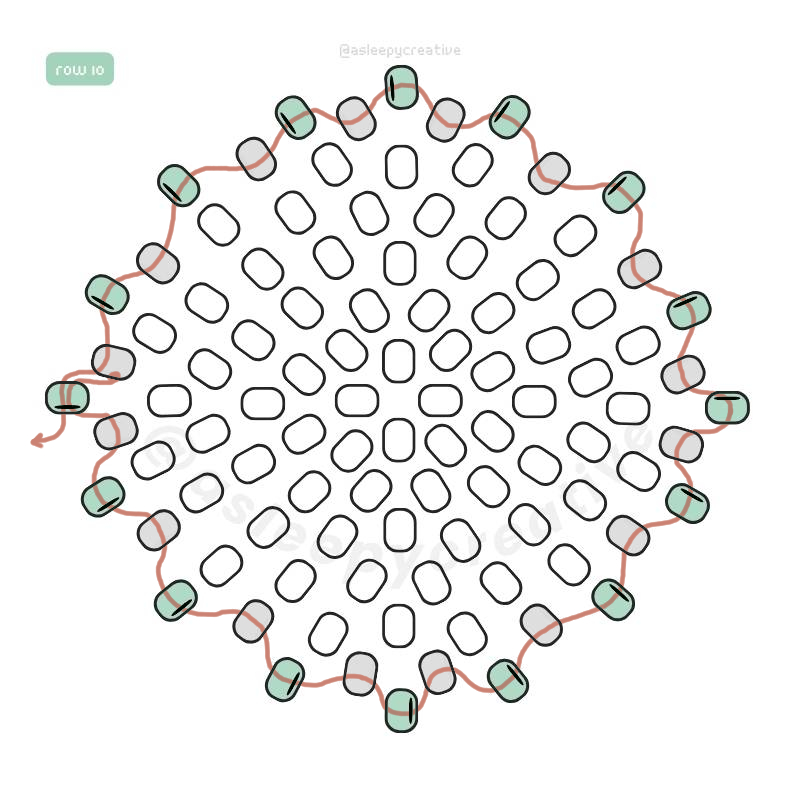
And as previously, we add one bead in between each bead added during the previous row. Total: 16 beads! (pattern: 1-1-1-1-1-1-1-1-1-1-1-1-1-1-1-1)
Row 10 – 17
The rows 10 to 17 follow exactly the same pattern.
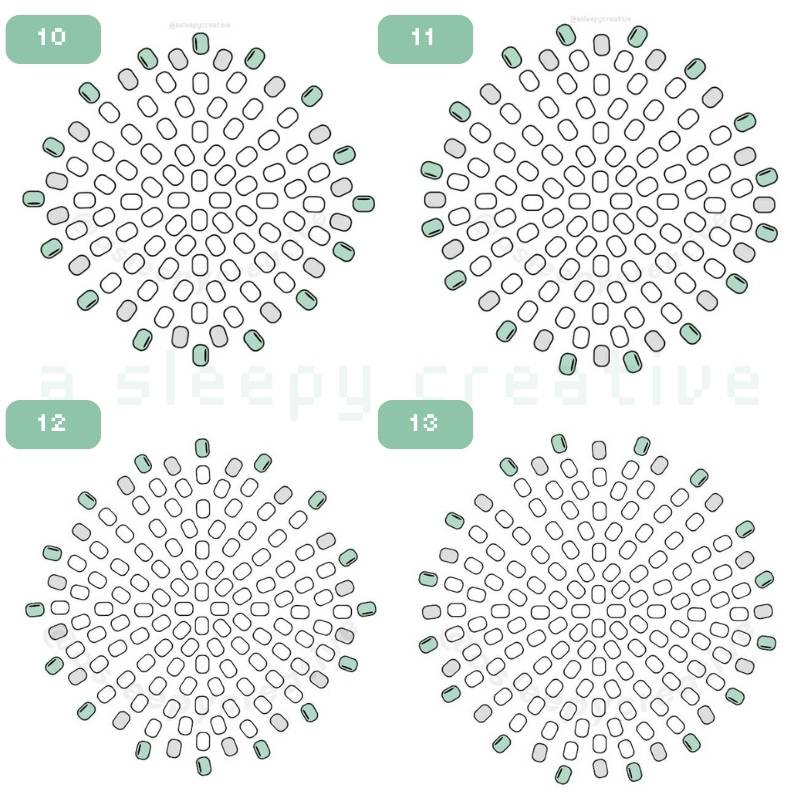
You’ll need to add, for each row, 16 beads. One in between each bead of the previous row. You’ll thread 8 rows like this, from 10 to 17.
Note: Don’t forget to end by passing through the first bead you added for all the rounds!
To count your rows: visualize where our last increase is. (on the picture the green dots (•))
Then, each green x represents a row. On the picture, you can see I threaded 8, which represents 8 rows from the last increase.
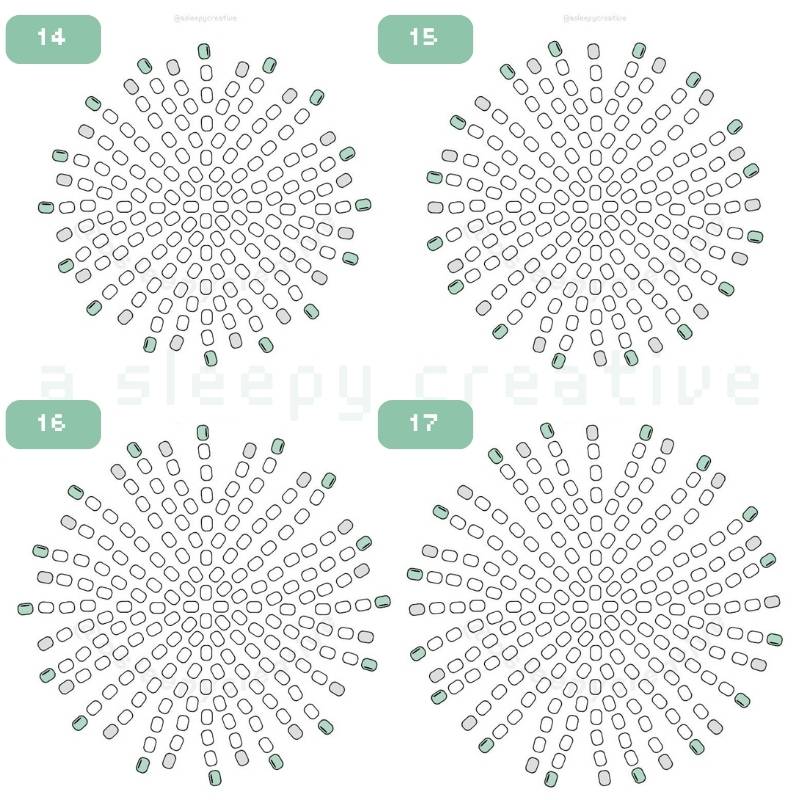
Row 18
Beads needed for row 18: 12
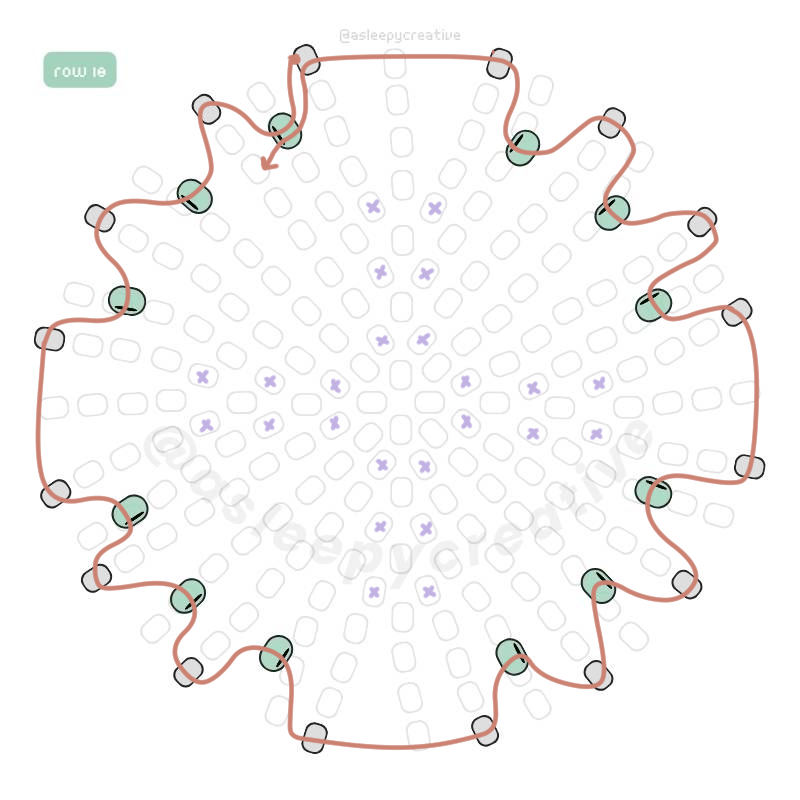
We finally start the decreases from now, which indicated that we’re almost done with our bead.
To decrease, we need to thread through 2 old beads without adding 1 bead in between. That is one decrease. We’ll make four decreases on this round. So we’ll skip 1, thread 3 beads , skip 1, thread 3, skip 1, thread 3, skip 1, thread 3, counting a total of 16 beads. (pattern: _ 1-1-1 _ 1-1-1 _ 1-1-1 _ 1-1-1 ; the skips are represented by _)
On the picture, you can identify the previous increases with purple x’s. I like keeping them in mind since I stack both my increases and my decreases. It is absolutely not mandatory, but it allows me to keep my counting easy and the work clean, I feel like.
Row 19
Beads needed for row 19: 12
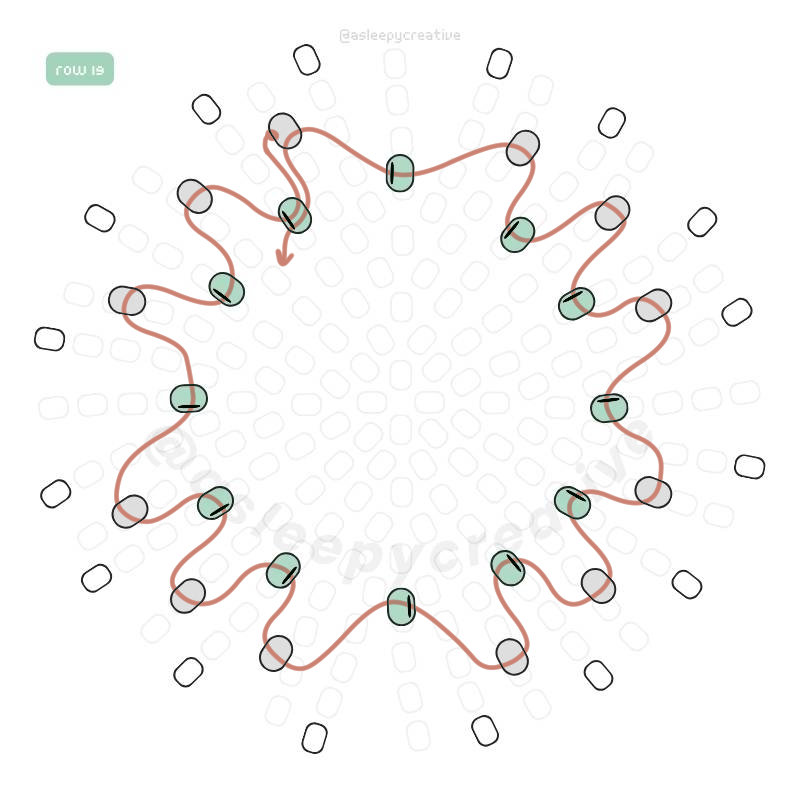
And we follow the decrease by threading 12 beads from now on until the next decrease. Add one bead in between each bead of the previous row, for a total of 12 beads.
Row 20
Beads needed for row 20: 12
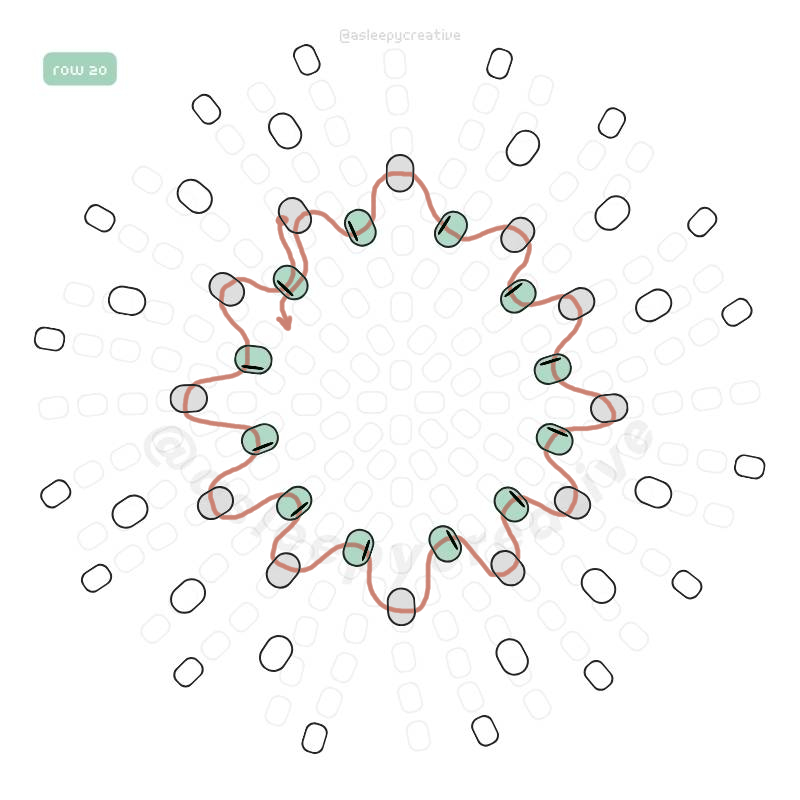
And the same goes for this row! Add one bead in between each bead of the previous row, counting 12 beads total for this row as well.
Row 21
Beads needed for row 21: 8
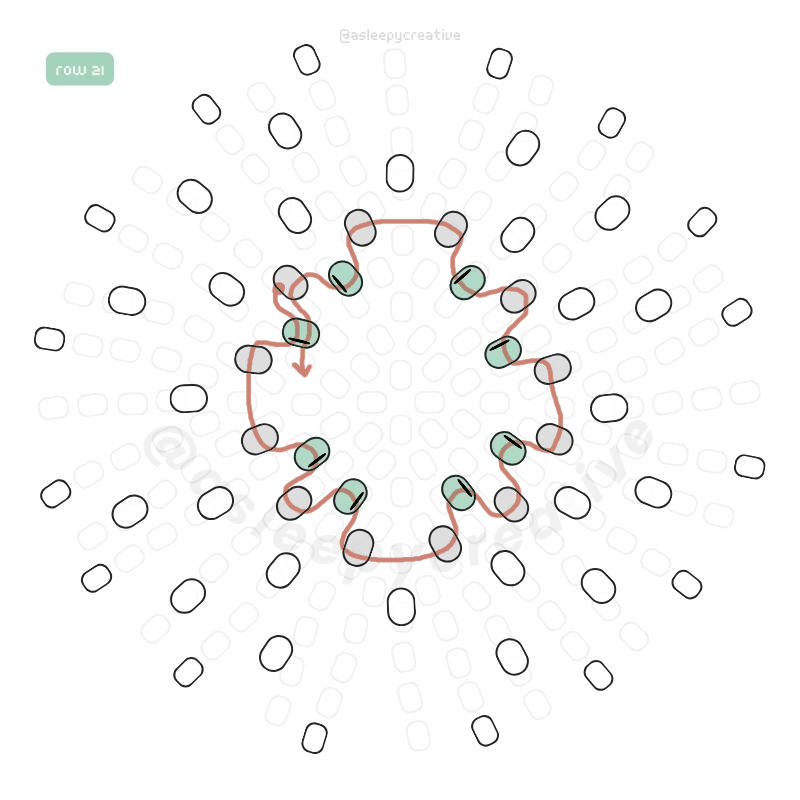
Time for another decrease, that I stack on top of the other one. Skip 1, thread 2, skip 1, thread 2, skip 1, thread 2, skip 1, thread 2, to end up with a total of 8 beads instead of 12. (pattern: _ 1-1 _ 1-1 _ 1-1 _ 1-1)
Note: Don’t forget to end by passing through the first bead you added during this round – and as I wrote multiple times in the tutorial, this should be done for each single row.
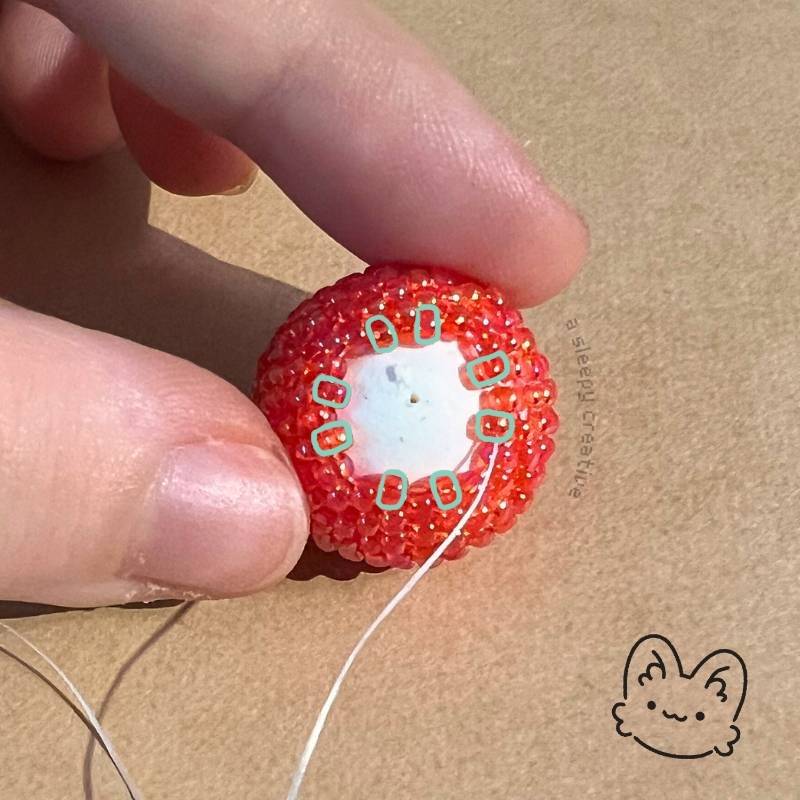
Row 22
Beads needed for row 22: 8
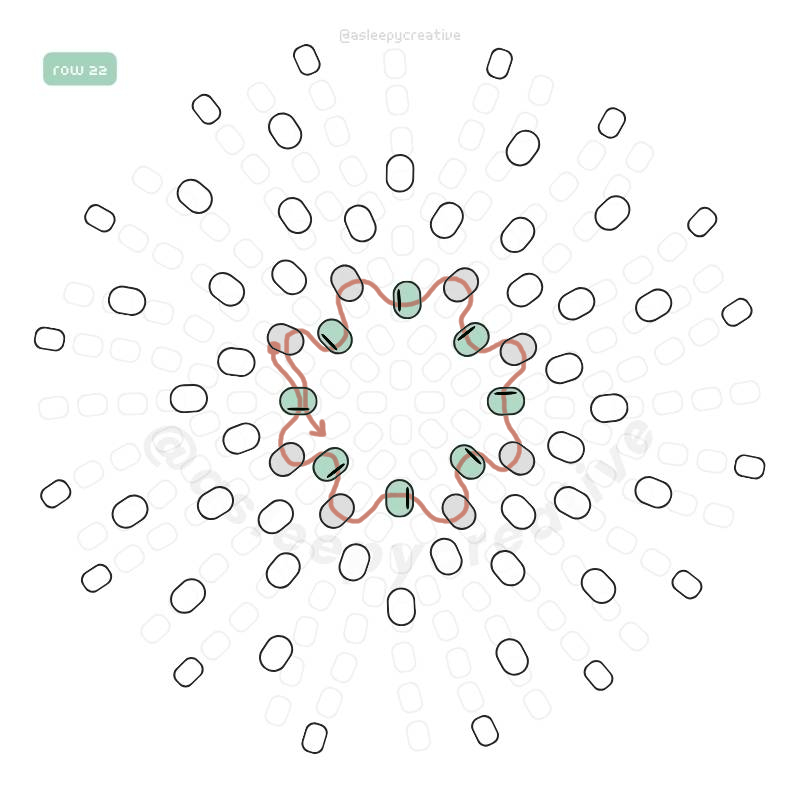
And we follow up by threading normally: one bead in between each bead of the previous row, for a total of 8 beads. (pattern: 1-1-1-1-1-1-1-1)
Row 23
Beads needed for row 23: 8

Once again for this row, we add one bead in between each bead of the row we’ve threaded right before. Don’t forget to pass through the first bead you’ve threaded during this row (23), as always! (pattern: 1-1-1-1-1-1-1-1)
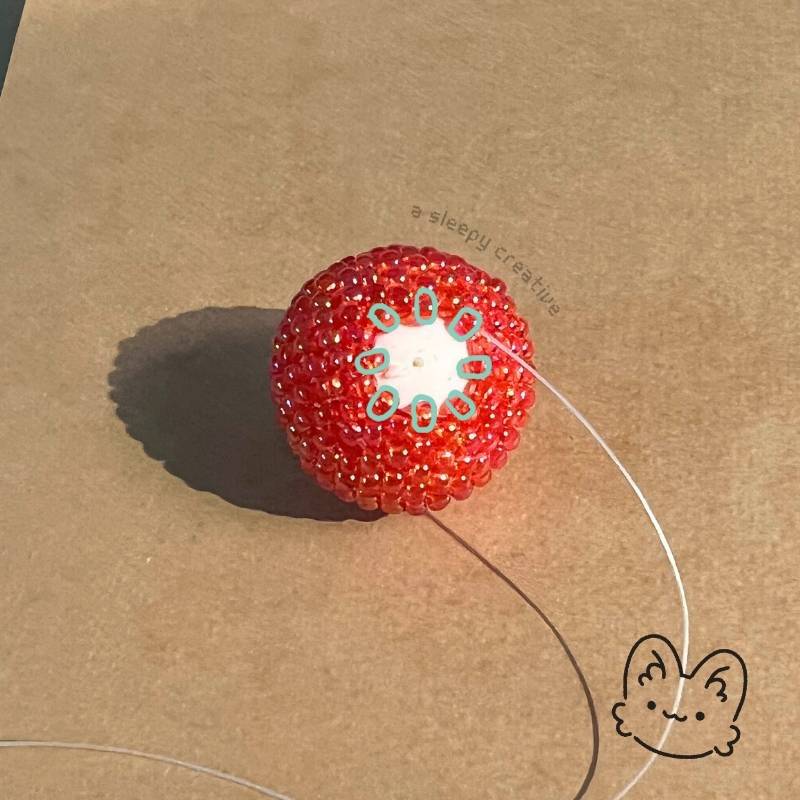
Row 24
Beads needed for row 24: 4
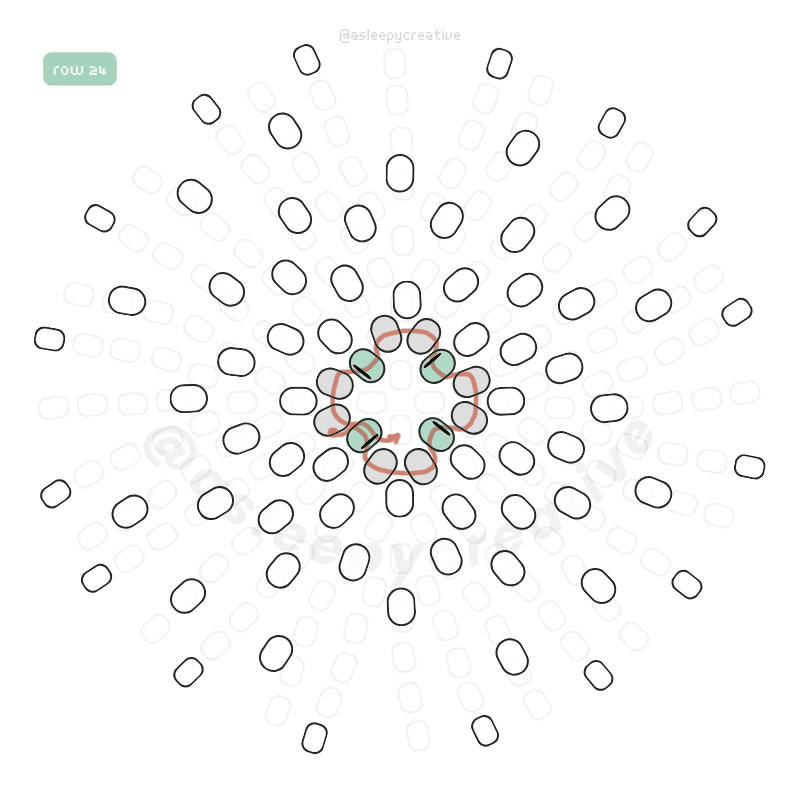
And now we’re starting our last decrease – the bead is almost wrapped up!
Skip 1, thread 1, skip 1, thread 1, skip 1, thread 1, skip 1, thread 1, for a total of four beads. Don’t forget that it’s easier if you stack it on top of your last decrease – meaning the skipping part (the decrease itself) is stacked on top of the previous skip (the previous decrease). (pattern: _ 1 _ 1 _ 1 _ 1)
All nicely coming together with our four beads – we can see there is little space left, just enough for our last row!
If you have more space at this point, it probably means that either your beads were smaller, or that your 16mm bead was a bit bigger. It’s okay though, you can add additional rows, even though it is better to add them between rows 10 and 17.
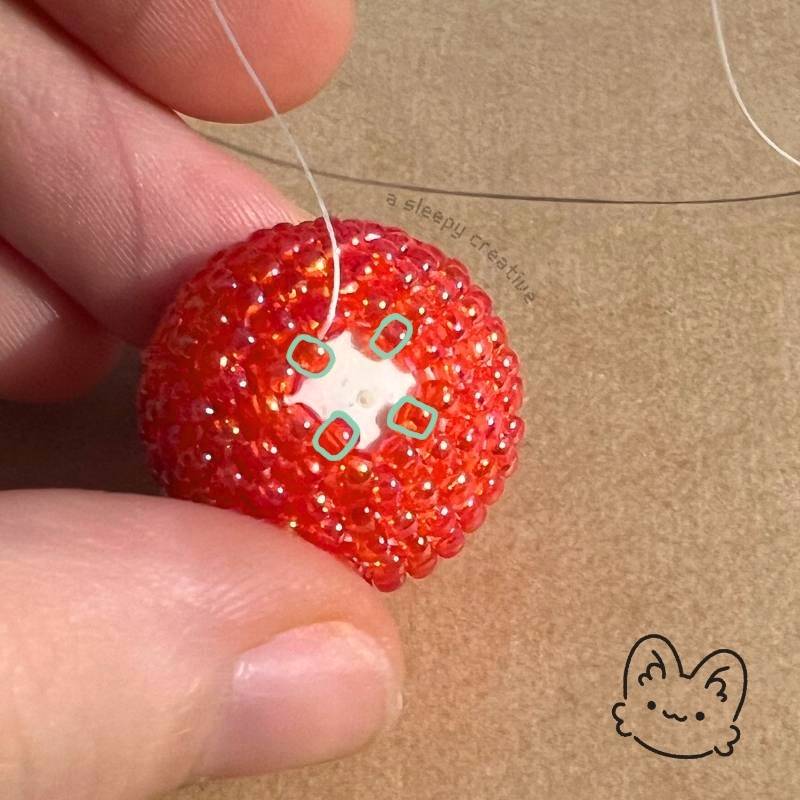
Row 25
Beads needed for row 25: 4
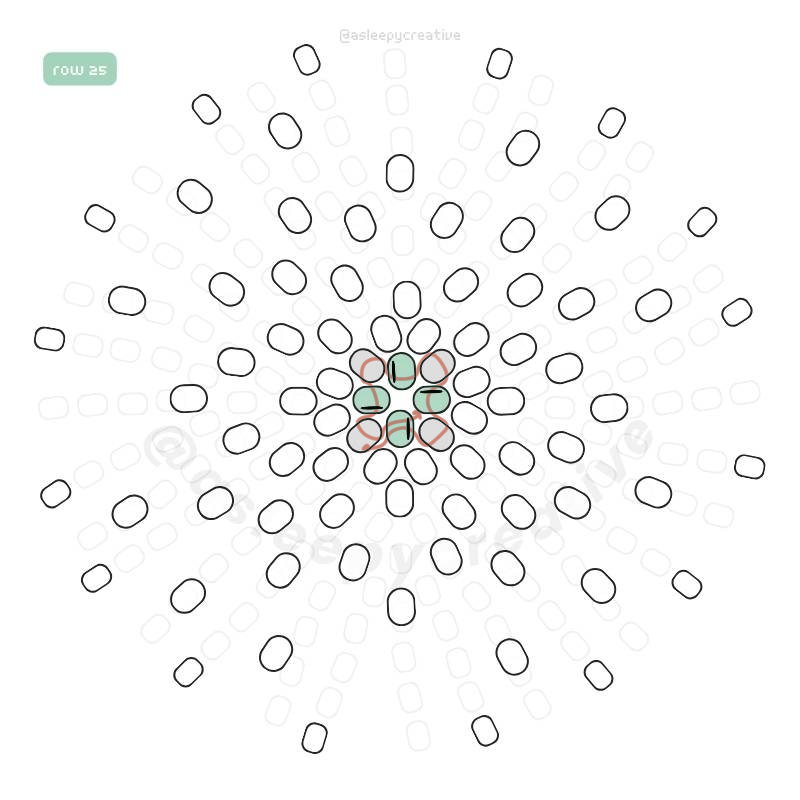
Our last row to wrap up our beaded ball. Thread 4 beads by passing through the beads of the previous row, as usual. And you’re done! (pattern: 1-1-1-1)
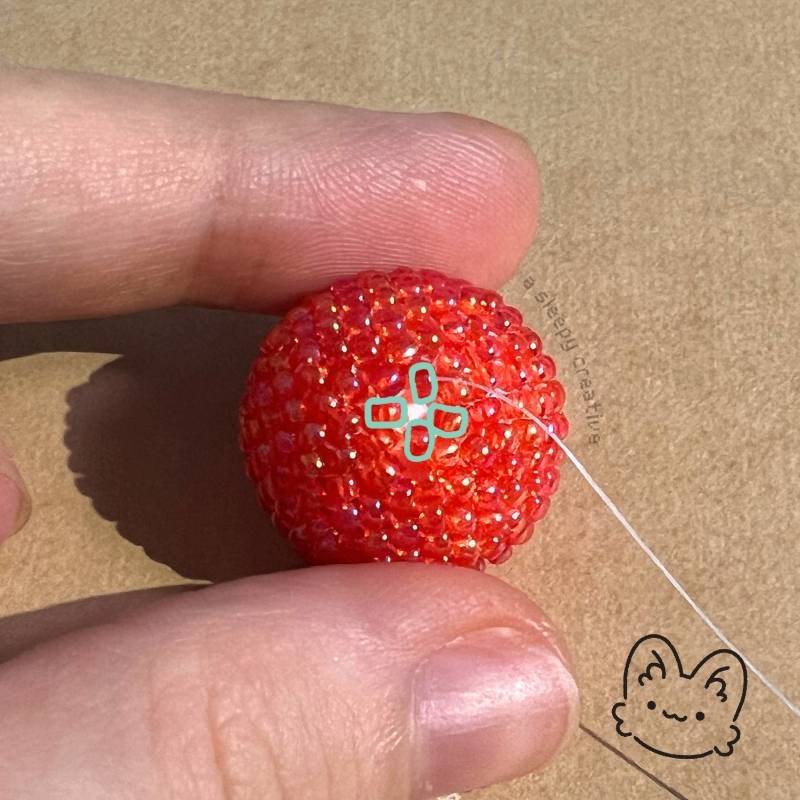
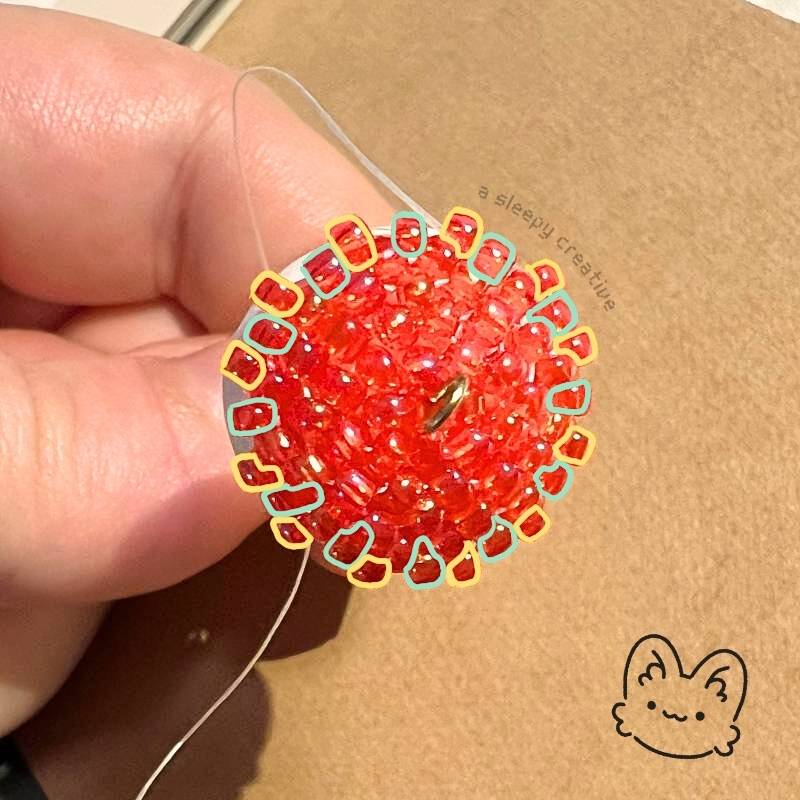
You should be left with a little space, just like on the other end of your bead. You can choose to thread an additional bead to seal this space, but I prefer using it for my eye pin!
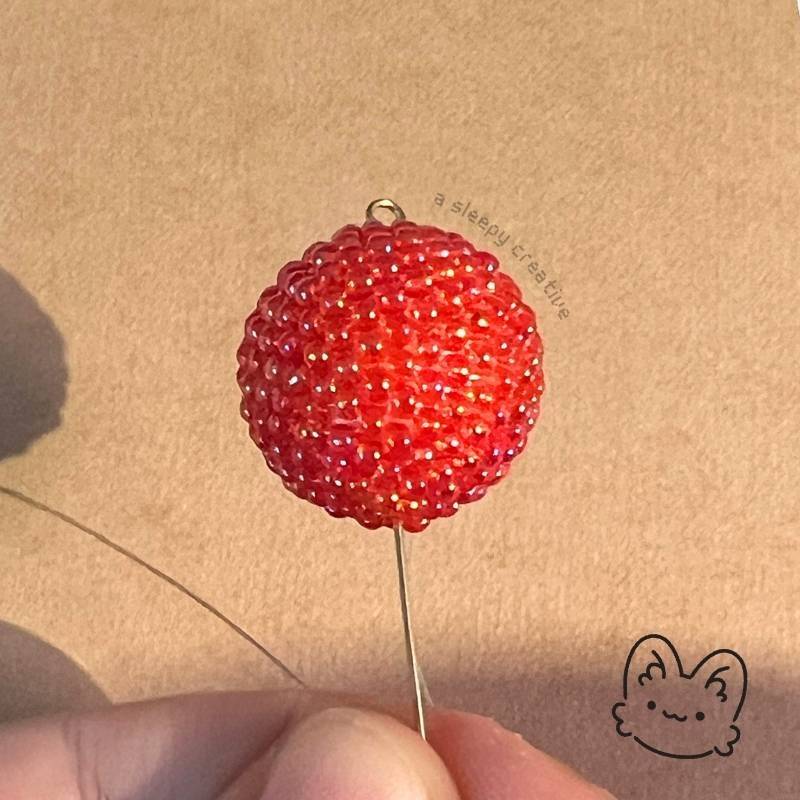
End Result
And here is my finished beaded ball!
If you’re a beginner (like me), it might be difficult to come to this result at first. It took me many tries and a lot of patience to reach this point, because I started beading just a couple weeks ago, and peyote stitch even later than that. Nonetheless, with a bit of time and a lot of patience, you can make super cute beaded spheres!
Other projects with a Beaded Ball
Frequently Asked Questions
How long does it take to make a beaded ball?
For beginners, your first beaded sphere might take a little more than 3 hours as you’re learning to read the pattern and maintain tension. (speaking from experience) Once you’re comfortable with the technique, you can complete a 16mm beaded ball in about 1h30 at a chill pace.
What size beads are best for making beaded balls?
Size 11° Japanese seed beads (like Miyuki or Toho) are ideal for beginners. They’re large enough to work with comfortably but small enough to create a nice smooth sphere. Japanese seed beads are more uniform than Czech beads, which helps create an even shape. You can also use size 15° for tiny beaded balls or size 8° for larger spheres.
Why does my beaded ball have gaps and holes?
Gaps are the most common issue with beaded spheres, especially at increase points. The main causes are loose thread tension and the natural geometry of increases. To minimize gaps: keep your tension firm and consistent, use slightly different sized individual beads at increase points, or add size 15° seed beads between increases. Personally, I have little to no gaps thanks to the choice of bead (I select slightly thicker or thinner bead depending on where I am in the work). Since the 11/0 round seed beads are not 100% consistent in size, it’s easy to do!
Can I make bigger beaded spheres, or smaller?
Yes! It’s all a matter of bead size, but also the number of increases/decreases. If you’re working with a bigger inside bead (example: 20mm), you should make one more increase, and reach a total of 20 beads max per row at the largest point. You’ll then have one more decrease as well!
Is circular peyote stitch hard to learn?
If you already know flat peyote stitch, circular peyote is just a small step up. The main difference is working in a tube and managing increases/decreases. It does require more focus and counting than flat peyote, especially at first. Start with this structured pattern rather than improvising, and you’ll get the hang of it within your first sphere or two.
Wrap Up
And that’s it for today’s learning journey! Thanks for tagging along my learning journey and visiting the blog. As I wrote previously, your first beaded bead may not be perfect, and that’s completely normal. My first few beaded spheres looked nothing like spheres, to be honest. And I think that’s because I really lacked patience and control. The technique requires practice to train tension control and increase placement. Each bead you make will improve your skills. Start with simple solid colors to focus on technique, then progress to more complex patterns as your confidence grows. (I’m not there yet but I plan on making cute ones for sure!)
My goal is to make various cute things based on beaded spheres and peyote stitch in general, so I hope you’ll be there for the journey as well.
I’ll see you soon I hope!