
version 1.0
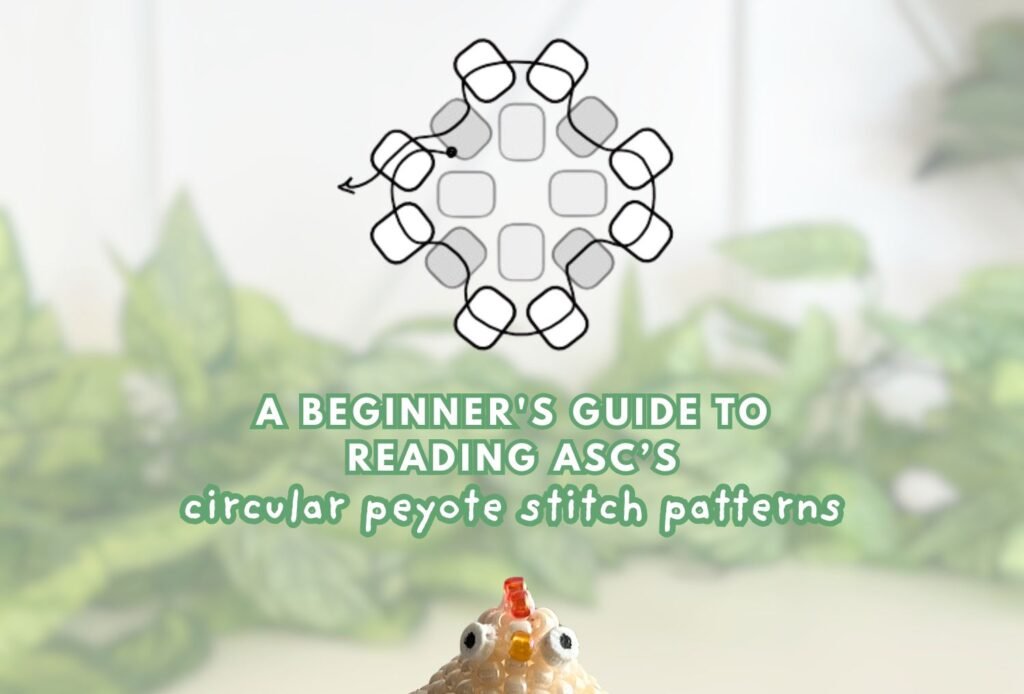
If you’ve ever purchased one of my patterns, you may have received a PDF guide alongside it – and this is that guide! As a buyer, you get access to it for free with your purchase, because I want to make sure you have everything you need to get started with confidence.
This guide is specifically designed to help you read and understand the patterns I create at A Sleepy Creative. Whether you’re brand new to bead weaving or just unfamiliar with the way I present my diagrams, this is the place to start. We’ll go over all the basics – from the foundation of a pattern to increases, decreases, and the reasoning behind the way I design my diagrams- so that by the time you sit down with one of my patterns, nothing will feel unfamiliar.
If you haven’t purchased a pattern yet and stumbled across this article, welcome! Hopefully this gives you a good idea of what to expect, and maybe even convinces you to give beading a try.
Note on RAW Stitch
Before we dive in, I want to take a moment to mention another popular bead weaving technique you may have come across: Right Angle Weave, or RAW for short (or PRAW, CRAW depending on the end shape). I don’t work with it myself – all of my patterns use circular peyote stitch exclusively – but if you’ve ever browsed other bead weaving patterns before, there’s a chance you’ve encountered RAW without knowing it, and I want to make sure there’s no confusion between the two.
These are two completely different techniques, and this matters more than it might seem. The stitches are worked differently, the diagrams look different, and the way you read them is different too. If you try to apply the logic of one to the other, things will go wrong very quickly – so it’s worth knowing how to tell them apart.
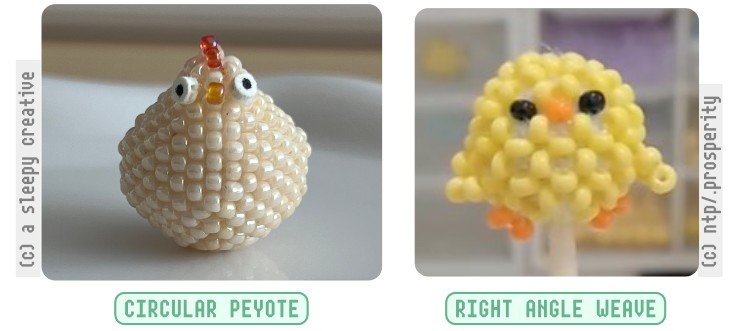
In a finished piece, circular peyote stitch has a smooth, tight, almost fabric-like surface. The beads sit closely together in a characteristic staggered offset, and the overall look is quite uniform and solid. RAW, on the other hand, has a more open, structured look. The beads are arranged in little square/diamond-shaped units, which gives the finished piece a more geometric feel with visible spaces between the bead groups.
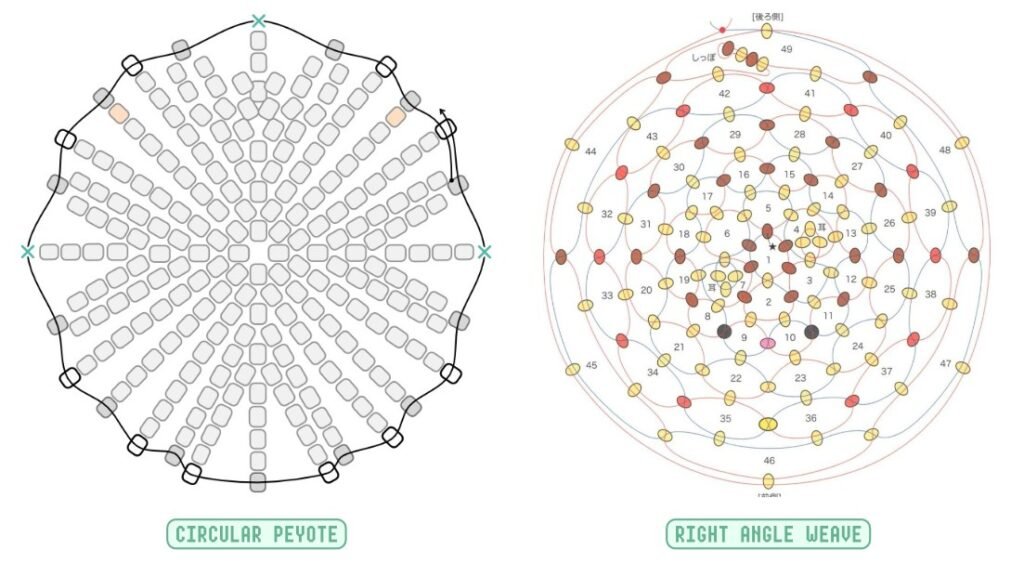
In diagrams, the difference is just as easy to spot once you know what to look for. A circular peyote diagram will show beads packed closely together in offset rounds, while a RAW diagram will show groups of beads arranged in those distinctive square or diamond units, often with lines connecting them to show the thread path, as well as numbers.
Circular peyote stitch patterns are usually designed to be read round by round rather than all at once – so you’ll have multiple images in your pattern, each showing how to work one row. RAW patterns, on the other hand, can often be read in their entirety from one image.
So if you ever pick up a pattern and the diagram doesn’t look quite like what you’ve learned here, there’s a good chance it might be RAW — and that’s perfectly fine, it’s just a different world entirely!
Now let’s dive straight into the world of circular peyote stitch, and how to read my diagrams.
Here’s what we’ll be going over:
• The foundation of a circular peyote piece
• How to make a regular row
• What an increase is
• How to make an increase
• What a decrease is
• How to make a decrease
• The reasoning behind how I write my patterns
• About the materials
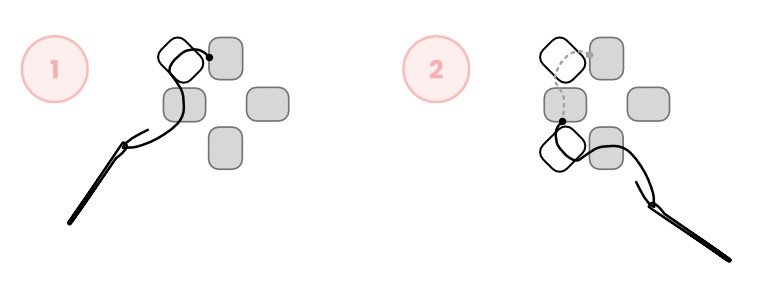
The Foundation
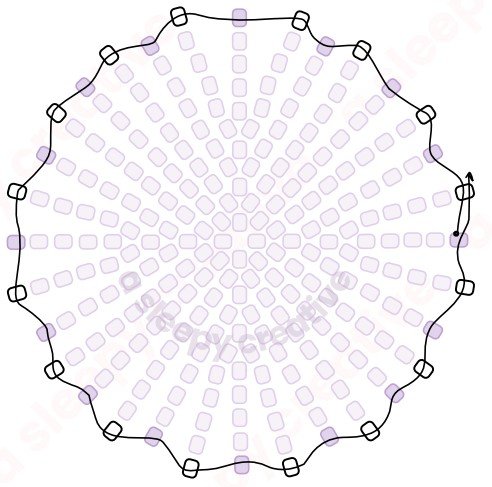
Every circular peyote stitch pattern starts with a foundation – a small ring of beads that forms the very beginning of your piece, right at its center.
In my patterns, the foundation is always either 3, 4, or 5 beads. The number will be specified at the start of each pattern, and it matters – these beads are strung together and joined into a ring, and every subsequent round will build outward from them. The size of the foundation influences the shape of the finished piece, which is why it varies from pattern to pattern.
It’s a small and seemingly simple step, but it’s worth taking your time with it and making sure your foundation ring is secure before moving on. Everything you build from here depends on it!
Regular Row
In circular peyote stitch, you work in rounds – meaning instead of going back and forth in a straight line, you’re continuously moving around in a circle. This is what allows the technique to build up into flat discs, curved surfaces, and fully 3D shapes.
In my diagrams, each bead is represented by a rounded rectangle. As you work each round, the new beads you add sit nestled in the gaps left by the beads of the previous round, and each round builds on top of the last. That offset rhythm is the key characteristic of peyote stitch, and once your eye gets used to spotting it in the diagrams, everything will start to feel much more intuitive. You’ll naturally start to see where each new bead belongs just by looking at the pattern.
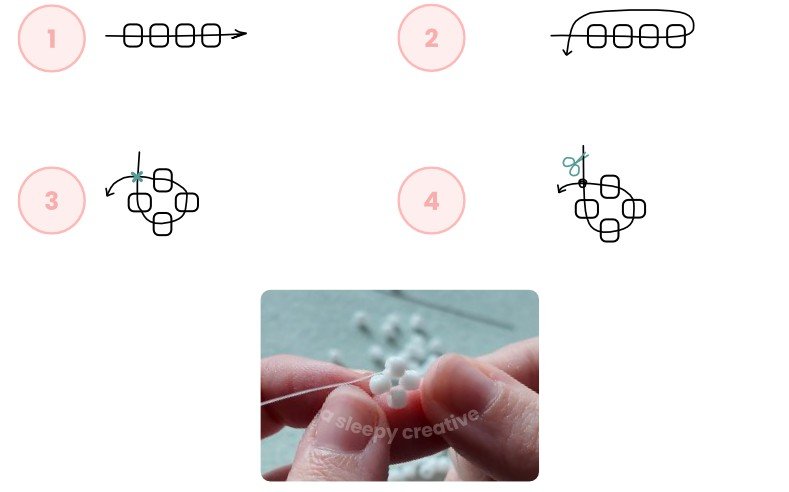
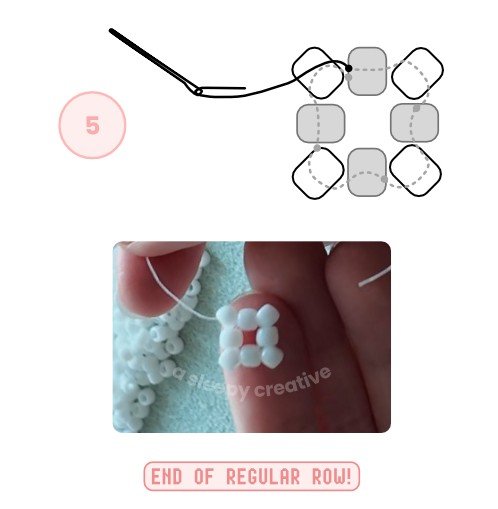
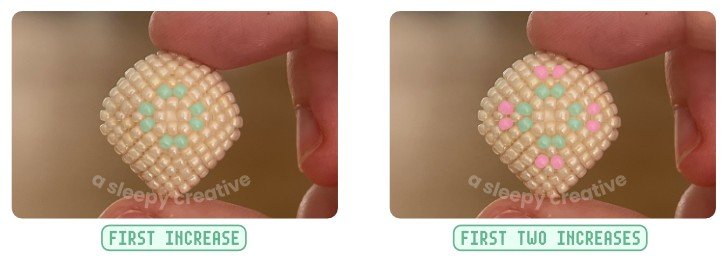
In the pattern, here’s what you’ll see for a regular row:

To work a regular row, depart from •, pick up one bead and pass your needle through the next bead of the previous row
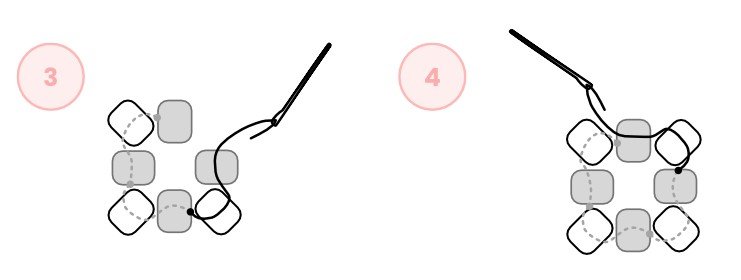
Once you have added all the beads necessary in the row, it is MANDATORY that you pass your needle through the first bead added during this row again before starting the next row, and this for each row (regular or not):
Increase
What is an Increase?
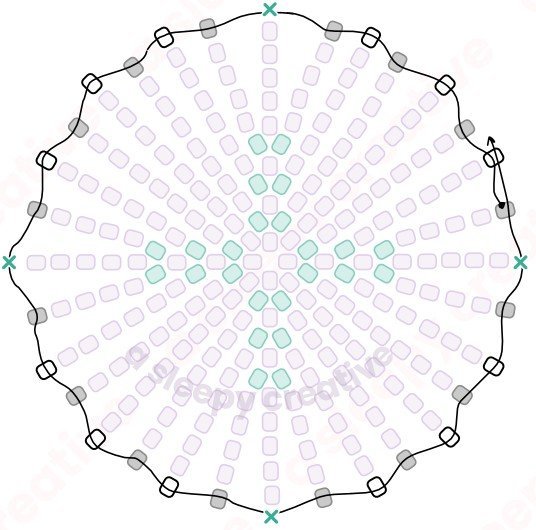
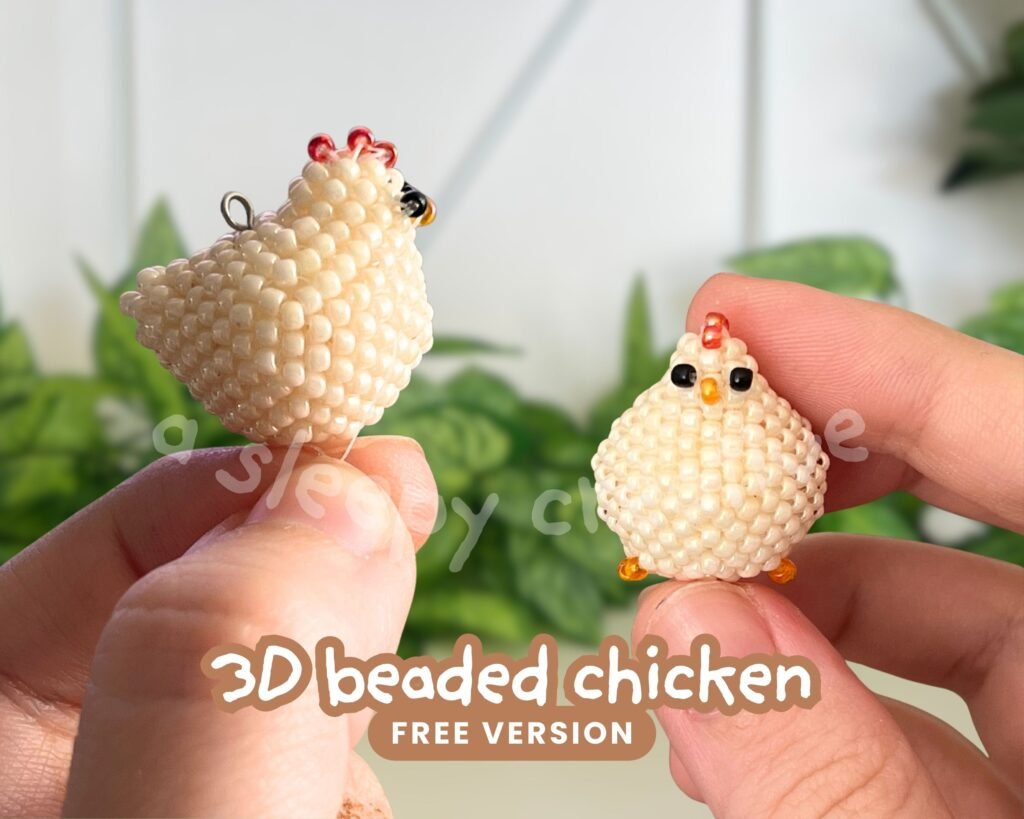
An increase is where you add extra beads in a round to make your work expand outward. In the context of my patterns (mostly 3D animals), increases are what allow a piece to gradually grow from a tight starting point into something with volume and dimension. Think of how a body gets wider from the neck down to the shoulders. That gradual outward curve is built round by round, through carefully placed increases.Without increases, your work would stay the same circumference all the way through and simply form a straight tube.
Here, you can see the first increases in this craft (bottom of the chicken pattern):
Making an Increase
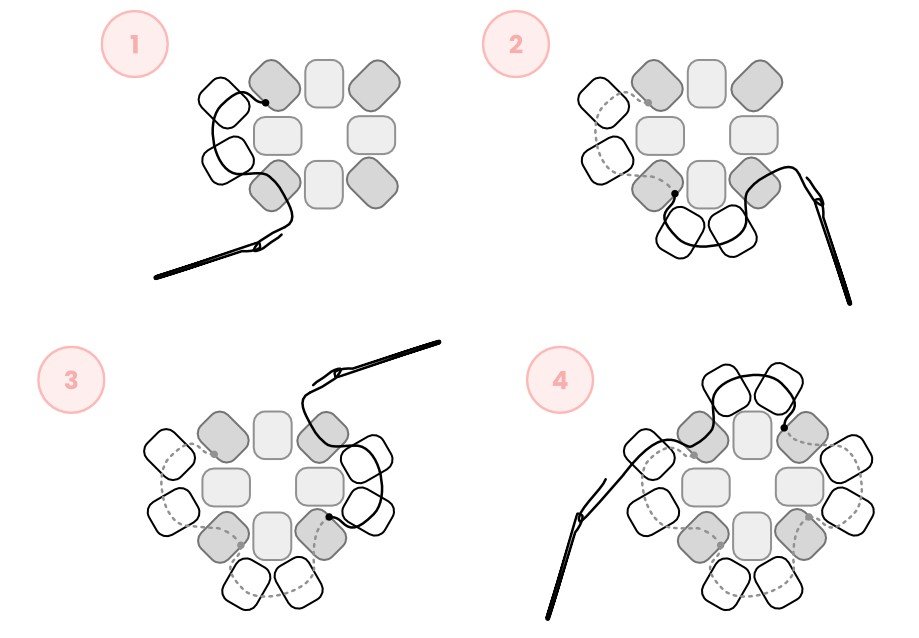
To work an increase, instead of adding one bead in a gap, you add two beads (or more, depending on the pattern) where you would normally add one. On the following round, those two beads are each treated as their own individual raised bead, which is what grows your bead count and causes your work to expand.
This is one of the spots that tends to confuse beginners the most, and for good reason! When you first add those two beads in a single gap, it can feel like a mistake: they may seem squished together or like they don’t quite sit right. Don’t worry. Once you’ve worked the following round and passed through each of them individually, they’ll settle into place.
Another thing that trips people up is losing track of where the increases are in the round. On the next round after an increase, the bead count is higher than before, and if you’re not paying close attention it’s easy to accidentally skip one of the two beads from the previous increase or treat them as one. If your work is pulling tighter than expected or not expanding the way the diagram suggests, this is usually why. Go back and check that you’ve treated both beads of each increase individually.
In the diagram, a round with increases will look slightly busier. The round that follows will have visibly more beads than the one before it, which is your confirmation that you’re on the right track. Make sure you count your beads! Let’s make an increase together:
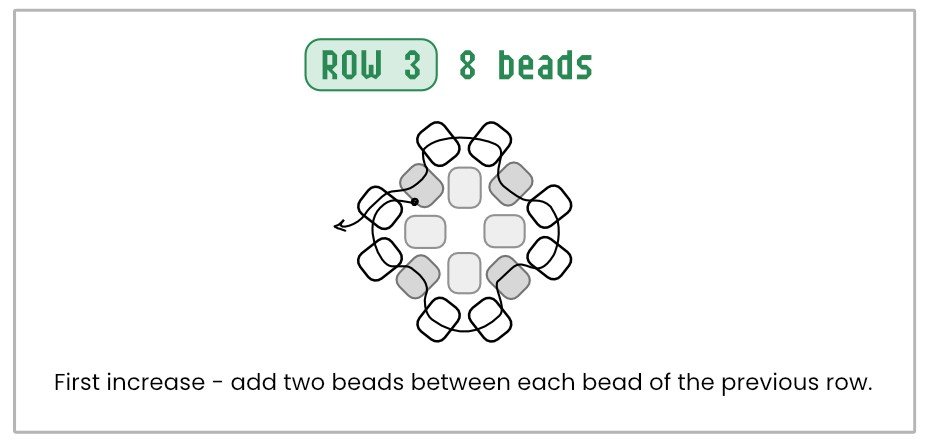
Don’t forget to pass your thread through the first bead added during the round!
This raises our bead count for the row to 8 beads.

The regular row coming right after the increase is also important since it can be confusing for beginners, so let’s quickly check it out:
During the round following an increase, those two beads are each treated as their own individual raised bead, so we add one bead between these as well, maintaining the new beads count (8 beads per round until next increase).
Decrease
What is a Decrease?
A decrease is the opposite of an increase: it’s where you reduce the number of beads in a round to make your work pull inward and narrow down. Just as increases build volume gradually, decreases close it back in, and in 3D work they’re as important.
Think of a finished animal body: increases take you from the starting ring out to the widest point, and decreases are what bring everything back in to form the other side. Without both, you’d never get a fully closed, rounded shape.
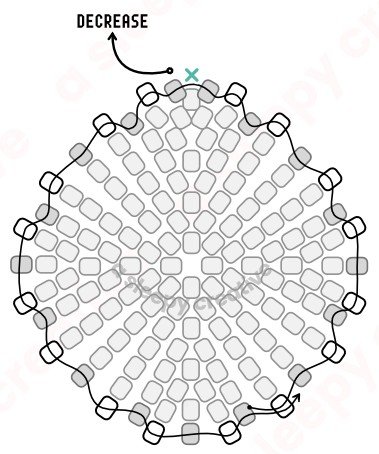
In my diagrams, decreases are marked with “X” . When you see this marking, you know it’s time to start pulling things inward
Making a Decrease
To work a decrease, instead of adding a bead in every gap, you skip the spot marked with “X” and pass your needle through two raised beads at once without placing a bead between them. This draws those two beads closer together and reduces your bead count for the next round.
Something to watch out for is that decreases can be harder to spot in a diagram than increases, precisely because something is missing rather than added. Where an increase round looks busier, a decrease round will look slightly sparser in those sections. It can make the diagram harder to read, so make sure to take your time whenever you reach a decrease round.
If you ever find yourself with a bead count that seems off, it’s worth going back to check whether you may have missed a decrease – it’s a very easy thing to overlook, especially on more complex rounds.
On the round that follows a decrease, you’ll have fewer raised beads to work with than in the previous round. The correct count is your confirmation that the decrease was worked correctly.
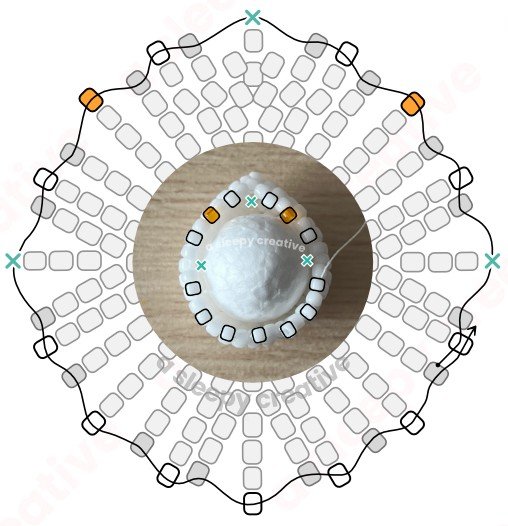
Now let’s look at an example from one of my actual patterns to see a decrease in context. These diagrams come from the whale pattern, row 19. At this point, we’ve worked up 3 increases and reached a total of 16 beads per round:
And now it’s time to start decreasing to begin closing up the body! The first decrease round looks like this:
The turquoise rectangles show the positions of the increases made in previous rounds, and the decreases are stacked on top of them. For each X, we skip the position instead of adding a bead.
And once you’ve decreased, it should look like this:
You can clearly identify the spots where you decreased because of the visible thread (marked with the 4 X on the image above)
The next round will look like this, with the reduced bead count:
About My Patterns
Now that you know the basics, here’s a little insight into how I think about my patterns and why I write them the way I do.
You might be wondering why my patterns show beads expanding outward rather than simply stacking beads on top of each other. After all, once all your increases are done, the beads do naturally begin to stack and form a spherical shape on their own. It’s a fair question!
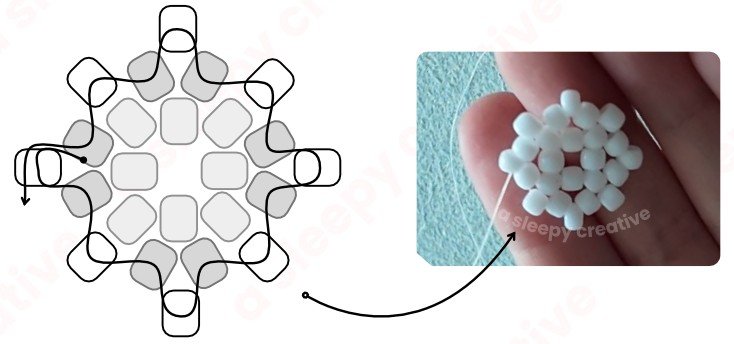
The honest answer is that it’s simply the way I learned circular peyote stitch, and it’s the approach I feel most comfortable with. I find it easy to read and follow, and one of the things I love about it is that when I’m working on a given round, I can clearly identify the previous rounds just by looking at the diagram. Everything stays visible and legible, which makes it much easier to keep track of where you are, especially on more complex pieces, in my opinion.
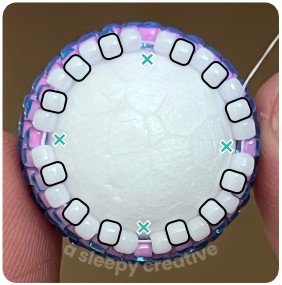
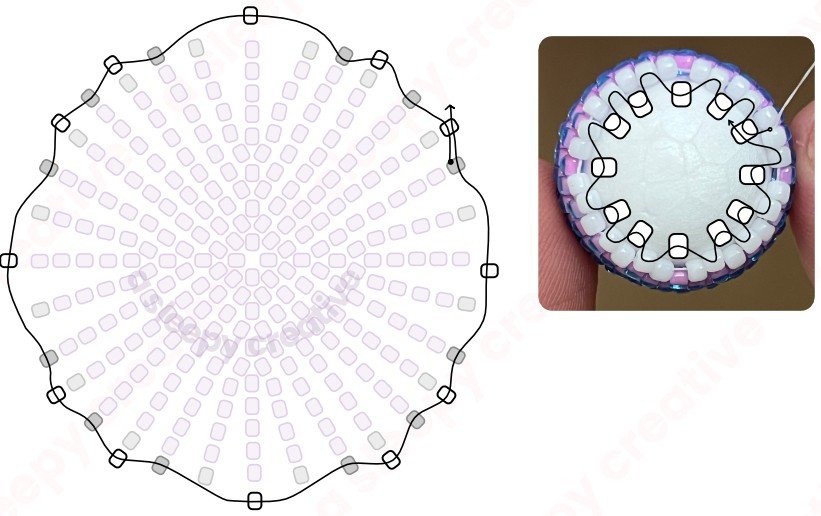
To make things as clear as possible, I always include pictures alongside the diagrams whenever the beadwork gets tricky. So depending on what works best for you, you can refer to the diagram, the picture, or both. Whatever helps you most!
Example:
My way of working and representing my beadwork might change over time, but so far, this is what feels most comfortable for me! ♥
About the Materials
To finish this guide, I want to talk a bit about the materials you’ll need for beading. I get a lot of questions about this, so let’s go over what I use and what I personally recommend. The materials I use the most are:
• Fireline Thread (6lb, 8lb) (link)
• Toho 11/0 round seed beads (link)
• Beading needle size 10 to 12 (link)
These are on the pricier side, but they’re what I reach for most often. That said, I don’t stick to them exclusively- if you’re just starting out, working with a tighter budget, or simply don’t want to invest in expensive materials right away, there are great alternatives out there that I’m happy to recommend too.
Thread: I always lean towards braided beading thread. You can find Fireline “dupes” and alternatives online easily. One I like comes from “Hobbyworker” — you can find it here. I use it often and it works really well.
With one spool of 45 yards (45m), you can make around 20 to 25 little beaded friends. If you’re using higher quality beads, you can go up to 8lb (0.18mm) thickness. With cheaper beads, stick to 6lb (0.16mm).
Beads: A lot of you want to know whether you can use cheap beads – the kind you’d find on Temu, Aliexpress, dollar stores, and so on. The answer is yes, but there are a couple of drawbacks worth knowing about.
- Cheap beads tend to be uneven in size. Some will be twice+ as large as others, some twice+ as thin. You’ll need to sort through them as you work and set the outliers aside.
- The color can wear off over time, especially on pieces that get handled a lot. A keychain, for example, can lose its color surprisingly fast. One way to get around this is to seal the finished piece with UV gel, which protects the surface completely. That said, there are cheap beads that hold up just fine! If you follow me on Instagram or TikTok (@asleepycreative), you might have seen my series where I make pieces exclusively with cheap beads; none of them have lost their color.
Beading needle: This one is non-negotiable: you really do need a proper beading needle. A regular sewing needle is too thick, and its eye is usually wide enough to crack or even shatter a bead, especially once you’ve already passed your thread through it once or twice. A beading needle is much finer and makes a world of difference.
I’m definitely happy about this, because I want to get into beading. But, just wondering if you can do this for more crafts. 🙂